Using Pentaho MapReduce to Parse Mainframe Data
How to use Pentaho to ingest a Mainframe file into HDFS, then use MapReduce to process into delimited records.
The steps in this guide include:
- Installing a plugin from the Marketplace
- Ingesting a Mainframe file into HDFS
- Developing a PDI Transformation as a Mapper Task
- Developing a PDI Job to Orchestrate all of the components
- Executing and Reviewing Output
This how-to guide was built using Pentaho Data Integration 5.0.4
Prerequisites
In order to follow along with this how-to guide you will need the following:
- Hadoop
- Pentaho Data Integration
- Pentaho configured properly for your Distribution Configuring Pentaho for your Hadoop Distro and Version (Pentaho Suite Version 5.1)
- Complete the Using Pentaho MapReduce to Parse Weblog Data example Using Pentaho MapReduce to Parse Weblog Data
- LegStar z/OS File reader Plugin installed through the Marketplace (see below)
About the LegStar z/OS File reader Plugin
This community-developed plugin is provided by LegSem and is available through the PDI Marketplace. It uses the JDK to compile a client library for parsing your specific COBOL Copybook file. After you install the plugin you should copy tools.jar (from JDK_HOME/lib) into the data-integration/lib directory where you have Pentaho installed.
1. To install the plugin, launch Sppon and go to the menu Help -> Marketplace
2. Search for z/os and you should see the LegStar z/OS File reader Plugin
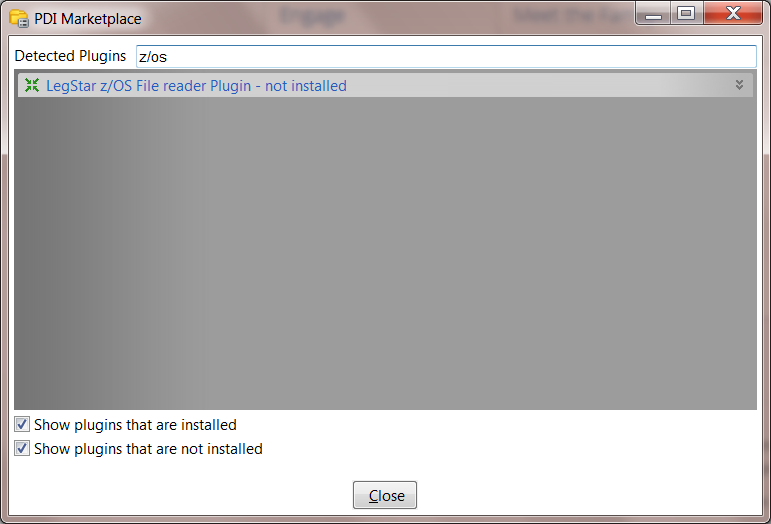
3. Click the Install this Plugin button
4. You need to add tools.jar to your PDI classpath, a simple way to do this is copy tools.jar from JDK_HOME/lib to data-integration/lib
5. Restart Spoon
Sample Files
The sample data needed for this guide is
File Name |
Content |
|---|---|
Contains a COBOL copybook file and Mainframe file in EBCDIC format |
Step-by-Step Instructions
Setup
Start Hadoop if not already running
Unzip the Data.zip to a directory
Create a Transformation to Convert z/OS File
This sample works by converting the existing Mainframe file that is in z/OS format into a text format for processing in Hadoop.
1. Start PDI on your desktop. Choose File -> New -> Transformation from the menu.
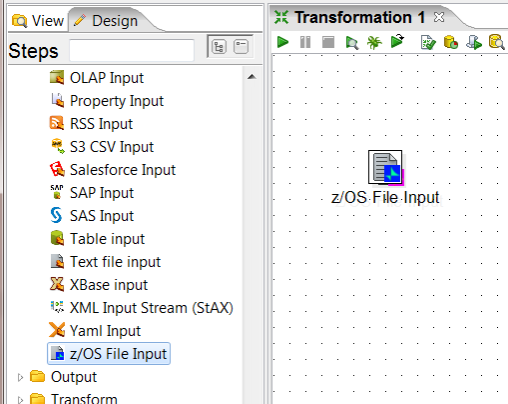
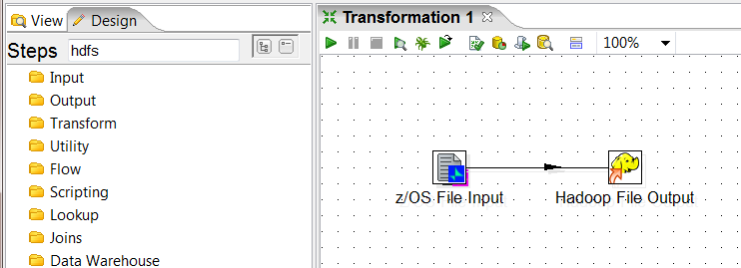
2. Add a z/OS File Input step (if you don't see this step check the pre-requisites for how to install through the Marketplace). Your transformation should look like this:
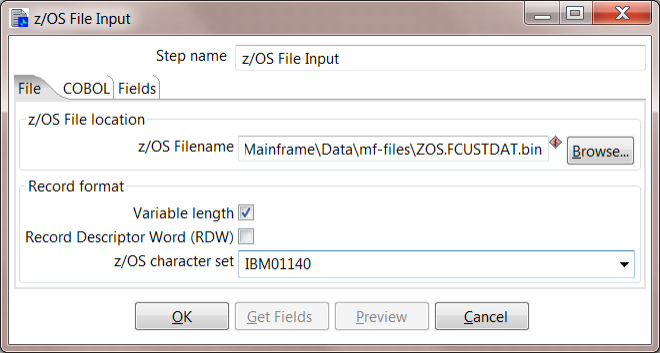
3. Edit the z/OS File Input step. For z/OS filename you will select your Mainframe file. If using the sample data, this is under mf-files/ZOS.FCUSTDAT.bin. This file contains messages of a variable length, so check that box as well. This uses the IBM01140 character set. You will need to know what codepage your EBCDIC file uses: {+}http://en.wikipedia.org/wiki/EBCDIC+
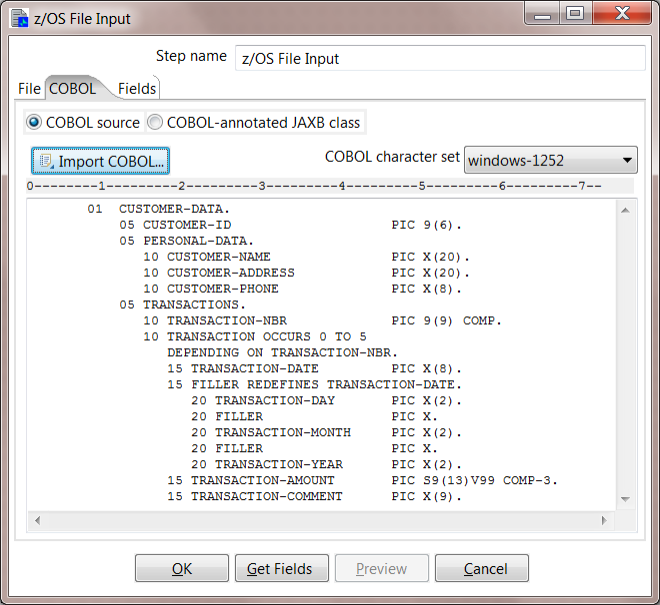
4. Configure the COBOL copybook. Go to the COBOL tab to place your copybook. The copybook is used to "translate" the Mainframe file into fields. If you are using the sample files, you can select Import COBOL and browse to copybooks/CUSTDATCC. Note that in the file browser you must change the drop-down to All files so this will show up in the list. You should now see your copybook has been loaded.
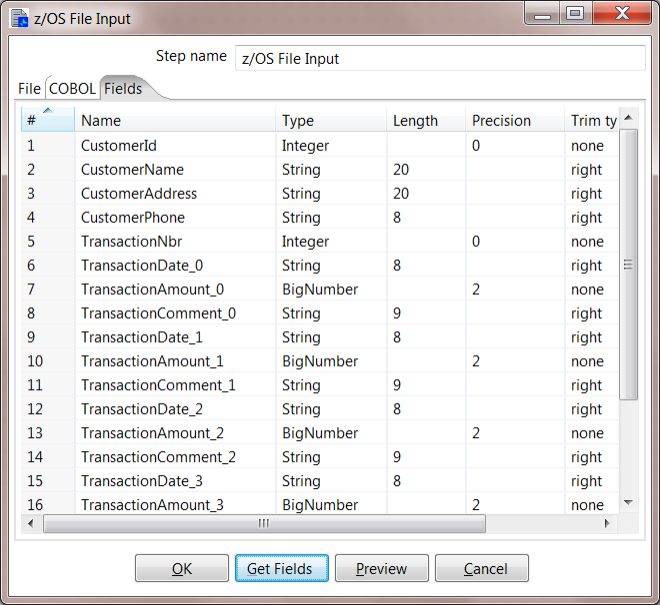
5. Configure the Fields. Click the Get Fields button so that PDI can parse the copybook definition and determine what fields will be present.
If you see an error that it was unable to find tools.jar, this is because tools.jar was not found in the classpath. A simple fix is to copy JDK_HOME/lib/tools.jar to data-integration/lib.
The fields should be properly read in like this:
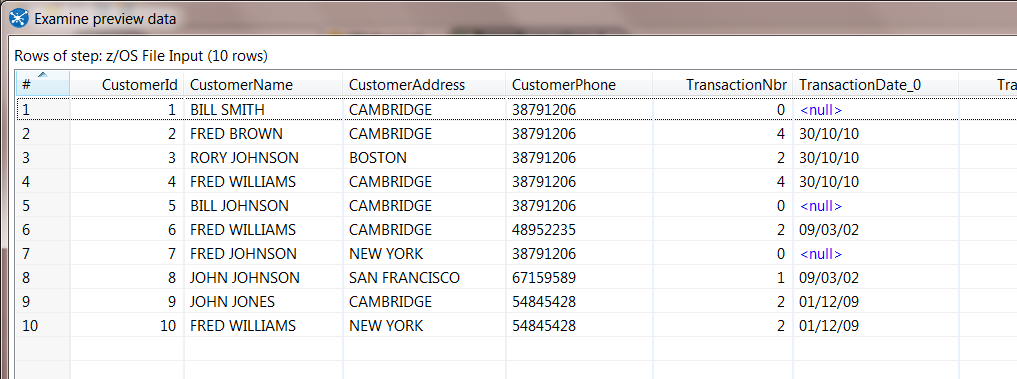
6. Preview Data. Hit the Preview button to make sure that all of the settings are correct.
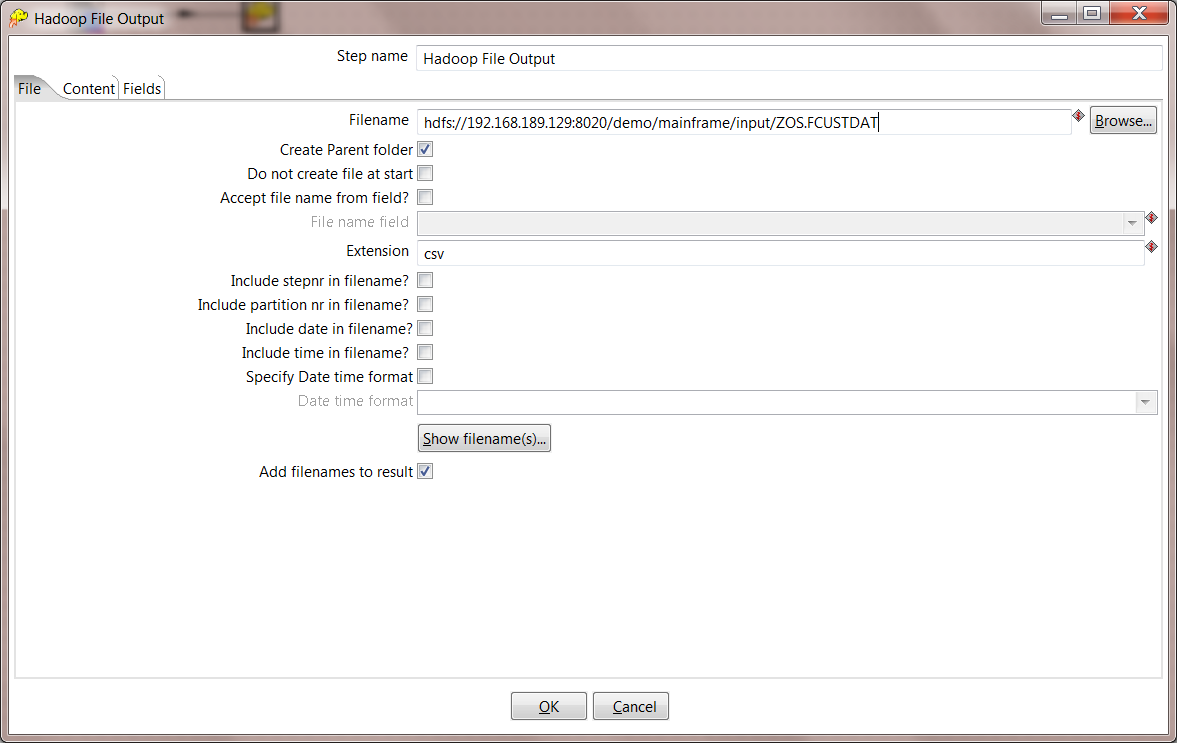
7. Save to HDFS. Now that the Mainframe data is being converted correctly, you can save the stream to Hadoop using the Hadoop File Output step. Add the step and create a hop from the z/OS File Input step to the Hadoop File Output step.
8. Configure HDFS Location. Set the correct HDFS input directory where you want your file to be stored. For this example we will store into HDFS /demo/mainframe/input. Make sure to use the correct hostname and port for your Hadoop Name Node.
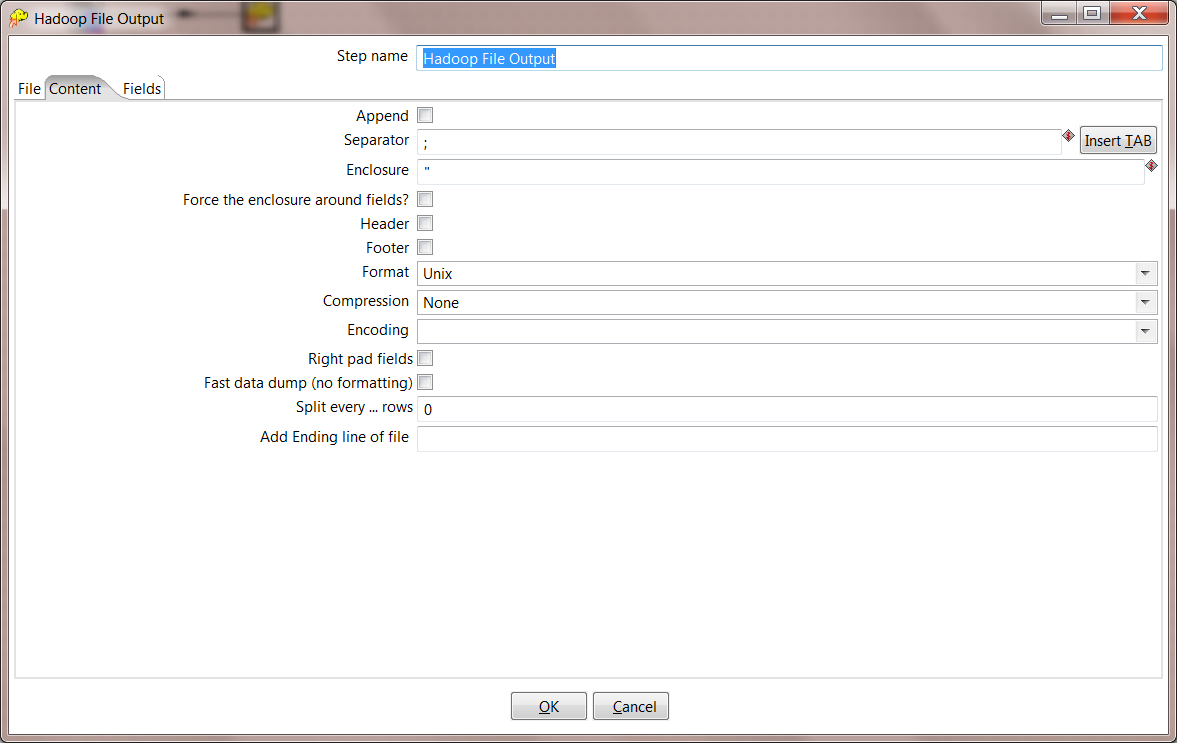
9. Configure HDFS Content. On the Content tab, make the following settings:
- Choose a separator character of semicolon ;
- Uncheck and change the format to Unix.
10. Configure HDFS Fields. On the Fields tab, select the Get Fields button to read in all of the fields that are created by the previous step. For every numeric field, you need to change the format to #.# to make sure that there are no extra spaces written to HDFS.

11. Save your transformation, the z/OS to HDFS is complete. Save it as zos-to-hdfs.ktr.
12. You can now run this transformation and it should complete successfully. The sample data contains 10,000 rows, you should see the following in your Step Metrics tab after running the transformation.

If your transformation has errors on the HDFS step, double check that you have configured your Big Data Shim correctly.
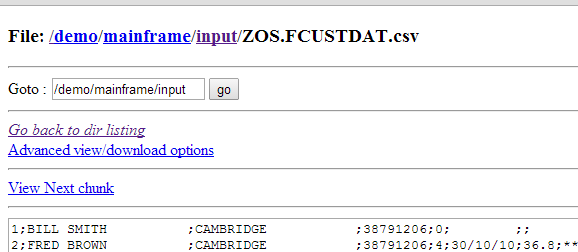
You should also see your file in the Hadoop file browser:
If you see a space at the very front of the file, you need to double check the settings in Step 10, make sure to put #.# for the Format on every Numeric value.
Create a Mapper Transformation to Process Converted File in Hadoop
In this task you will create a Mapper Transformation that will parse the Mainframe file into a structured format, and pivot each transaction into its own row.
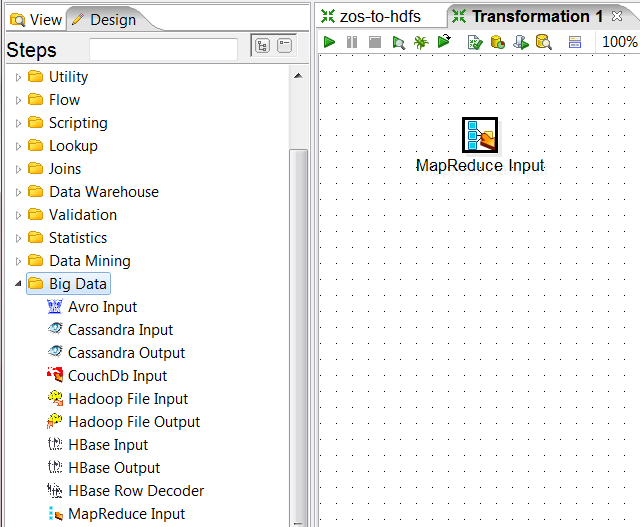
1. Choose File -> New -> Transformation from the menu.
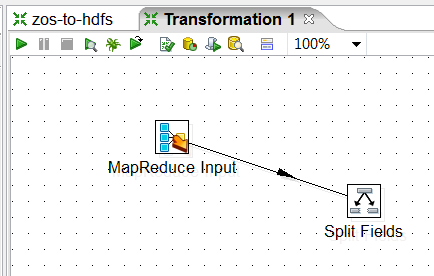
2. Add a MapReduce Input step. Your transformation should look like this.
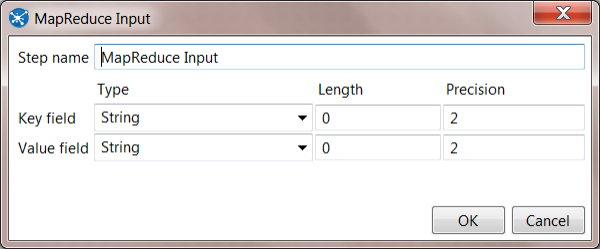
3. Configure MapReduce Input step. Both the Key and Value can be configured as Strings:
4. Split Fields. The incoming value will be a line from the CSV file that you created with your earlier transformation. We want to split this CSV file back into individual columns. Add a Split Fields step and create a hop from the MapReduce Input step to the Split Fields step.
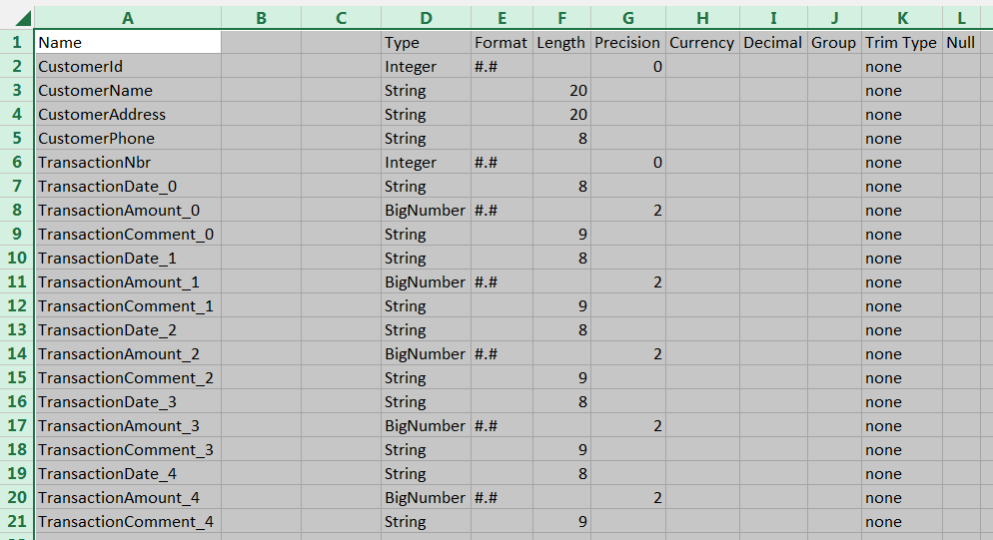
5. Configure Split Fields. Double click the Split Fields step to configure the new fields that will be created. These are the same fields that were defined in the zos-to-hdfs transformation in part 1. Make sure that the field to split is "value" and that the delimiter matches what you configured in the zos-to-hdfs transformation.
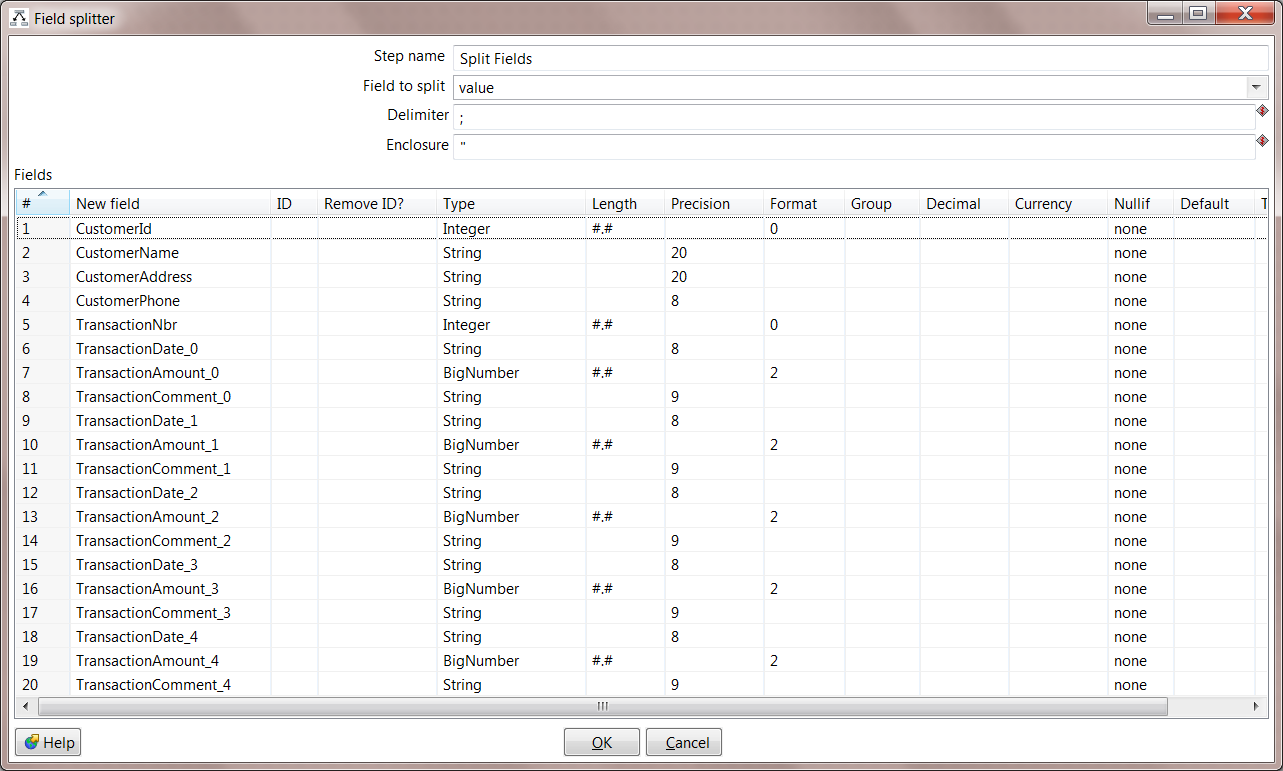
You can copy a table from one transformation to another, but the columns must match up. If you look at the Hadoop File Output step from zos-to-hdfs, you will see that the columns are Name, Type, Format, Length, etc. However, the columns for the Split Fields step are New Field, ID, Remove ID, Type, Length, etc. You can copy from Hadoop File Output to Split Fields by using Excel to add the 2 new columns (ID and Remove ID). Start a new worksheet in Excel, then select all rows in Hadoop File Output, use CTRL-C to copy, and then CTRL-V to paste into Excel. Select Column B (Type), and hit Insert (do this twice). Now select all of your data in Excel, use CTRL-C to copy, and then CTRL-V to paste into the Split Fields Step.
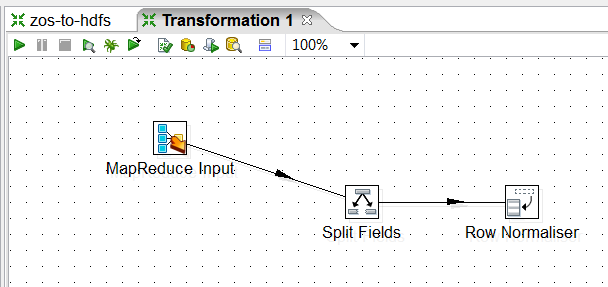
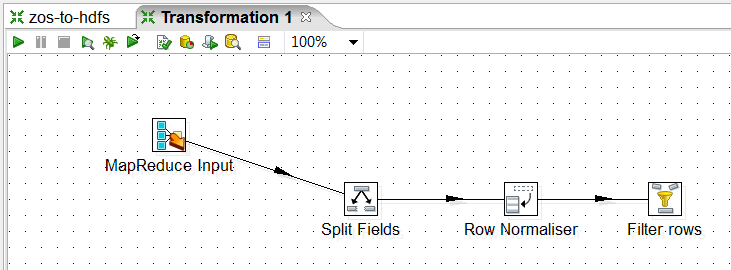
6. Normalize the Transactions. You may have noticed that there are 5 transactions in each row. The way this COBOL copybook works, there can be anywhere from 0 to 5 transactions in each record. In a modern database, you would usually put each transaction in its own row. We can use the Row Normaliser step to pivot those individual transactions each into their own row. Add a Row Normaliser step and create a hop from Split Fields to Row Normaliser.
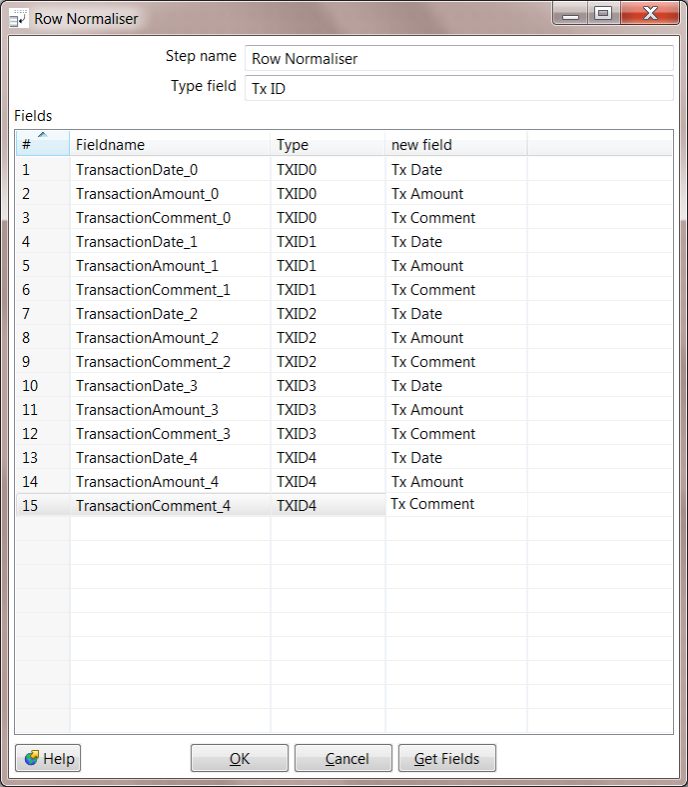
7. Configure the Row Normaliser. For "Type field", enter Tx ID. The Type field is the name of a new column that describes this row. You can select "Get Fields" to read in the fields coming from the Split Fields step. The relevant fields are called:
- TransactionDate_x
- TransactionAmount_x
- TransactionComment_x
For the Type column, you can identify the "group" that this transaction belongs with. For the new field column, you can provide the name of the new column you want to use. Each field should be renamed with the number removed from the end, for example like this:
8. Filter out Null Transactions. Add a Filter Rows step and create a hop from the Row Normaliser to the Filter Rows.
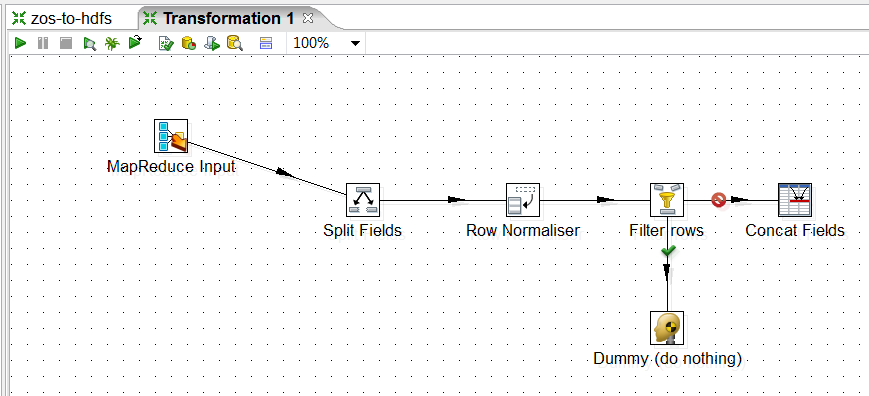
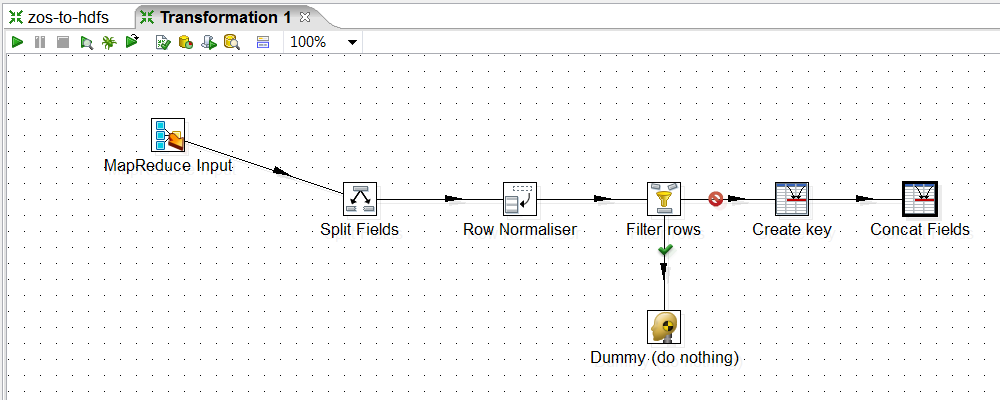
9. Add TRUE/FALSE paths. This step will need a "TRUE" and "FALSE" path to stream results. Add a Dummy (no nothing) step and a Concat Fields step to the transformation. Create a hop from Filter rows to Dummy for "TRUE" and from Filter Rows to Concat Fields for "FALSE".
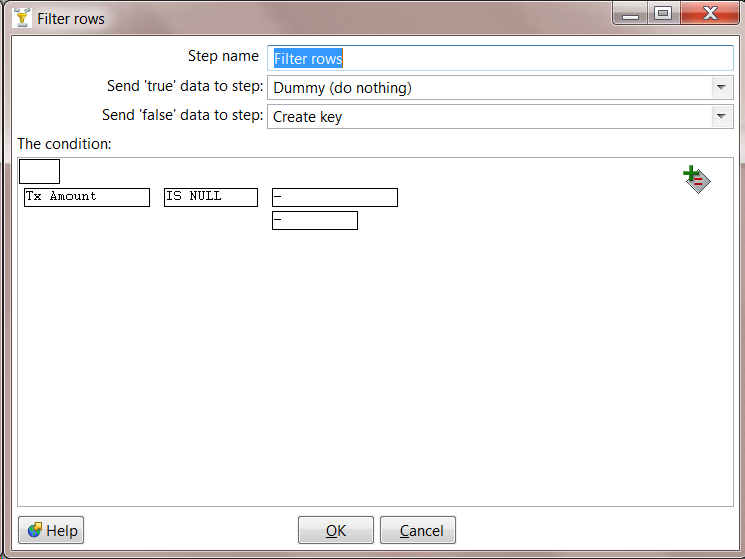
10. Configure Filter. Transactions that are NULL should go to the Dummy step. Double click on Filter Rows and create a rule if the field "Tx Amount" IS NULL.
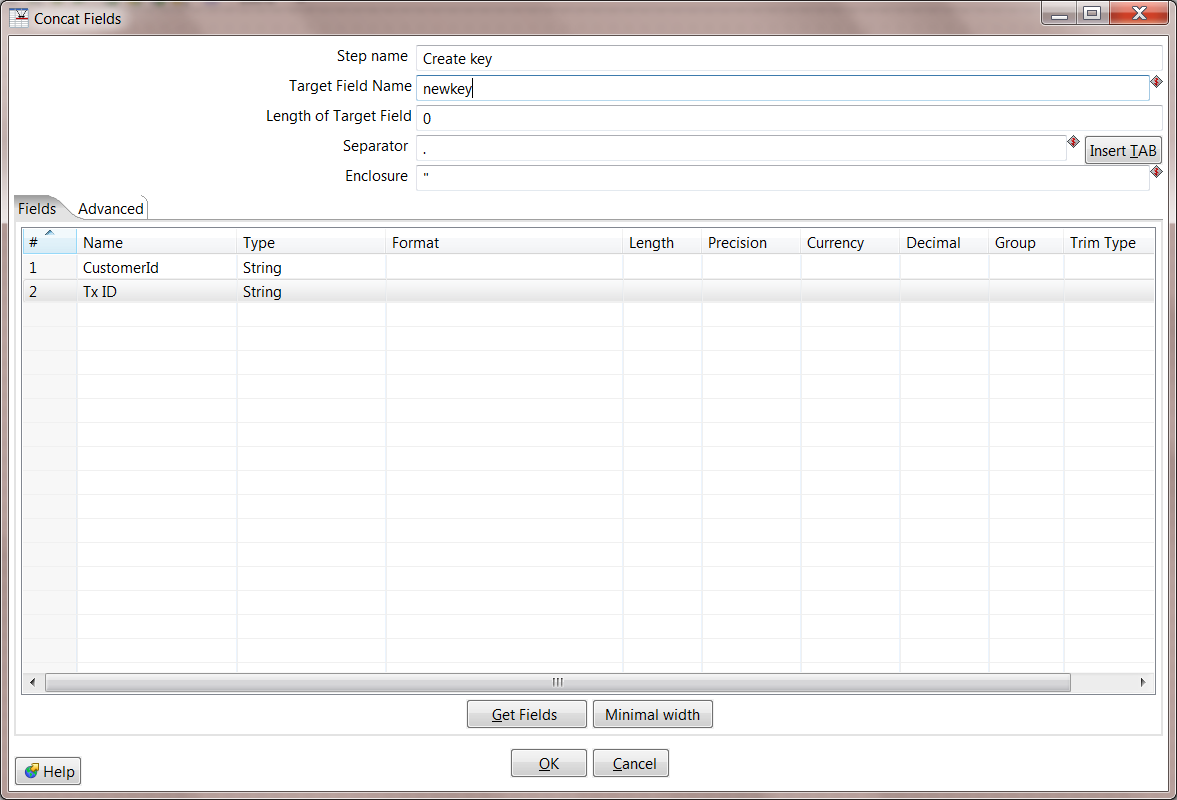
11. Create Key. Each MapReduce output record must have a Key and Value. Because we have created additional rows, if we use the same Key we had at the beginning (position in the input file), the same Key will show up multiple times. To resolve this, you can make a new Key by combining the Customer ID and the Tx ID.
The Concat Fields step will be used to create this new key. Change the step name to Create key. The Target Field Name should be called "newkey". For a Separator, use the period ".". The fields should be CustomerId and Tx ID.
12. Add another Concat Fields step. Finally we have to create our output value that will go back into HDFS, so add another Concat Fields step and make a hop from Create key to this new step.
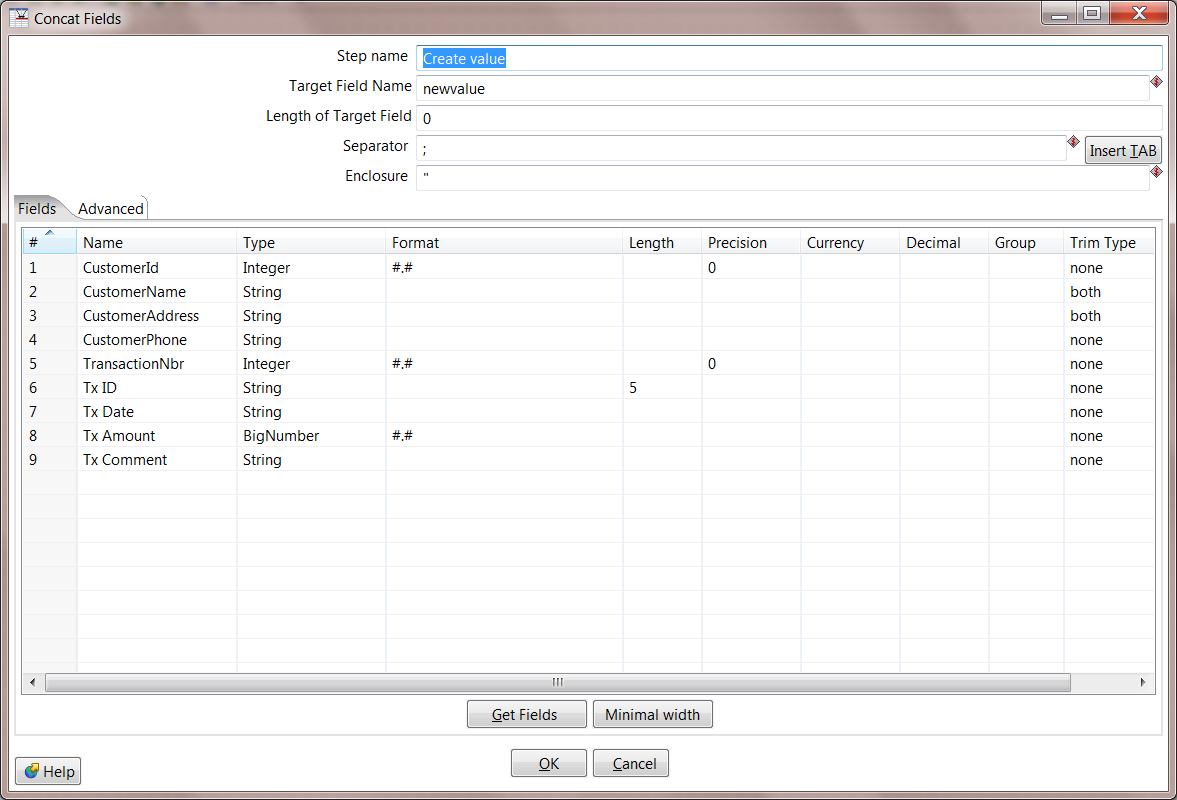
13. Create Value. Double click to edit the Concat Fields step. For the step name, change to "Create value", make the Target Field Name "newvalue", and make the Seperator a pipe "|". Then click the Get Fields button and you will see all fields in your stream are added. Remove key and newkey, and you should be left with 9 fields total.
To remove extra spaces that are from the original Mainframe file, make the following adjustments:
- CustomerId: Set Format to #.#
- CustomerName: Set Trim Type to "both"
- CustomerAddress: Set Trim Type to "both"
- TransactionNbr: Set Format to #.#
- Tx Amount: Set Format to #.#
14. Add MapReduce Output. Now that we have our new key and new value, we're ready for these to be returned by our mapper. Add the MapReduce Output step, and create a hop from Create value to MapReduce Output.

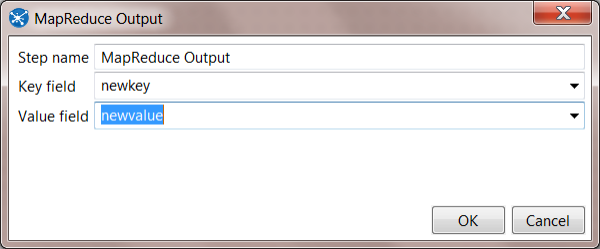
15. Configure MapReduce Output. Double click your MapReduce Output step, and configure the Key as "newkey" and the Value as "newvalue".
16. Your Mapper Transformation is complete, save as mainframe-mapper.ktr.
Create a Job to orchestrate the z/OS to HDFS and Pentaho MapReduce
In this task you will create a job that will convert the Mainframe file to CSV within HDFS, then run a "map only" MapReduce process to create an output file.
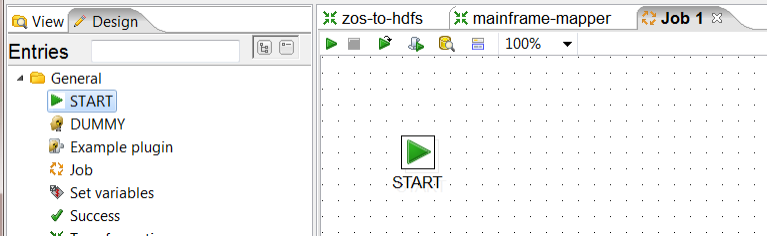
1. Within PDI, choose File -> New -> Job from the menu system.
2. Add a Start Job Entry. PDI needs to know where the Job should start, so add the Start step onto the job canvas. You job should look like this:
3. Save your Job. For some of the next steps, it will be convenient if your Job has already been saved to the same directory where you saved your other transformations. Call your Job mainframe-mapreduce.kjb.
4. Add a Transformation step. Drag the Transformation step from the palette onto the canvas, and create a hop from the START to the Transformation step. Your job should look like this:
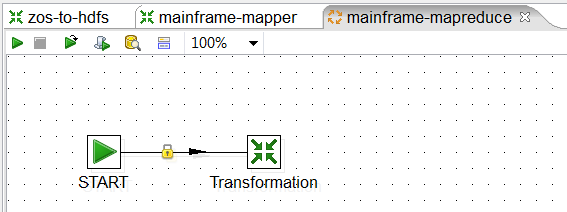
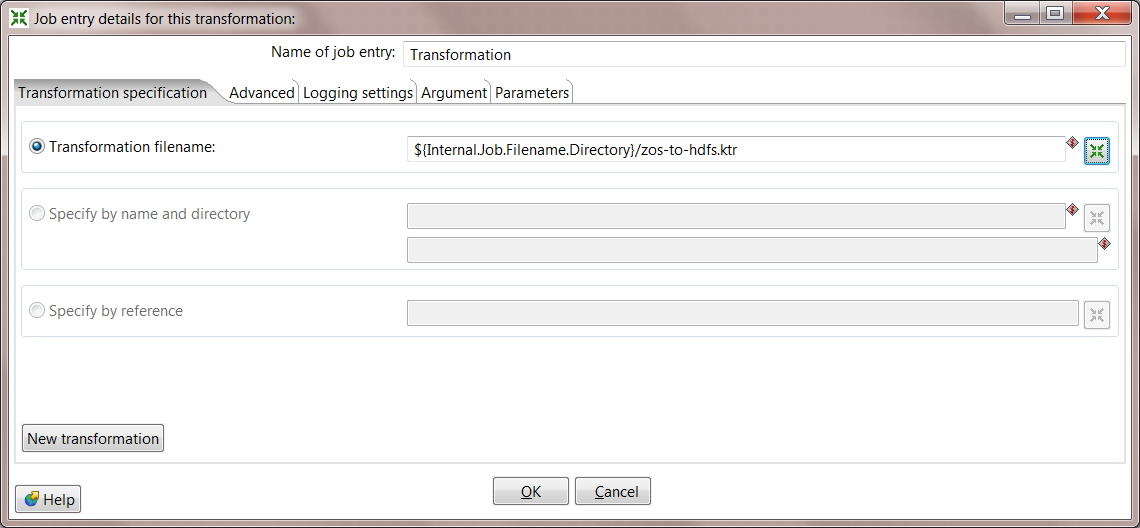
5. Configure the Transformation step. Double click on Transformation, and for Transformation filename you should be able to browse to zos-to-hdfs.ktr that was created earlier. This will ensure that the Mainframe file is loaded into HDFS before the MapReduce process is kicked off.
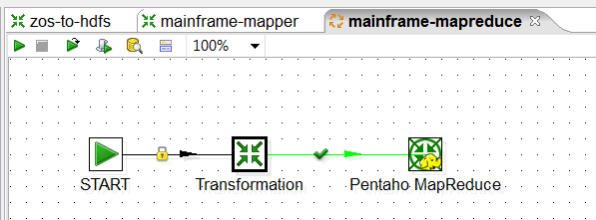
6. Add the MapReduce step. Drag the Pentaho MapReduce step onto the canvas and create a hop from Transformation to Pentaho MapReduce. Your job should look like this:
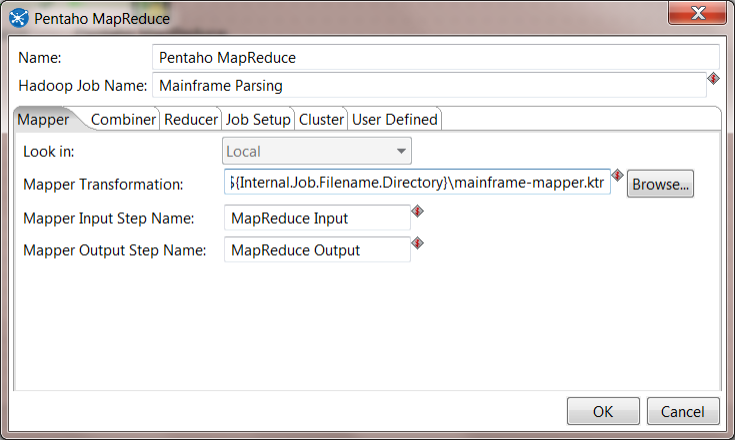
7. Configure MapReduce mapper. Double click on the Pentaho MapReduce step. For the Hadoop Job Name, enter "Mainframe Parsing". On the Mapper tab, Browse to the mainframe-mapper.ktr that you created earlier. Fill out the rest of the form as follows:
- Mapper Input Step Name: MapReduce Input
- Mapper Output Step Name: MapReduce Output
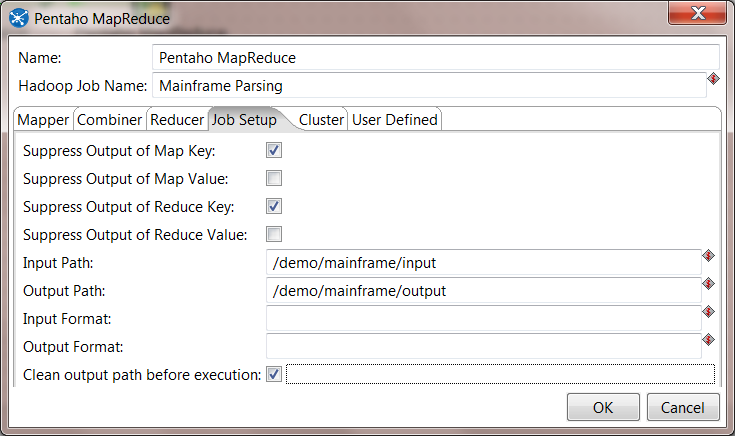
8. Configure Job Setup. On the Job Setup tab, you must create the following settings. Note that the Input Path should match the value that is used in the zos-to-hdfs Transformation.
- Suppress Output of Map Key: checked
- Suppress Output of Reduce Key: checked
- Input Path: /demo/mainframe/input
- Output Path: /demo/mainframe/output
- Clean output path before execution: checked
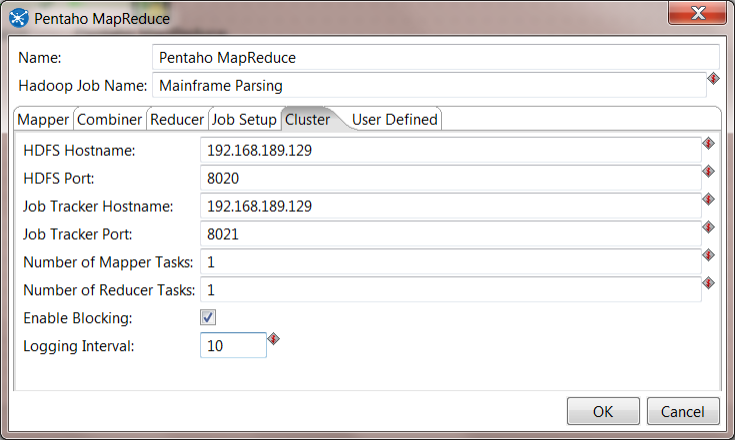
9. Configure Cluster. On the Cluster tab, you you need to configure the following settings.
- HDFS Hostname, HDFS Port, Job Tracker Hostname, Job Tracker Port - these must be the correct values for your environment
- Enable Blocking: checked
- Logging Interval: 10
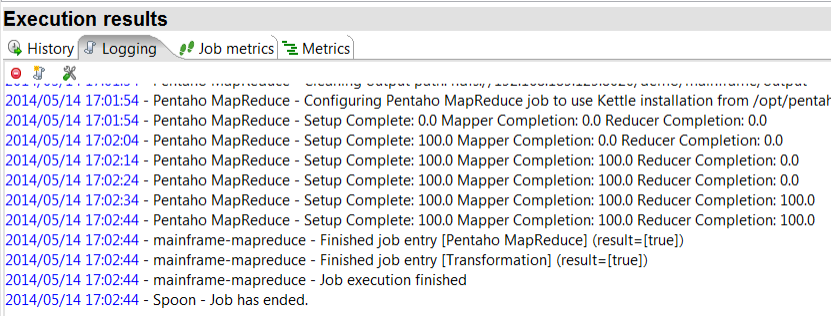
10. Save the Job. At this point the job is complete, it will convert the Mainframe file to CSV, and then process the records inside Hadoop.
11. Run and Launch the Job. You should see your job complete successfully.
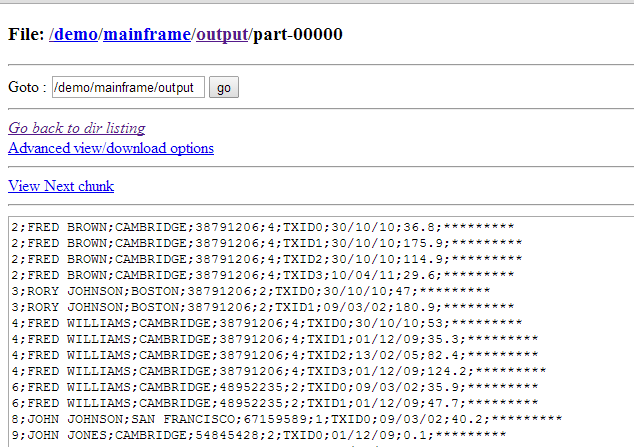
Your output file should be in /demo/mainframe/output/part-00000 and should look like this:
FAQ/Troubleshooting
If you do not see the z/OS File Input step in Spoon, then you need to install through the Marketplace (see prerequisites for instructions). After installing through the Marketplace you need to restart Spoon.
If you see an error that it was unable to find tools.jar, this is because tools.jar was not found in the classpath. A simple fix is to copy JDK_HOME/lib/tools.jar to data-integration/lib.

If you see an error that PDI is unable to write to HDFS correctly, it could be that you have not yet configured the Big Data Shim. Double check the instructions about configuring the shim for your distribution here: Using Pentaho MapReduce to Parse Weblog Data
If you see an error when running the MapReduce job that it is unable to split fields, you need to follow the directions in Step 10 of the Convert z/OS File to HDFS. You need to make sure that every numeric value uses #.# for Format. The exception will show up in the Hadoop logs as this:
Split Fields - Unexpected error
Split Fields - org.pentaho.di.core.exception.KettleValueException:
Error converting value [ 1], when splitting field [value]!

Unexpected conversion error while converting value [CustomerId String] to an Integer

CustomerId String : couldn't convert String to Integer
Unparseable number: " 1"
Summary
Congratulations! You now can process Mainframe files in Hadoop so that the "dark data" residing on the Mainframe can be part of Big Data Analytics projects!