| Excerpt |
|---|
May 4, 2006 |
...
- The first step should be to install MySQL and build your database. There is plenty of documentation on the MySQL web site that can help you there. I will assume for brevity that you have an existing MySQL database that you want to report against.
- Unzip the Pentaho PCI and run through some of the samples, using the Pentaho Getting Started Guide to guide you. You want to be sure that your PCI is functioning so that you can publish your report to the server later. From here forward, I will refer to the root of the PCI as <pci-home>.
- Unzip the Report Design Wizard, using the Pentaho Report Design Wizard Guide as your guide. From here forward, I will refer to the root of the Wizard as <wizard-home>.
- Unzip the MySQL Connector/J package. In the root of the unpacked folders, note that there is a .jar file named "mysql-connector-java-3.1.12-bin.jar".
- Copy the mysql-connector-java-3.1.12-bin.jar to the <pci-home>\jboss\server\default\lib directory.
- Copy the mysql-connector-java-3.1.12-bin.jar to the <wizard-home>\lib\jdbc directory.
- Add the mysql-connector-java-3.1.12-bin.jar to your classpath. For Windows, this would entail changing the ClassPath environment variable under My Computer | Properties | Advanced. On *nix systems, this variable may be found in your .cshrc file. Remember that you must specify the absolute path to the jar when adding it to your classpath.
- Run the Report Design Wizard ( execute the reportwizard.bat|.sh file).
- Choose "Blank Template", then click the Next button.
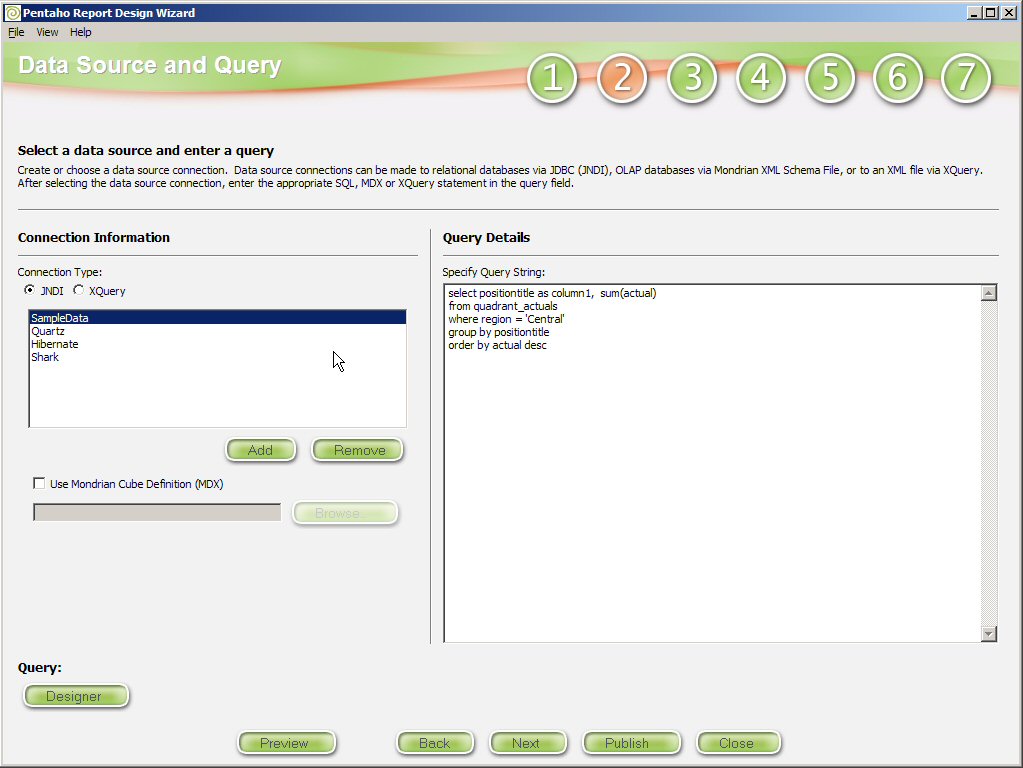
- Choose "JNDI" as the Connection Type, then click the Add button.
- Type in the following information:
- JNDI Name: mysql_db (this can be whatever you want it to be, just REMEMBER what it is. You will be repeating this name in a couple of places, and spelling and CASE matters!
- Driver: com.mysql.jdbc.Driver
- Connect String: jdbc:mysql://localhost:PORT/DATABASE_NAME (You can leave off the port if you are usinig the default 3306, and the database name should be the name of your database. My connect string looks like this: jdbc:mysql://localhost/SampleData.
- User Name: username authorized to read database
- Password: password for authorized user
- On the same step in the wizard, define your query. In my test, I defined an SQL query, my dialog looked similar to the following:
- At this point, you can Preview your report (its that easy!), or you can take advantage of the powerful features in the Report Design Wizard to customize the look and feel of you report. I'll leave that as an exercise for you and a leisurely read of the Pentaho Report Design Wizard User's Guide.
- I suggest at this point that you SAVE your wizard session. While this is not a usual feature in a wizard, it comes in very handy when you want to get back to a step in the wizard to modify datasource connections or report design easily. From the File menu, select Save As. Name your saved session whatever you like. The file will be given an .xreportspec extension.
- When you feel you are done with your report design, click the Publish button. This will publish your report to the <wizard-home>\resources\solutions\samples\reporting directory. Note that this DOES NOT publish your report to the PCI! We will cover those steps shortly. You should see at least three files when your report is published:
...