Pentaho Analysis EE
The Pentaho Analysis Enterprise Edition is a plugin for Mondrian. It is a simple JAR archive to deploy along Mondrian which will register new features and make them available to Mondrian. It must be deployed alongside all of the Mondrian nodes.
Mondrian plugin
The client plugin is distributed as a set of JAR archives and configuration files, which must be deployed alongside an existing Mondrian installation. You can deploy it inside of an existing Pentaho BI platform installation, or with a standalone installation of Mondrian. It does not necessarily require a full Pentaho BI server.
This plugin was designed to be very flexible and might require some configuration changes to accommodate your environment and get the best performance. By default, the plugin is configured to use a segment cache based on JBoss Infinispan. Infinispan supports a wide variety of sub-configurations and can be adapted to:
- cache in memory.
- cache to the disk.
- cache into a RDBMS.
- distribute the cached data across a self-managed cluster of peers.
The later sub-configuration is the one used by default. It is a highly scalable caching solution which distributes the cache data across a self-managed cluster of Mondrian instances. Every Mondrian instance running this plugin on a local network will automatically discover each other using TCP multicast. An arbitrary number of segment data copies are stored across all available nodes. The total size of the cache will be the sum of all of the node's capacities, divided by the number of copies to maintain. You can configure all those options inside of the Infinispan configuration file. We will explain later how to change this behavior.
Other segment cache configurations include, but are not necessarily limited to:
- Memcached
Uses an existing memcached infrastructure to cache and share the segment data among Mondrian peers. - Pentaho Platform Delegating Cache
This particular segment cache configuration can only be used when this plugin is deployed alongside an existing Pentaho BI platform. It simply delegates the storage of segment data to the platform's own caching capabilities, thus leveraging the existing caching configuration. Some users might prefer this configuration, as it keeps your platform manageable as a homogeneous whole.
Installation
To install this plugin, you will need to copy some JAR files and make them available to Mondrian. The following table explains the correct place to copy the JAR files, depending on your deployment type.
Deployment type |
JAR files destination |
|---|---|
Pentaho BI Platform |
[pentaho directory]/tomcat/webapps/pentaho/WEB-INF/lib/ |
Mondrian standalone |
[tomcat directory]/webapps/mondrian/WEB-INF/lib/ |
Mondrian embedded |
The JAR files must be part of your application's classpath. The actual location depends on your application architecture. |
The segment cache configuration that you choose will require different dependencies to be copied to the location mentioned above. You do not need all the libraries that we have included. The table below lists the required dependencies according to the configuration you have chosen. The file names reflect that of the dependency names. Some of those dependencies might already be present at the location where you must copy the files. Pay close attention to the files already present, as putting two versions of the same library in that location will create many problems later on.
The versions below are eligible for Pentaho BA 7.0.0.
Configuration |
Dependency |
Minimum Required Version |
|---|---|---|
Common dependencies for all configurations |
mondrian |
3.14 |
|
pentaho-analysis-ee |
7.0.0 |
|
pentaho-ee-dsc-core |
7.0.0 |
|
commons-lang |
2.0 |
|
commons-io |
1.3.1 |
|
commons-codec |
1.3 |
Infinispan configuration |
infinispan-core |
8.2.5.Final |
|
infinispan-commons |
8.2.5.Final |
|
jgroups |
3.6.7.Final |
|
jboss-transaction-api |
1.1 |
|
jboss-marshalling-osgi |
1.4.10.Final |
|
jboss-logging |
3.3.0.Final |
Pentaho BI Platform Delegating Cache |
pentaho-platform-api |
7.0.0 |
|
pentaho-platform-core |
7.0.0 |
Memcached |
memcached |
1.0.0-PENTAHO |
Configuration of the Segment Cache
The Pentaho Analysis EE plugin comes with configuration files, within the "config" folder. You will need to copy those files to the root of your deployment's classpath. The following table shows where you need to copy these files, according to your deployment type.
Deployment type |
JAR files destination |
|---|---|
Pentaho BI Platform |
[pentaho directory]/tomcat/webapps/pentaho/WEB-INF/classes/ |
Mondrian standalone |
[tomcat directory]/webapps/mondrian/WEB-INF/classes/ |
Mondrian embedded |
The JAR files must be part of your application's classpath. The actual location depends on your application architecture. |
The configuration files are the following.
- pentaho-analysis-config.xml
This file defines the global behavior of the plugin. This file allows you to define which segment cache configuration to use. It can also be used to turn off the segment cache altogether. - infinispan-config.xml
This file is used by the InfinispanSegmentCache. It configures the Infinispan system. - jgroups-tcp.xml
This file is used to configure the nodes cluster backing the Infinispan cache. It defines how the nodes find each other and how communication is performed. By default, we use TCP and multicast discovery, as it allows us to run many instances on a single machine or many instances on many machines. Examples of other communication setups should be included in the Jar archive. This file is looked up by infinispan as specified in the infinispan-config.xml configuration file. You can modify this setting there. - memcached-config.xml
This file configures the Memcached based segment cache. It is not used by default. To enable it, modify SEGMENT_CACHE_IMPL in pentaho-analysis-config.xml.
Enabling the external segment cache
To enable the segment cache plugin, you must first follow the installation steps above. Once this is done, open the file [APP ROOT]/WEB-INF/classes/pentaho-analysis-config.xml and set the following property.
<entry key="USE_SEGMENT_CACHE">true</entry>
Switching the segment cache implementation
To switch over a different segment cache configuration, you can edit the same file as above and set the following property.
<entry key="SEGMENT_CACHE_IMPL">com.pentaho.analysis.segmentcache.impl.infinispan.InfinispanSegmentCache</entry>

or...

<entry key="SEGMENT_CACHE_IMPL">com.pentaho.analysis.segmentcache.impl.memcached.MemcachedSegmentCache</entry>

or...

<entry key="SEGMENT_CACHE_IMPL">[your class name]</entry>
Configuration examples
This section will demonstrate how to configure the plugin to use different segment cache implementations.
Infinispan / Pentaho BI Platform
This example will demonstrate how to deploy this plugin inside of an existing Pentaho BI Platform using the Infinispan configuration.
1. Copy all required dependencies
The first step is to copy all the required dependencies to the Pentaho BI Server's libraries directory. The proper folder to copy those should be :
[pentaho-folder]/biserver-ee/tomcat/webapps/pentaho/WEB-INF/lib/
Some of the required libraries will already be present, so we will only copy the missing ones. The required files are:
- pentaho-analysis-ee.jar
- infinispan-core.jar
- infinispan-commons.jar
- jgroups.jar
- jboss-transaction-api.jar
- jboss-marshalling.osgi.jar
- jboss-logging.jar
Additionally, if you are using a community edition of the Pentaho BI Server, you will need to copy:
- pentaho-ee-dsc-core.jar
Please also note that this plugin requires Mondrian version 3.14 or later, along with olap4j 1.2.0 or later. The Pentaho BI server 4.0 and earlier was shipped with versions of Mondrian and olap4j that are not compatible with this plugin. If you are unsure of the versions used by your BI server, navigate to the directory mentioned above and you will be able to tell which versions of the JAR libraries are included by simply looking at their name. If the versions of Mondrian and olap4j are too old, you can replace them by the ones we have included in the Pentaho Analysis EE package. You will need to copy the two following libraries, just like you did above. You might want to make backup copies of the JAR archives which are already present, before replacing any.
- mondrian.jar
- olap4j.jar
2. Verify the plugin configuration files
We will verify the contents of the configuration file named "pentaho-analysis-config.xml". You will need to open that file and verify that the contents matches approximately the following.
<?xml version="1.0" encoding="UTF-8"?>
<!DOCTYPE properties SYSTEM "http://java.sun.com/dtd/properties.dtd">
<properties>
    <entry key="USE_SEGMENT_CACHE">true</entry>
    <entry key="DISABLE_LOCAL_SEGMENT_CACHE">true</entry>
    <entry key="SEGMENT_CACHE_IMPL">com.pentaho.analysis.segmentcache.impl.infinispan.InfinispanSegmentCache</entry>
</properties>
3. Start the BI Server
Now you can start your Pentaho BI Server just like normal. Once the BI server is started, login to the Pentaho User Console (typically available by pointing your browser to "http://localhost:8080/pentaho") using an administrator account.
4. Checking that everything works
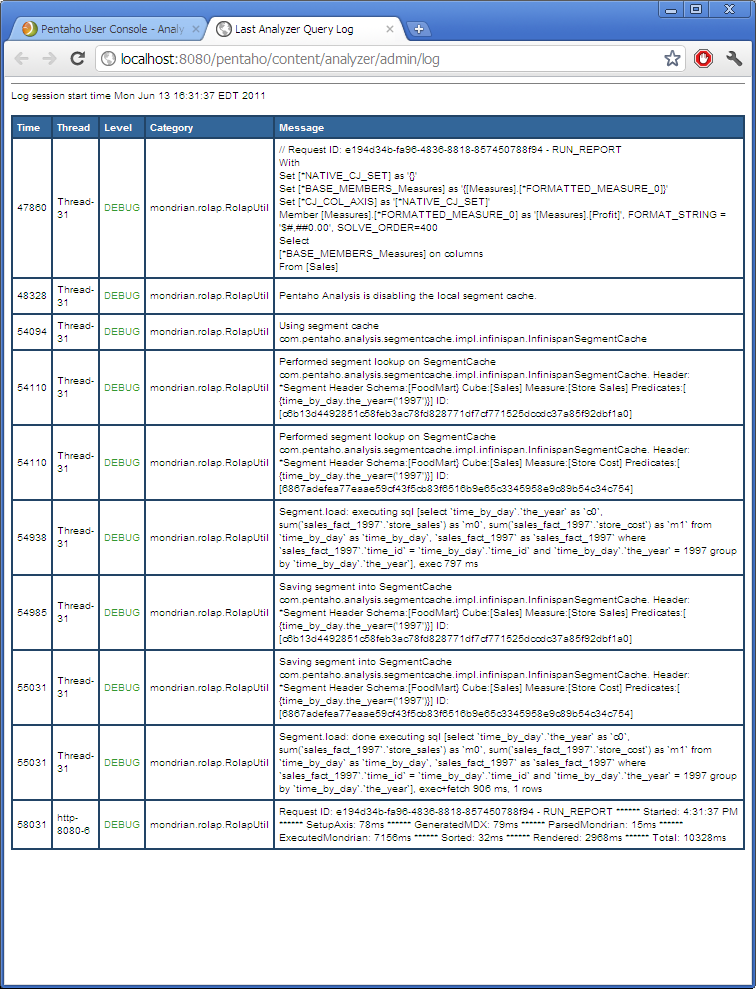
Create a new Pentaho Analyzer report and drag a measure or a dimension in the report. Once your report is displaying numbers, click on the top link, identified as "More actions and options" and choose "Administration / Log" item. If there is no such link available within Pentaho Analyzer, it is because you have not used an administrator account to login to Pentaho User Console. You must log out and log back in using an administrator account credentials.
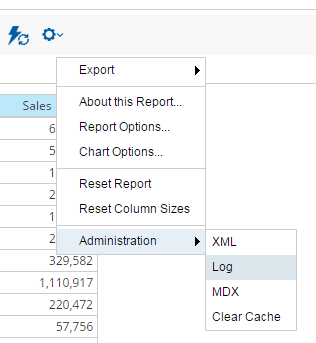
If your plugin was successfully configured, you should see log information relating to the segment cache. If there was an error in your configuration, all exception messages will be displayed here as well.
Debugging JGroups - When the nodes can't see each other.
The default Infinispan configuration uses JGroups to distribute the cache across all Mondrian instances it finds on the local network. If you want to modify how those communications are done, you must edit the JGroups configuration file. You should consult JGroups documentation and make sure you understand the changes you are about to perform. Each environment might require different configurations, so although we provide a very portable default configuration, it might not work in your environment.
If you are deploying this plugin on Amazon EC2, JGroups has a special configuration file you can use. You will need to edit the file named "infinispan-config.xml" and perform the following change.
For UDP communications:  <property name="configurationFile" value="jgroups-udp.xml"/>
For TCP communications:  <property name="configurationFile" value="jgroups-tcp.xml"/>
For Amazon EC2:          <property name="configurationFile" value="jgroups-ec2.xml"/>
Binding the nodes to IP addresses and ports
You will need to make sure that the different nodes can speak to each other over the network.
At the very least, each node must use one port and must be bound to an IP address. Binding to 0.0.0.0 (for all addresses) also works, but is discouraged for reasons we won't cover here.
Binding settings for TCP
When the TCP configuration is used, we willedit the binding in the TCP element of your configuration file. This allows the nodes to communicate with each other.
      <TCP bind_addr="${jgroups.tcp.address:127.0.0.1}"
        bind_port="${jgroups.tcp.port:7800}"
        bind_port="${jgroups.tcp.port:7800}"
        enable_diagnostics="false"
        thread_naming_pattern="pl"
        send_buf_size="640k"
        sock_conn_timeout="300"
        bundler_type="transfer-queue"

        thread_pool.min_threads="${jgroups.thread_pool.min_threads:2}"
        thread_pool.max_threads="${jgroups.thread_pool.max_threads:30}"
        thread_pool.keep_alive_time="60000"
        thread_pool.queue_enabled="false"

        internal_thread_pool.min_threads="${jgroups.internal_thread_pool.min_threads:5}"
        internal_thread_pool.max_threads="${jgroups.internal_thread_pool.max_threads:20}"
        internal_thread_pool.keep_alive_time="60000"
        internal_thread_pool.queue_enabled="true"
        internal_thread_pool.queue_max_size="500"

        oob_thread_pool.min_threads="${jgroups.oob_thread_pool.min_threads:20}"
        oob_thread_pool.max_threads="${jgroups.oob_thread_pool.max_threads:200}"
        oob_thread_pool.keep_alive_time="60000"
        oob_thread_pool.queue_enabled="false"
   />
Next, we need to provide a means for the nodes to discover each other. There are two choices. First, let's use UDP Multicast by editing the MPING element in the xml configuration.
   <MPING bind_addr="${jgroups.tcp.address:127.0.0.1}"
          mcast_addr="${jgroups.mping.mcast_addr:228.2.4.6}"
          mcast_port="${jgroups.mping.mcast_port:43366}"
          ip_ttl="${jgroups.udp.ip_ttl:2}"
   />
Configuration Attribute |
Description |
|---|---|
bind_addr |
The IP address to bind to in order to discover other nodes. It must be a public IP of the machine onto which the mondrian node resides. |
mcast_addr |
The IP address to use when sending multicast packets to discover the unknown nodes. This is not the same physical IP address which is assigned to the OS. It is an arbitrary number which serves as creating "buckets" of nodes. Only the nodes which use the same IP will see each other when sending multicast packets. Be careful when changing the default value. There are rules to follow and only a certain range of addresses which are compatible with your network infrastructure. You must follow these standards. |
mcast_port |
The port used for the multicast discovery requests. |
ip_ttl |
The time to live (TTL) to set when sending packets out. This defines the number of network hops for which the packets will travel. On a network where each node lives on the same subnetwork, this can be safely set to 1 and the packets won't escape the local subnet. It is unadvisable to set this property too high, as this would allow the packets to be leaked through the higher levels of the network. |
num_initial_members |
The approximate number of nodes that the cluster should expect when booting up. This is an arbitrary value which is used for optimization purposes. |
It is also possible to switch to TCP when discovering peer nodes. Edit your configuration file and find the element called TCPPING. By default, it will be commented out. Uncomment the TCPPING element and comment out the other MPING configuration instructions in the file. You can only use one of the two discovery methods at a time.
 <TCPPING
     timeout="3000"
     initial_hosts="192.168.0.2[7800],192.168.0.3[7801]"
     port_range="5"
     num_initial_members="3"
     ergonomics="false"
     />
The TCPPING configuration is different from the MPING one when it comes to pinging and searching for peers. The TCP protocol, albeit more stable, doesn't allow to send unaddressed packets over the network. It means that a prior list of IP addresses must be specified. Each IP address represents the one we have bound the node communications to earlier, generally the port 7800. It is assumed that more than one node could coexist at the same IP address, so we also define a maximum number of ports (port_range) over which Infinispan will search and ping for peer nodes. Starting at the port specified in initial_hosts, JGroups will iterate and try to find peers on X+N number of ports.
Configuration Attribute |
Description |
|---|---|
timeout |
A simple timeout value in milliseconds. Defines how much time to wait when pinging a node. |
initial_hosts |
The list of the initial hosts to connect to, and the port at which to start discovering nodes. |
port_range |
The number of ports to scan for peers, starting at the port specified in initial_hosts |
Binding to IPv4 addresses on IPv6 enabled JVMs
When JGroups binds itself to an IP address on a JVM which supports and uses IPv6 addresses, the nodes won't be able to see each other unless the network onto which they operate is also IPv6 compliant. In the general case, your network won't support it. When this happens, we need to add a parameter to the starting scripts of the JVM and instruct it to prefer IPv4 addresses over IPv6.
-Djava.net.preferIPv4Stack=true
To verify that the settings have worked, it is necessary to use your local OS tools. On most Unix, Linux and Mac machines, the following line should do it.
$ netstat -na | grep 43366
udp4       0      0  192.168.0.2.43366     *.*

$ netstat -na | grep 7800
tcp4       0      0  192.168.0.2.7800        *.*                    LISTEN
Notice that the IPs are in IPv4 form, as opposed to IPv6. This means that our binding was done correctly.
Memcached / Mondrian standalone
This example will show how to configure this plugin when deployed alongside a standalone installation of Mondrian and by using the Memcached configuration.
1. Copy all required dependencies
The first step is to copy all the required dependencies to Mondrian's libraries folder. The proper folder to copy those should be :
tomcat/webapps/mondrian/WEB-INF/lib/
Some of the required libraries will already be present, so we will only copy the missing ones. The required files are:
- pentaho-analysis-ee.jar
- commons-lang.jar
- commons-io.jar
- commons-codec.jar
- pentaho-ee-dsc-core.jar
- memcached.jar
2. Verify the plugin configuration files
We nedd to edit the file "pentaho-analysis-config.xml". Open that file and edit it to match the following:
<?xml version="1.0" encoding="UTF-8"?>
<!DOCTYPE properties SYSTEM "http://java.sun.com/dtd/properties.dtd">
<properties>
    <entry key="USE_SEGMENT_CACHE">true</entry>
    <entry key="DISABLE_LOCAL_SEGMENT_CACHE">true</entry>
    <entry key="SEGMENT_CACHE_IMPL">com.pentaho.analysis.segmentcache.impl.memcached.MemcachedSegmentCache</entry>
</properties>
Note that the property SEGMENT_CACHE_IMPL has changed from the default value. The next file to edit is "memcached-config.xml". We will modify the following configuration elements.
<?xml version="1.0" encoding="UTF-8"?>
<!DOCTYPE properties SYSTEM "http://java.sun.com/dtd/properties.dtd">
<properties>

    (... snip ...)

    <entry key="SALT">[YOUR SECRET SALT VALUE HERE]</entry>

    <entry key="SERVERS">192.168.0.1:1642,192.168.0.2:1642</entry>

    <entry key="WEIGHTS">1,1</entry>

    (... snip ...)

</properties>
The table above describes the changes that need to be performed.
Property |
Description |
|---|---|
SERVERS |
A comma separated list of servers and port numbers, representing the memcached nodes usable by the plugin. |
WEIGHTS |
A comma separated list of relative caching capacity of the servers enumerated by the SERVERS property. There needs to be as many values of WEIGHTS as there are values of SERVERS. As an example, if the first server has a capacity of 128 megabytes, and the second has a capacity of 256 megabytes, the correct values for the WEIGHTS property should be "1,2", indicating that the first server has a relative size of half of the second one. |
SALT |
A secret key prefix to be used when saving and loading segment data from the memcached nodes. This property must be the same for all Mondrian nodes which must share their caches. If the SALT value is different from one node to the next, the nodes will not be able to share their cache data. |
There are many more properties that can modified, but we will only cover those for now. You should have an in-depth knowledge of memcached systems before attempting to use this configuration, as such distributed systems are very complex.
3. Enable log output
This step is optional, but will help you diagnose any issues with your plugin configuration. Using a text file editor, open the following file:
[tomcat directory]/webapps/mondrian/WEB-INF/classes/log4j.xml

or

[tomcat directory]/webapps/mondrian/WEB-INF/classes/log4j.properties
If they aren't present already, add the following lines of text to this file, then save it and close it.
if log4j.properties:

    log4j.logger.mondrian.sql=DEBUG

if log4j.xml

    <category name="mondrian.sql">
      <priority value="DEBUG"/>
    </category>
The result of this is that a lot of debugging information will become available in your application server's logs concerning the SQL queries getting executed by Mondrian, as well as information relative to the segment cache plugin.
4. Start Mondrian
You are now ready to start Mondrian, as usual. There are no special startup parameters required and Mondrian should detect the presence of the plugin automatically. Your Mondrian plugin is now ready for use.
5. Verifying the configuration
If you have performed the task at step number 3, you can validate your configuration by opening up your log files. When queries come in, Mondrian will add information to the logs regarding the segment cache plugin. If there was any problem with your configuration parameters, they will be displayed there as well.
Advanced Debugging
When deployed alongside the Pentaho BI server, you can view the segment cache logs by opening the log window from Analyzer. If you are using this plugin on a standalone installation of Mondrian, the log information is available through log4j. Edit your log4j configuration and set the category named "com.pentaho.analysis.segmentcache" to the DEBUG output level.
There are other log4j categories that can help you diagnose problems with your configuration.
- com.pentaho.analysis.segmentcache.impl.infinispan
This category will output information related to the Infinispan implementation of the segment cache. - com.pentaho.analysis.segmentcache.impl.memcached
This category will output information related to the memcached implementation of the segment cache. - com.pentaho.analysis.segmentcache.impl.pentaho
This category will output information related to the Pentaho BI platform delegating implementation of the segment cache.
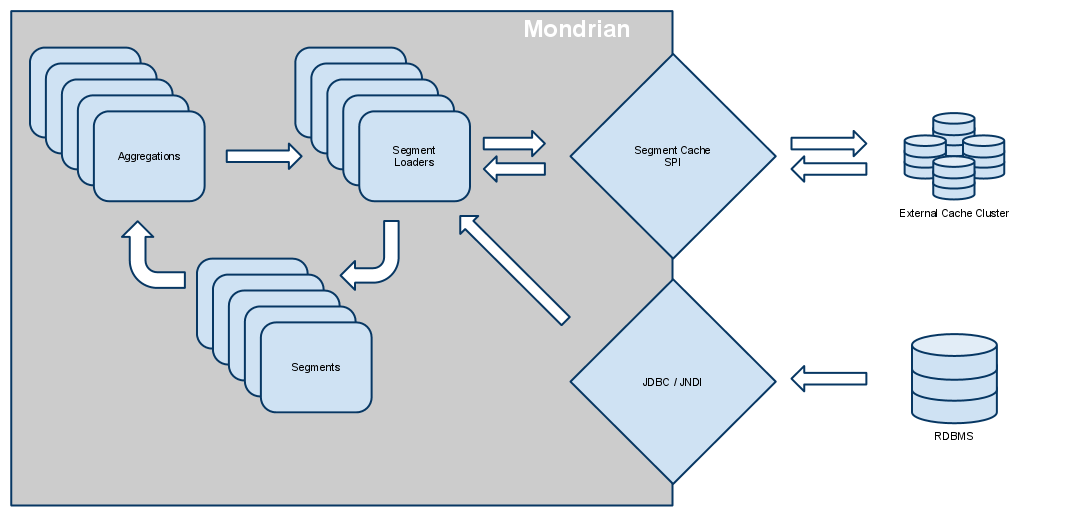
Architecture of a Mondrian node
This section will discuss the architecture behind the segment cache. We will also cover the limitations of each specific configuration options.
There are different levels of caching in play within Mondrian, and to use the external segment cache effectively, one must understand how Mondrian makes use of them.
Individual memory use of a Mondrian node
In order to achieve optimal performance, each Mondrian node, regardless of the segment cache configuration used, brings into system memory the segments required to answer a given query. This cache space is referred to as the query cache. The query cache is composed of hard Java references to the segment objects. Each individual node must have enough memory space available to answer any given query. This might seem like a big limitation, but in reality, Mondrian uses deeply optimized data structures which usually take no more than a few megabytes, even for queries returning thousands of rows.
Once the query finishes, Mondrian will usually try to keep the data locally, using a weak reference to the segment data object. A weak reference is a special type of Java object reference which doesn't force the JVM to keep this object in memory. As the Mondrian node keeps answering queries, the JVM might decide to free up that space for something more important, like answering a particularly big query. This cache is referred to as the local cache.
The local cache can be switched on or off by editing the Pentaho Analysis EE configuration file. The property name is DISABLE_LOCAL_SEGMENT_CACHE and it must be set to a value of either true or false. Setting this property will not affect the query cache we talked about earlier.
The order in which Mondrian will try to obtain data for a required segment is the following.
- A query arrives at a Mondrian node.
- The node will parse the query and figure out which segments it must load to answer that particular query.
- It checks into the local cache, if enabled.
- If the data could not be loaded from the local cache, it checks into the external segment cache, provided by the Pentaho Analysis plugin, and it places a copy inside the query cache.
- If the data is not available from the external cache, it loads the data form SQL and places it into the query cache.
- If the data was loaded form SQL, it places a copy in the query cache and it sends it to the external cache to be immediately shared with the other Mondrian nodes.
- The node can now answer the query.
- Once the query is answered, Mondrian will release the data from the query cache.
- If the local cache is enabled, a weak reference to the data is kept there.
Cache control and propagation
All cache control operations are performed through Mondrian's CacheControl API. It is documented in the Mondrian project documentation. The CacheControl API allows you to modify the contents of the cache of a particular node. It controls both the data cache, but also the cache of members which form your OLAP schema. For the purposes of this document, we will only cover operations related to the data cache, or segment cache, and how it relates to the external segment cache.
When flushing a segment region on a node, that node will propagate the change to the external cache, using the SegmentCache SPI. If the nodes are not using the local cache space, you can safely assume that the data will be fetched again through SQL by the next node which picks up a query requiring that segment. Once the data is loaded form SQL, it will again be stored in the external segment cache.
The Mondrian team does not recommend using the local cache space when using the external cache. This is why we have disabled it by default when you deploy the Pentaho Analysis plugin.
Lets assumes that you have turned on the local segment cache. Using the local cache space on a node can improve performance with increased data locality, but it also means that all the nodes have to be notified of that that change. At the moment, Mondrian nodes don't propagate the cache control operations between the members of a cluster. If you deploy a cluster of Mondrian nodes and you do not propagate the change manually across the nodes, you will have a situation where some nodes will answer queries with stale data.
Using a dynamic schema processors with the segment cache
When using the DynamicSchemaProcessor SPI, Mondrian lets you parse the XML schema and modify it dynamically at runtime before each query is answered. When using that feature, it is always recommended to enable the UseContentChecksum connection property. This enables Mondrian to detect when changes are made to the schema and prevent any false-positives in its caches. Usage of the SegmentCache SPI in conjunction with the DynamicSchemaProcessor also requires that schemas are checksummed. To enable the checksumming of a schema, you must add a property to the JDBC connection string you use to create your Mondrian connection. If you are using the Pentaho BI platform, open the file:
[pentaho solutions folder]/system/olap/datasources.xml
and perform the changes like so:
<Datasources>
    (snip...)
    <DataSourceInfo>Provider=Mondrian;DataSource=MondrianFoodMart;DynamicSchemaProcessor=com.example.Processor;UseContentChecksum=true</DataSourceInfo>
    (snip...)
<Datasources>
Architecture of specific configurations
Each segment cache configuration has its own inherent limitations. Deploying the Pentaho Analysis plugin and obtaining the expected performance level requires can only be achieved if you understand sufficiently the technology we use.
Infinispan
Infinispan is essentially a platform to share a common data space among computer nodes on a network. Behind the scenes, it maintains and distributes a list of the currently available nodes on a network. Each node contains instructions about how to join the network, how to store its data locally and how to share its data with others. When you are using the Infinispan configuration, there are no 'master' nodes. Each node is a self sufficient entity with full knowledge of how to operate.
By default, we have setup the Infinispan configuration so that it maintains at all times two copies of the segment data. This behavior can be modified and is described in Infinispan's documentation. When a node joins a network, the first thing it does is to get a list of the current segments which are stored in the data grid. The node will then, if necessary, pick some segments randomly and store them locally. Each node which join the network adds more total capacity to the data grid. Whether the segments are written to disk or held in memory can be configured by editing Infinispan's configuration file described in the section above. By default, we maintain the data in memory.
When the segment cache SPI is invoked by the Mondrian engine residing on a particular node, the node will search for the data across its peers. If it finds it, it will copy that segment into its local storage and notify the other peers that it now also possesses a copy of that data, potentially enabling one of its peer to free up that space for another segment. That data is now pinned in memory by the Mondrian engine for the duration of the queries requiring it.
Before each node quits a network, it will attempt to distribute the contents of its local storage to its peers. Since we have by default configured the cluster to keep at least two copies of the segment data, in the event that a node quites unexpectedly and the data it contained is lost, it is possible that the data is still stored on one of the peers. The nodes will realize that this segment is now only contained in a single place, and one of them will be designed to pick up the data and safekeep it instead of the failed peer.
There is one outstanding issue with the Infinispan library. When shutting down your JVM, there might be threads left behind by Infinispan. This is a known issue and is referenced by the follopwing bug reports from the Infinispan / JBoss groups.
Memcached
Memcached is a stateless distributed caching system. It needs to be installed on server nodes and the list of servers which are part of the cluster is known in advance. Each Mondrian node needs to be aware of that list of servers. You can modify the list of servers, along with numerous settings, by editing the memcached configuration file mentioned above. Mondrian nodes and server nodes don't have to be the same physical machines. Actually, we recommend deploying them on separate machines, if possible.
Memcached is a protocol for storing data on nodes by using HTTP calls. When a Mondrian node wants to store the data of a segment in the external cache, it will send the data to one of the server nodes contained in that list. It determines the node to store the data into by using a round robin algorithm. When it wants to fetch data from the cluster, it must call each individual node and ask it if it contains the data required.
Using the memcached configuration has an impact on the rollup capabilities of Mondrian. To achieve better performance, Mondrian is smart enough to use segments of a finer granularity to answer queries about coarser grained queries. Because the memcached protocol does not support getting a list of all the contained segments within each server node, a Mondrian node is only aware of the segments it has previously either required or stored. This doesn't mean that the data, if contained in one of the server nodes won't be available to that Mondrian node. If a segment is required by a node and a second node happens to have stored cell data under that same key, the data will be re-used. If a rollup operation could have been possible using data in the external cache, stored there by a tier node, but the node resolving the second query had no prior need of that particular segment, it has no knowledge of the existence of that segment in the cache. The rollup operation cannot be completed in that particular case.
We could have programmed each Mondrian node to try all possible combinations, but for very obvious performance reasons, we cannot do such a thing. If you are using the memcached configuration, the performance impact due to memcached's limitations should not be that great, as rollup operations, despite their great performance benefits, remain quite rarely possible.
Deployment type |
JAR files destination |
|---|---|
Pentaho BI Platform |
[pentaho directory]/tomcat/webapps/pentaho/WEB-INF/lib/ |
Mondrian standalone |
[tomcat directory]/webapps/mondrian/WEB-INF/lib/ |
Mondrian embedded |
The JAR files must be part of your application's classpath. The actual location depends on your application architecture. |