04. Refining Hello World
![]() PLEASE NOTE: This tutorial is for a pre-5.0 version PDI. If you are on PDI 5.0 or later, please use https://help.pentaho.com/Documentation.
PLEASE NOTE: This tutorial is for a pre-5.0 version PDI. If you are on PDI 5.0 or later, please use https://help.pentaho.com/Documentation.
Refining Hello World
Now that the Transformation has been created and executed, the next task is enhancing it.
Overview
These are the improvements that you'll make to your existing Transformation:
- You won't look for the input file in the same folder, but in a new one, a folder independent to that where the Transformations are saved. The name of the input file won't be fixed; the Transformation will receive it as a parameter.
- You will validate the existence of the input file (exercise: execute the Transformation you created, setting as the name of the file, a file that doesn't exist. See what happens!)
- The name the output file will be dependent of the name of the input file.
Here's what happens:
- Get the parameter
- Create the output file with greetings
- Check if the parameter is null; if it is, abort
- Check if the file exists; if not, abort
This will be accomplished via a Job, which is a component made by Job Entries linked by Hops. These Entries and Hops are arranged according the expected order of execution. Therefore it is said that a Job is flow-control oriented.
A Job Entry is a unit of execution inside a Job. Each Job Entry is designed to accomplish a specific function, ranging from verifying the existence of a table to sending an email.
From a Job it is possible to execute a Transformation or another Job, that is, Jobs and Transformations are also Job Entries.
A Hop is a graphical representation that identifies the sequence of execution between two Job Entries.
Even when a Hop has only one origin and one destination, a particular Job Entry can be reached by more than a Hop, and more than a Hop can leave any particular Job Entry.
This is the process:
- Getting the parameter will be resolved by a new Transformation
- The parameter will be verified through the result of the new Transformation, qualified by the conditional execution of the next Steps.
- The file's existence will be verified by a Job Entry.
- Executing the main task of the Job will be made by a variation of the Transformation you made in the first part of this tutorial.
Graphically it's represented like this:
![]()
Preparing the Environment
In this part of the tutorial, the input and output files will be in a new folder called Files - go ahead and create it now. Copy the list.csv file to this new directory.
In order to avoid writing the full path each time you need to reference the folder or the files, it makes sense to create a variable containing this information. To do this, edit the kettle.properties configuration file, located in the C:\Documents and Settings\<username>\.kettle* folder on Windows XP/2000, C:\Profiles\<username>\.kettle* folder on Windows Vista or the *~/.kettle directory on other platforms. Put this line at the end of the file, changing the path to the one specific to the Files directory you just created:
FILES=/home/PentahoUser/Files
Spoon reads this file when it starts, so for this change to take effect, you must restart Spoon.
Now you are ready to start. This process involves three stages:
- Create the Transformation
- Modify the Transformation
- Build the Job
Creating the Transformation
- Create a new Transformation the same way you did before. Name this Transformation get_file_name.
- Drag the following Steps to the workspace, name them, and link them according to the diagram:
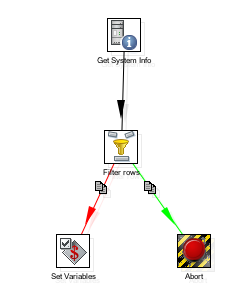 ## Get System Info (Input category)
- Filter Rows (Flow category)
- Abort (Flow category)
- Set Variable (Job category)
- Configure the Steps as explained below:
Configuring the Get System Info Step (Input category)
This Step captures information from sources outside the Transformation, like the system date or parameters entered in the command line. In this case, you will use the Step to get the first and only parameter. The configuration window of this Step has a grid. In this grid, each row you fill will become a new column containing system data.
- Double-click the Step.
- In the first cell, below the Name column, write my_file.
- When you click the cell below Type, a window will show up with the available options. Select command line argument 1.
- Click OK.
Configuring the Filter Rows Step (Flow category)
This Step divides the output in two, based upon a condition. Those rows for which the condition evaluates to true follow one path in the diagram, the others follow another.
- Double-click the Step.
- Write the condition: In Field select my_file and replace the = with IS NULL.
- In the drop-down list next to Send 'true' data to Step, select Abort.
- In the drop-down list next to Send 'false' data to Step, select Set Variable.
- Click OK.
Now a NULL parameter will reach the Abort Step, and a NOT NULL parameter will reach the Set Variable Step.
Configuring the Abort Step (Flow category)
You don't have anything to configure in this Step. If a row of data reaches this Step, the Transformation aborts, then fails, and you will use that result in the main Job.
Configuring the "Set Variable" Step ("Job" category)
This Step allows you to create variables and put the content of some of the input fields into them. The configuration window of the Step has a grid. Each row in this grid is meant to hold a new variable.
Now you'll create a new variable to use later:
- Double-click the Step.
- Click Get Fields. The only existing field will appear: my_file. The default variable name is the name of the selected field in upper case: MY_FILE. Leave the default intact.
- Click OK.
Execution
- To test the Transformation, click Run.
- Within the run dialog, you will find a grid titled "Arguments" on the bottom left. Delete whatever arguements are already inside, and instead type list as the first argument value. This will be transfered to the transformation as the command line argument.
- Click Launch.
- In the Logging pane, you'll see a message like this:
Set Variables.0 - Set variable MY_FILE to value [list]
- Click Run again, and clear the value of the first argument. This time, when you hit Launch you'll see this:
Abort.0 - Row nr 1 causing abort : []
Abort.0 - Aborting after having seen 1 rows.
In the Step Metrics Pane, You'll see the Step Abort line highlighted in red, which indicates that an error occurred and that the Transformation failed (as expected).
Modifying the Transformation
Now it's time to modify the Hello transformation in order to match the names of the files to their corresponding parameters. If the command line argument to the job would be foo, this transformation should read the file foo.csv and create the file foo_with_greetings.xml. It would also be helpful to add a filter to discard the empty rows in the input file.
- Open the Transformation Hello.ktr.
- Open the CSV File Input Step configuration window.
- Delete the content of the Filename text box, and press Ctrl-Spacebar to see the list of existing variables. You should see the FILES variable you added to kettle.properties. Select it and add the name of the variable you created in the previous Transformation. The text becomes:
${FILES}/${MY_FILE}.csv - Click OK.
- Open the XML Output Step configuration window.
- Replace the content of the Filename text box with this:
${FILES}/${MY_FILE}_with_greetings - Click Show Filename(s) to view the projected XML filename. It should replace the FILES variable with your files directory and look like this (depending on the location specified for FILES):
/home/Pentaho/files/${MY_FILE}_with_greetings.xml - Click OK.
- Drag a Filter Rows step into the transformation.
- Drag the Filter Rows step onto the Hop that leaving CSV Input and reaching Modified Javascript Script Value. When you see that the Hop line becomes emphasized (thicker), release the mouse button. You have now linked the new step to the sequence of existent steps.
- Select name for the Field, and IS NOT NULL for the comparator.
- Leave Send 'true' data to Step and Send 'false' data to Step blank. This makes it so only the rows that fulfill the condition (rows
with non-null names) follow to the next Step. This is similar to an earlier Step. - Click OK.
- Click Save As and name this Transformation Hello_with_parameters.
Executing the Transformation
To test the changes you made, you need to make sure that the variable MY_FILE exists and has a value. Because this Transformation is independent of the Transformation that creates the variable, in order to execute it, you'll have to create the variable manually.
- In the Edit menu, click Set Environment Variables. A list of variables will appear.
- At the bottom of the list, type in MY_FILE as the variable name; as the content, type the name of the file without its extension.
- Click OK.
- Click Run.
- In the list of variables, you'll see the one you just created. Click Launch to execute the Transformation.
- Lastly, verify the existence and content of the output file.
Building the main job
The last task in this part of the tutorial is the construction of the main Job:
- Create the Job:
- Click New, then Job.
- The Job workspace, where you can drop Job Entries and Hops, will come up.
- Click Job, then Settings.
- A window in which you can specify some Job properties will come up. Type in a name and a description.
- Click Save. Save the Job in the Tutorial folder, under the name Hello.
- Build the skeleton of the Job with Job Entries and Hops:
To the left of the workspace there is a palette of Job Entries.
Now build the Job:
- Drag the following steps into the workspace: one General->Start step, two General->Transformation steps, and one File Exists step. Link them in the following order: Start, Transformation, File Exists, Transformation.
- Drag two General->Abort steps to the workspace. Link one of them to the first Transformation step and the other to the File Exists step. The newly created hops will turn red.
- Configure the Steps:
- Double click the first Transformation step. The configuration window will come up.
- In the Transformation filename field, type the following:
This will work since transformations and jobs reside in the same folder.
${Internal.Job.Filename.Directory}/get_file_name.ktr - Click OK.
- Configure the second of the two Transformation Job Entries:
- Double-click the entry. The configuration window will come up.
- Type the name of the other Transformation in the Transformation Filename field:
${Internal.Job.Filename.Directory}/Hello_with_parameter.ktr - Click OK.
- Configure the File Exists Job Entry:
- Double-click the entry to bring up the configuration window.
- Put the complete path of the file whose existence you want to verify in the Filename field. The name is the same that you wrote in the modified Transformation Hello:
${FILES}/${MY_FILE}.csvNote: Remember that the variable ${FILES} was defined in the kettle.properties file and the variable ${MY_FILE} was created in the Job Entry that is going to be executed before this one.
- Configure the Abort step connected to the get_file_name transformation step:
- In the Message textbox write: The file name argument is missing
- Configure the Abort step connected to the File Exists step:
- In the Message textbox write this text:
The file ${FILES}/${MY_FILE}.csv does not existNote: In runtime, the tool will replace the variable names by its values, showing for example: "The file c:/Pentaho/Files/list.csv does not exist. If you place your mouse pointer over the Message textbox, Spoon will display a tooltip showing projected output.
- In the Message textbox write this text:
Configuring the Hops
A Job Entry can be executed unconditionally (it's executed always), when the previous Job Entry was successful, and when the previous Job Entry failed. This execution is represented by different colors in the Hops: a black Hop indicates that the following Job Entry is always executed; a green Hop indicates that the following Job Entry is executed only if the previous Job Entry was successful; and a red Hop indicates that the following Job Entry is executed only if the previous Job Entry failed.
As a consequence of the order in which the Job Entries of your Job were created and linked, all of the Hops took the right color, that is, the Steps will execute as you need:
- The first Transformation entry will be always executed (The Hop that goes from Start toward this entry, is black)
- If the Transformation that gets the parameter doesn't find a parameter, (that is, the Transformation failed), the control goes through the red Hop towards the
Abort Job entry. - If the Transformation is successful, the control goes through the green Hop towards the File Exists entry.
- If the file doesn't exist, that is, the verification of the existence fails, the control goes through the red Hop, towards the second Abort Job entry.
- If the verification is successful, the control goes through the green Hop towards the main Transformation entry.
If you wanted to change the condition for the execution of a Job Entry, the steps to follow would be:
- Select the Hop that reached this Job Entry.
- Right click to bring up a context menu.
- Click Evaluation, then one of the three available conditions.
How it works
When you execute a Job, the execution is tied to the order of the Job Entries, the direction of the Hops, and the condition under which an entry is or not executed. The execution follows a sequence. The execution of a Job Entry cannot begin until the execution of the Job Entries that precede it has finished.
In real-world situations, a Job can be a solution to solve problems related to a sequence of tasks in the Transformations. If you need a part of a Transformation to finish before another part begins, a solution could be to divide the Transformation into two independent Transformations, and execute them from a Job, one after the other.
Executing the Job
To execute a Job, you first must supply a parameter. Because the only place where the parameter is used is in the get_file_name Transformation (after that you only use the variable where the parameter is saved) write the parameter as follows:
- Double-click the get_file_name Transformation Step.
- The ensuing window has a grid named Arguments. In the first row type list.
- Click OK.
- Click the Run button, or from the title menu select Job->Run.
- A window will appear with general information related with the execution of the Job.
- Click Launch.
- The execution results pane on the bottom should display the execution results.
Within the execution results pane, the Job Metrics tab shows the Job Entries of your Job. For each executed Job Entry, you'll see, among other data, the result of the execution. The execution of the entries follows a sequence. As a result, if an entry fails, you won't see the entries that follow because they never start.
In the Logging tab you can see the log detail, including the starting and ending time of the Job Entries. In particular, when an Entry is a Transformation, the log corresponding to the transformation is also included.
The new file has been created when you see this at the end of the log text:
Spoon - Job has ended.
If the input file was list.csv, then the output file should be list_with_greetings.xml and should be in the same folder. Find it and check its content.
Now change the name of the parameter by replacing it with a nonexistent file name and execute the Job again. You'll see that the Job aborts, and the log shows the following message (where <parameter> is the parameter you supplied):
Abort - The file <parameter> does not exist
Now try deleting the parameter and executing the Job one more time. In this case the Job aborts as well, and in the log you can see this message, as expected:
Abort - The file name is missing
Kitchen
Kitchen is the tool used to execute Jobs from a terminal window. The script is kitchen.bat on Windows, and kitchen.sh on other platforms, and you'll find it in the installation folder. If you execute it, you'll see a description of the command with a list of the available options.
To execute the Job, try the simplest command:
kitchen /file <Jobs_path>/Hello.kjb <par> /norep
- /norep is a command to ask Spoon not to connect to the repository.
- /file precedes the name of the file corresponding to the Job to be executed.
- <Jobs_path> is the full path of the folder Tutorial, for example:
or
c:/Pentaho/Tutorial (Windows)
/home/PentahoUser/Tutorial
- <par> is the parameter that the Job is waiting for. Remember that the expected parameter is the name of the input file, without the csv.
- The other options (i.e. log level) take default values.
After you enter this command, the Job will be executed in the same way it did inside Spoon. In this case, the log will be written to the terminal unless you redirect it to a file. The format of the log text will vary a little, but the information will be basically the same as in the graphical environment.
Try to execute the Job without parameters, with an invalid parameter (a nonexistent file), and with a valid parameter, and verify that everything works as expected. Also experiment with Kitchen, changing some of the options, such as log level.