03. Hello World Example
![]() PLEASE NOTE: This tutorial is for a pre-5.0 version PDI. If you are on PDI 5.0 or later, please use https://help.pentaho.com/Documentation.
PLEASE NOTE: This tutorial is for a pre-5.0 version PDI. If you are on PDI 5.0 or later, please use https://help.pentaho.com/Documentation.
Hello World Example
Although this will be a simple example, it will introduce you to some of the fundamentals of PDI:
- Working with the Spoon tool
- Transformations
- Steps and Hops
- Predefined variables
- Previewing and Executing from Spoon
- Executing Transformations from a terminal window with the Pan tool.
Overview
Let's suppose that you have a CSV file containing a list of people, and want to create an XML file containing greetings for each of them.
CSV File Contents:
last_name,name
Suarez,Maria
Guimaraes,Joao
Rush,Jennifer
Ortiz,Camila
Rodriguez,Carmen
da Silva,Zoe
Desired Output:
<Rows>
  <row>
    <msg>Hello, Maria!</msg>
  </row>
  <row>
    <msg>Hello, Joao!</msg>
  </row>
  <row>
    <msg>Hello, Jennifer!</msg>
  </row>
  <row>
    <msg>Hello, Camila!</msg>
  </row>
  <row>
    <msg>Hello, Carmen!</msg>
  </row>
  <row>
    <msg>Hello, Zoe!</msg>
  </row>
</Rows>
A Transformation is made of Steps, linked by Hops. These Steps and Hops form paths through which data flows.
Preparing the environment
Before starting a Transformation, create a Tutorial folder, where you'll save all the files for this tutorial. Then create a CSV file like the one shown above, and save it in the Tutorial folder as list.csv.
Transformation walkthrough
The proposed task will be accomplished in three subtasks:
- Creating a new Transformation
- Designing the basic flow of the transformation, by adding steps and hops
- Configuring the steps for the dataset and the desired actions
Creating a new Transformation
- Click New, then select Transformation. Alternatively you can go to the File menu, then select New, then Transformation. You can also just press Ctrl-N.
- Click Save, and save it into the Tutorial folder with the name hello. The transformation will be stored as a hello.ktr file.
Designing the basic flow of the transformation, by adding steps and hops
A Step is the minimal unit inside a Transformation. A wide variety of Steps are available, grouped into categories like Input and Output, among others. Each Step is designed to accomplish a specific function, such as generating a random number or inserting rows into a database table.
A Hop is a graphical representation of data flowing between two Steps, with an origin and a destination. The data that flows through that Hop constitutes the Output Data of the origin Step, and the Input Data of the destination Step. A Hop has only one origin and one destination, but more than one Hop could leave a Step. When that happens, the Output Data could be distributed among the outgoing hops, or copied entirely to each outgoing hop. Likewise, more than one Hop can reach a Step. In those instances, the Step has to have the ability to merge the Input from the different Steps in order to create the Output.
Our Transformation has to do the following:
- Read the CSV file
- Build the greetings message
- Save the greetings in the XML file
For each of these items you'll use a different Step, according to the next diagram:
![]()
In this example, each task will be done in a single step, due to the simplicity of the requirements. For more complex transformations, it may take many more steps to achieve the desired result.
Here's how to start the Transformation:
- To the left of the workspace is the Steps Palette. Select the Input category.
- Drag the CSV file onto the workspace on the right.
- Select the Scripting category.
- Drag the Modified JavaScript Value icon to the workspace.
- Select the Output category.
- Drag the XML Output icon to the workspace.
Now you will link the CSV file input with the Modified Java Script Value by creating a Hop:
- Select the first Step.
- Hold the Shift key and drag the icon onto the second Step.
- Link the Modified Java Script Value with the XML Output via this same process.
![]()
Specifying Step behavior
Every Step has a configuration window. These windows vary according to the functionality of the Steps and the category to which they belong. The Step Name can be set within the configuration window, making it easier to understand what each step will do. A Step Description is also available allows you to clarify the purpose of the Step for documentation purposes.
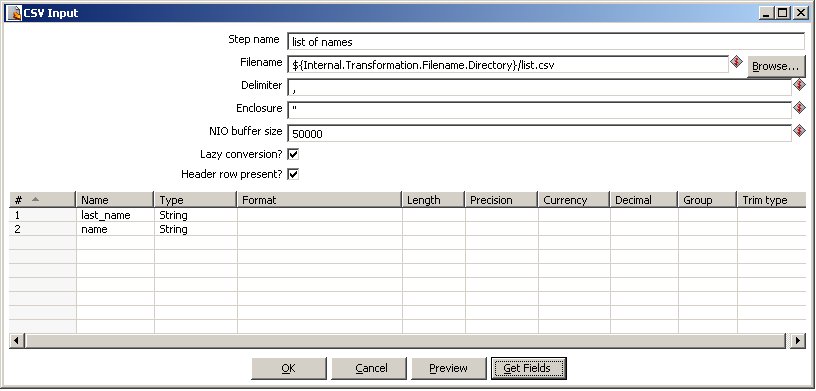
Configuring the CSV file input Step
- Double-click on the CSV file input Step.
- The configuration window for the step will appear. Here you'll indicate the file location, file format (e.g. delimiters, enclosure characters, etc.) and column metadata (e.g. column name, data type, etc)
- Change the step name with one that is more representative of this Step's function. In this case, type in name list.
- For the Filename field, click Browse and select the input file.
Note: Just to the right of the text box is a symbol with a red dollar sign. This means that you can use variables as well as plain text in that field. A variable can be written manually as ${name_of_the_variable} or selected from the variable window, which you can access by pressing Ctrl-Spacebar. This window shows both predefined and user-defined variables, but since you haven't created any variables yet, right now you'll only see the predefined ones. Among those, select:
${Internal.Transformation.Filename.Directory}Next the name of the variable, type a slash and the name of the file you created:
${Internal.Transformation.Filename.Directory}/list.csvAt runtime the variable will be replaced by its value, which will be the path where the Transformation was saved. The Transformation will search the file
list.csv in that location. - Click Get Fields to add the list of column names of the input file to the grid. By default, the Step assumes that the file has headers (the Header row present checkbox is checked).
Note: The Get Fields button is present in most Steps' configuration windows. Its purpose is to load a grid with data from external sources or previous Steps. Even when the fields can be written manually, this button gives you a shortcut when there are many available fields and you want to use all or almost all of them.
- The grid has now the names of the columns of your file: last_name and name, and should look like this:
- Switch lazy conversion off
- Click Preview to ensure that the file will be read as expected. A window showing data from the file will appear.
- Click OK to finish defining the Step CSV file input.
Configuring the Modified JavaScript Value Step
- Double-click on the Modified JavaScript Value Step.
- The Step configuration window will appear. This is different from the previous Step config window in that it allows you to write JavaScript code. You will use it to build the message "Hello, " concatenated with each of the names.
- Name this Step Greetings.
- The main area of the configuration window is for coding. To the left, there is a tree with a set of available functions that you can use in the code. In particular, the last two branches have the input and output fields, ready to use in the code. In this example there are two fields: last_name and name. Write the following code:
var msg = 'Hello, ' + name + "!";
- At the bottom you can type any variable created in the code. In this case, you have created a variable named msg. Since you need to send this message to the output file, you have to write the variable name in the grid. This should be the result:
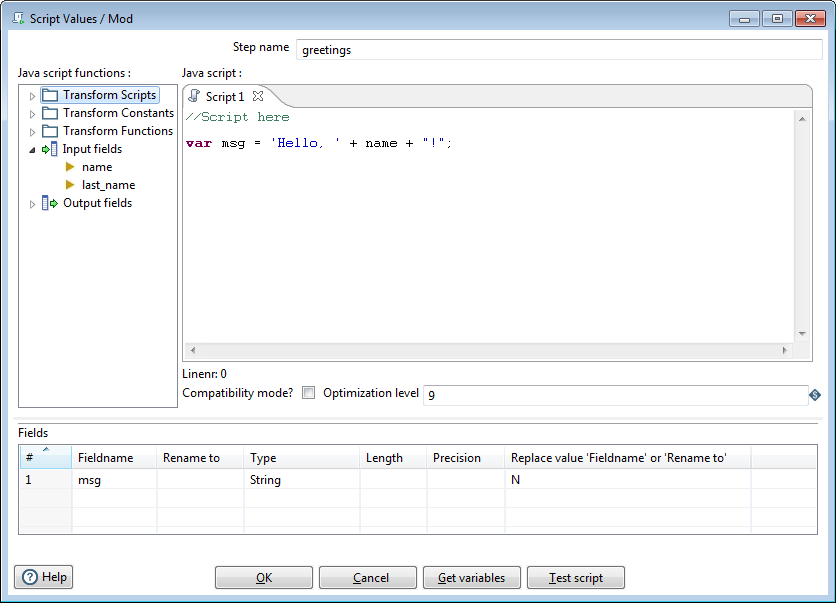
Warning: Don't mix these variables with PDI variables - they are not the same.
- Click OK to finish configuring the Modified Java Script Value step.
- Select the Step you just configured. In order to check that the new field will leave this Step, you will now see the Input and Output Fields. Input Fields are the data columns that reach a Step. Output Fields are the data columns that leave a Step. There are Steps that simply transform the input data. In this case, the input and output fields are usually the same. There are Steps, however, that add fields to the Output - Calculator, for example. There are other Steps that filter or combine data causing that the Output has less fields that the Input - Group by, for example.
- Right-click the Step to bring up a context menu.
- Select Show Input Fields. You'll see that the Input Fields are last_name and name, which come from the CSV file input Step.
- Select Show Output Fields. You'll see that not only do you have the existing fields, but also the new msg field.
Configuring the XML Output Step
- Double-click the XML Output Step. The configuration window for this kind of Step will appear. Here you're going to set the name and location of the output file, and establish which of the fields you want to include. You may include all or some of the fields that reach the Step.
- Name the Step File with Greetings.
- In the File box write:
${Internal.Transformation.Filename.Directory}/Hello.xml - Click Get Fields to fill the grid with the three input fields. In the output file you only want to include the message, so delete name and last_name.
- Save the Transformation again.
How does it work?
When you execute a Transformation, all steps are executed simultaneously. The Transformation executes asynchronously; the rows of data flow through the steps at their own pace. Each processed row flows to the next step as soon as that row is processed by the current step.
At this point, Hello World is almost completely configured. A Transformation reads the input file, then creates messages for each row via the JavaScript code, and then the message is sent to the output file. This is a small example with very few rows of names, so it is difficult to notice the asynchronous execution in action. Keep in mind, however, that it's possible that at the same time a name is being written in the output file, another is leaving the first Step of the Transformation.
Verify, preview and execute
- Before executing the Transformation, check that everything is properly configured by clicking Verify. Spoon will verify that the Transformation is syntactically correct, and look for unreachable Steps and nonexistent connections. If everything is in order (it should be if you followed the instructions), you are ready to preview the output.
- Select the JavaScript Step and then click Preview button. The following window will appear:
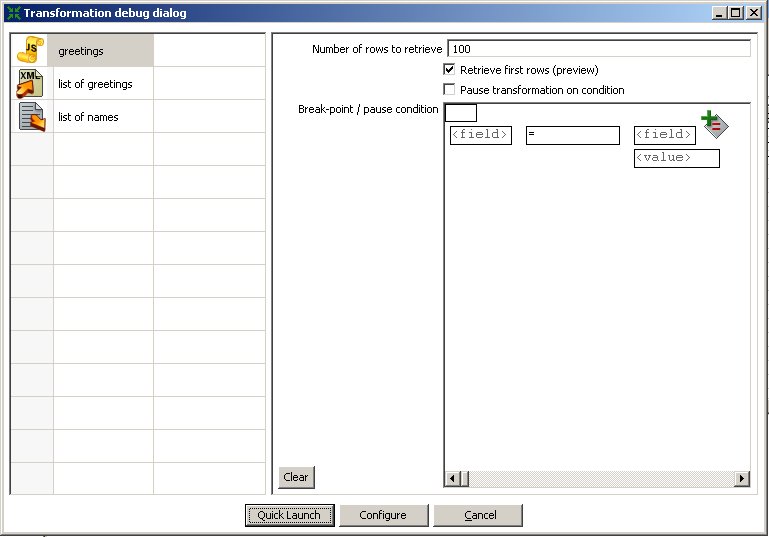
- As you can see, Spoon suggests that you preview the selected Step. Click Quick Launch. After that, you will see a window with a sample of the output of the JavaScript Step. If the output is what you expected, you're ready to execute the Transformation.
- Click Run.
- Spoon will show a window where you can set, among other information, the parameters for the execution and the logging level. Click Launch.
- An Execution Results pane will appear at the bottom, allowing you to view step performance metrics and log messages.
In the Step Metrics tab, you can see the executed operations for each Step of the Transformation. In particular, pay attention to these:
- Read: the number of rows coming from previous Steps.
- Written: the number of rows leaving from this Step toward the next.
- Input: the number of rows read from a file or table.
- Output: the number of rows written to a file or table.
- Errors: errors in the execution. If there are errors, the whole row will become red.
In the Logging tab, you will see the execution step by step. The detail will depend on the log level established. If you pay attention to this detail, you will see the asynchronicity of the execution. The last line of the text will be:
Spoon - The transformation has finished!!
If there weren't error messages in the text, open the newly generated Hello.xml file and check its content.
Pan
Pan allows you to execute Transformations from a terminal window. The script is Pan.bat on Windows, or pan.sh on other platforms, and it's located in the installation folder. If you run the script without any options, you'll see a description pan with a list of available options.
To execute your Transformation, try the simplest command:
Pan /file <Tutorial_folder_path>/Hello.ktr /norep
- /norep is a command to ask Spoon not to connect to the repository.
- /file precedes the name of the file that contains the Transformation.
- <Tutorial_folder_path> is the full path to the Tutorial folder, for example:
C:/Pentaho/Tutorial
or
/home/PentahoUser/Tutorial
The other options are run with default values.
After you enter this command, the Transformation will be executed in the same way it did inside Spoon. In this case, the log will be written to the terminal unless you specify a file to write to. The format of the log text will vary a little, but the information will be basically the same that you saw in the graphical environment.