Pentaho reports integration with portlets web application
October 07, 2007
Contributed by Ashish Sarin, Pentaho Community Member
Pentaho reports are normally accessed using the web application that comes alongwith the Pentaho PCI. There are scenarios when its required to access the reports over the web from other applications. For example, if there is an application which is developed using JSF/Portlets and it needs to use Pentaho reporting for generating and showing reports. One of the widely used approach is (assuming that reports are generated based on parameters passed by the user):
User enters the report filtering criterias on the screen. The application generates a hyperlink to the ViewAction servlet that generates and returns the report. The report filtering criterias (along with path to solutions directory and the name of xaction) are passed to ViewAction in the query string of the URL.
There are a number of problems with this approach:
1. It allows users to see the URL of the Pentaho server
2. There is no authentication involved.
3. The parameters are passed in the URL, therefore, its not possible to restrict the user from entering invalid filtering criterias, solution directory name, xactio name in the URL.
4. The application itself doesn't know what parameters were passed to the ViewAction and what was the result of executing the xaction. In some cases the application would like to maintain a log in case the report generation fails for some reason.
This tech tip attempts to provide a simpler solution to the above mentioned problems using Apache HttpClient for sending HTTP POST (you can also use HTTPS request) request to the ViewAction servlet and then showing how to access the generated report from a JSF/Portlet web application.
Problem with portlet web application: The Portlets only allow HTML content to be shown to the user. The Portlet doesn't allow showing binary content (PDF/Excel). Setting the response's content type to anything but text/html will result in error. This means that in Portlet application you need to use a different strategy to show the Pentaho reports.
Solution
In Pentaho, a report is generated as a result of execution of an 'Action Sequence'. The action sequence implementation decides whether the report needs be generated and shown to the user or it is generated in the background and then e-mailed to the user as an attachment.
The following information is needed by the ViewAction servlet to generate the report :
1. Type of report to be generated: The report type could be PDF, XLS, HTML, RTF, etc
2. Solutions directory name: The name of the solutions directory which contains Pentaho solutions.
3. Action Sequence name: The name of the action sequence that needs to be executed
4. Path to the action sequence: The path to the directory (inside the solutions directory) which contains the action sequence
5. Run in background: Show report to the user or generate the report in background and e-mail it to the user as attachment
6. Filtering criteria: Report specific filtering criteria that is entered by the user.
Some of the information above is mandatory and must be passed to the ViewAction servlet. Also, some of the information can have only a set of pre-defined values. For example, the report type is mandatory and the name of the request parameter which specifies the report type MUST be "type" and the possible values it can have are "pdf", "xls", "html".
If you go to the Pentaho 'Solutions' that come with PCI and access the 'Detailed Inventory Report' inside Steel Wheel Reporting Samples, you will see that the URL in the browser looks like:
http://<server>:8080/pentaho/ViewAction?&productline=Classic%20Cars&type=pdf&solution=samples&action=Inventory%20List.xaction&path=steel-wheels/reports
The following code snippet shows the ReportParam class that contains all the information that Pentaho ViewAction servlet needs to generate a report:
/**
 * ReportParam object represents all the values that needs to be passed to the ViewAction servlet.
 * @author Ashish Sarin
 */
package com.sample.integration;

import java.util.HashMap;
import java.util.Map;
public class ReportParam {

    private Map<String, String> filterCriteria = new HashMap<String, String>();
    private String reportType;
    private String solutionsDirectoryName;
    private String actionSequenceName;
    private String actionSequencePath;
    private boolean runInBackground;
    //..getter and setter methods for all the attributes

   //..utility method that adds a parameter in the filterCriteria map
    public void setParameter(String name, String value) {
       filterCriteria.put(name, value);
    }

}
The following code snippet shows the Constants class that contains all the standard names/values ViewAction servlet expects in the request:
package com.sample.integration;

public class Constants {
    //the name with which the report object should be saved in the session
    private static final String REP_PARAM_NAME = "reportParam";
    //the request parameter name for the report type
    private static final String REPORT_TYPE_NAME_PARM = "type";

    //the request parameter name for the solutions directory
    private static final String SOLUTION_DIR_NAME_PARM = "solution";

    //the request parameter name for the Action Sequence name
    private static final String ACTION_NAME_PARM = "action";

    //the request parameter name for the path to the action squence
    private static final String PATH_NAME_PARM = "path";

    //the request parameter name specifying whether the report should be run in background or not
    private static final String RUN_IN_BACKGROUND = "background";

    //allowed report types
    public static final String[] allowedTypes = {"xls", "pdf", "html"};
}
The web application which is going to access the Pentaho report will be responsible for creating a ReportParam object and setting the appropriate values for all its attributes. In case of a JSF/Portlet application, when a user selects the filtering criteria, report type, etc the web application will be responsible for validating the inputs from the user. This way the user can be asked to fill the mandatory filtering criteria which the application expects.
The following figure shows a report lookup screen based on the similar lines as Detailed Inventory Report:
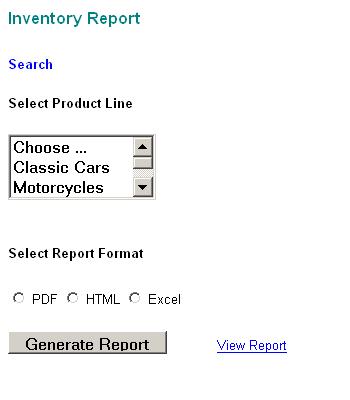
When the user clicks the 'Generate Report' button then the JSF/Portlet application ( or any other web application ) will validate that the mandatory fields are selected. The 'View Report' link is not shown to the user unless the validation is successful. The following code snippet shows how this can be done in a JSF action defined in a managed bean:
public class SomeManagedBean {
    private String productLine;
    private String reportType;

    public String validateAndShowReportLink() {
        String returnPage = "somePage";
        boolean isValidRequest = true;
        if(productLine == null || productLine.equalsIgnoreCase("")) {
           //show an error message asking the user to select a product line item
           isValidRequest = false;
        }
        if(reportType == null || reportType.equalsIgnoreCase("")) {
           //show an error messahe asking the user to select the report type he/she wants
           isValidRequest = false;
        }

       //if the request didn't fail any validation error then put the ReportParam object in session
       if(isValidRequest) {
          ReportParam reportObject = new ReportParam();
          reportObject.setActionSequenceName("Inventory List.xaction");reportObject.setParameter("productline", productLine);
          reportObject.setActionSequencePath("steel-wheels/reports");reportObject.setReportType(reportType);
          reportObject.setSolutionsDirectoryName("samples");
          PortletSession session = (PortletSession)FacesContext.getCurrentInstance().getExternalContext().getSession(false);
          session.setAttribute(Constants.REP_PARAM_NAME, reportObject, PortletSession.APPLICATION_SCOPE);
          session.setAttribute("viewReportLink", "Y");
       }
       return returnPage;
    }
    //.. more actions and attributes
}
The validateAndShowReportLink method does the following:
- Validates that the user has selected the mandatory options
- Creates a ReportParam object and populates it with the parameters that needs to be passed to the Action Sequence
- Adds the ReportParam object to the PortletSession.
- Adds an attribute 'viewReportLink' to the session. The value of this attributes decides whether the 'View Report' link needs to be shown to the user or no
Portlets don't allow the content type of the response to be set to anything except text/html, therefore, an HttpServlet must be used to show the generated report from Pentaho. The 'View Report' link will invoke this HttpServlet and show the generated report to the user. If a portlet application needs to share session attributes with a servlet (in the same portal web application) then that session attribute must be set in the PortletSession's APPLICATION_SCOPE. This is the reason why the ReportParam object has been added to the PortletSession.APPLICATION_SCOPE. The Servlet will make use of the ReportParam object and generate the parameters to be passed to the Pentaho server.
The Servlet that will access the Pentaho server needs to address the following points:
1. It should make use of some validation mechanism to access the server
2. It should be able to send an HTTP request to the server as a POST request instead of GET request
3. It should pass obtain the report from the Pentaho and pass it to the response of the web application which invoked the servlet
There are many ways in which a Servlet or any Java application can send an HTTP to a URL. In this article we will be using the Apache HttpClient to send an HTTP request to Pentaho server.
Sending HTTP request using HttpClient
Step 1. Obtain the ReportParam object from the session and create the request parameters that needs to be passed to the Pentaho server
Step 2. Create the PostMethod object and add all the parameters to it.
PostMethod method = new PostMethod(pentahoServerURL);
method.addParameters(parameters); //add all the request parameters that need to be passed to Pentaho
Step 3. Set the default credentials
Credentials defaultcreds = new UsernamePasswordCredentials("suzy","password");
HttpClient client =new HttpClient();
client.getState().setCredentials(null,null, defaultcreds);
client.getState().setAuthenticationPreemptive(true); //this will ensure that the authentication happens before the server asks for credentials
Step 4. Invoke the POST method on the Pentaho server and add the response obtained to the current reponse.
OutputStream outputStream = response.getOutputStream(); //the OutputStream for the response that needs to be sent to the user
client.executeMethod(method);
InputStream responseBody = method.getResponseBodyAsStream();
byte[] buffer = new byte[1024];
while (true) {
    int bytes = responseBody.read(buffer);
    if (bytes <= 0) {
        break;
    }
    outputStream.write(buffer, 0, bytes);
}
outputStream.flush();