Dynamically Generating a Cross Tab Report, Part 1
September 12, 2006
Contributed by Nic Guzaldo, Pentaho Community Member
I recently received a monster (in a great way!!) of a tech tip from Nic Guzaldo, a self-taught Pentaho expert and supporter. I spent a day or so getting my head around what Nic had accomplished (with many exclamations of "wow, I didn't know we could do THAT!"), and figured I should break it up into a series of articles for easier consumption.
So the goal of this exercise? The high level goal is exactly as the post title says: "Dynamically Generating a Cross Tab Report". But that so doesn't do this exercise justice. Here is a whirlwind explanation, from Nic himself:
"Pretty much what I have in mind for the cross tabular on-the-fly report spec generation will be an xaction that will create your cross tab SQL query dynamically based on user and dev inputs that will allow you to alter your report spec on the fly so you have a nicely tabular report with the number of columns you need. Should be good which will basically expand on the tech tip "Dynamically Generating SQL.. And More"."
So, yeah, lots of good stuff in there! Let me break it down.
In the first article of the series, we will create a query that will not only demonstrate setting up regular data for a cross tab report, but also use user input to determine the number of columns in the query. For anyone who has tried to generate reports with a dynamic number of columns, this is a must read! Here are the nuts and bolts of the first article:
- Look at a previous tip for migrating the Pentaho sample data from HSQLDb to MySQL.
- Set up a MySQL JNDI connection in JBoss.
- Build the list of selections for columns in our query from row data in the Pentaho sampledata database.
- Build the prompt page to select from the list of columns those we want in our report, as well as selecting a few other parameters for the report.
- Call a sub-action sequence to build and run the final query for our cross tab report.
The second article will pick up where we left off. We will use the query that we derived in the first article to feed into a Pentaho report template. Actually, we will use several mini templates that demonstrate template re-use and assembling with parameters, very cool stuff. Our template will have several replaceable parameters that will accommodate our variable number of columns, a dynamically generated report title, and a nice name for any output files we generate, should the user choose to output their report to a format such as Excel, RTF, PDF, etc.
So hopefully you get the overall goal. Don't worry, I'll explain the use case, best practices and other bits as we go along.
Resources Before You Get Started
The following software is what I used to build out this article. I highly recommend you set up these pieces in your environment before you get started. While it may seem like a bit of work, each project has a very simple install and setup. And they are all zip files with no residual footprint outside of their installation (minor exception being MySQL 5.0), so cleanup is as easy as deleting your work directory - not that you'll ever want to ![]()
- MySQL Server, version 5.0+ Community Edition (or other DB that supports the "if" function )
- MySQL Connector/J, JDBC Driver for MySQL, version 3.1.2
- Pentaho Design Studio (PDS) version 1.2 RC2 or later.
- Pentaho Pre-configured Installation (PCI) running locally, and the hypersonic database running locally with the SampleData database, version 1.2 RC2 or later.
- Kettle, version 2.3.0 (for migrating the Pentaho sample data into MySQL)
Also, we are going to use some features of Pentaho that are covered in detail in the following tech tips. They are a great primer for this article, especially if you are new to action sequences, J2EE and/or pentaho in general.
- Designing Reports With MySQL & JNDI
- Setting up Parameters With the Design Studio - Parameters Made Easy
- Use Kettle to Migrate Sample Data to MySQL
You can also download the solution to this article to follow along if you like, although the article will step through creating each of these files.
Sample Use Case
The Pentaho sample data is quite simplistic. The table that we will use in this exercise is QUADRANT_ACTUALS. The QUADRANT_ACTUALS table contains Region, Department, PositionTitle (job title), Actual, Budget and Variance data.
We want to be able to create a report that will show aggregated expenses by job title, broken down by region.
The main requirements we will address are:
- We want to use the PositionTitle data as our columnar data in the report. We also will want to be able to choose a subset of job titles that we are going to report on, which will vary.
- We need to aggregate all selected expense data by job title across all departments.
- We want to be able to choose the measure to report on, either Actual or Budget expenses.
- We also want to be able to choose what the report output format is: RTF, Excel, web page, XML, or pdf.
Let's get started!
Step-By-Step
As I mentioned in the "Resources.." section, it's important at this point that you have the PCI, the Pentaho Design Studio, and Kettle installed and ready to run somewhere on your computer. If you have any questions on how to set these things up, they all have installation and user guides located at http://www.pentaho.org/download/latest.php. From here forward I will assume you have the necessary tools for the exercise.
Migrate Your Data
First up, you will want to migrate your Pentaho sample data from the HSQLDb to MySQL. This step actually is necessary, as HSQLDb doesn't seem to like the if() function. Fortunately, we already put together step by step instructions for using the Pentaho demo data and Kettle to migrate the sample data to MySQL. If you haven't done so already, hop on over and migrate your data.
Set Up JNDI to MySQL
Next, you will want to set up a new JNDI connection to the sampledata in MySQL in the Pre-configured Installation's (hereby known as PCI) JBoss application server. This is one of those best practices I mentioned earlier. It is wise to set up a single JNDI definition with the server, rather than having all sorts of database connection parameters littering your solution. We have a previous tech tip that demonstrates creating a JNDI connection in JBoss that you can follow if you are not familiar. The JNDI name that I used in the sample files attached to this tip is "MySQLSampleData". If you want to use those sample files, and don't want to have to tweak the JNDI name, I would recommend you use that same name.
Creating the Sample Solutions Project in Design Studio
Now we get into the fun part. We are going to build the action sequence that will output our cross tab query as defined in our requirements. The first thing we need to do is set up the Design Studio so that we can work and debug directly from the sample solutions that come with the PCI. (If you want to use your own solution directories, that's fine too, just modify the following steps to accommodate your structure).
- Open the Pentaho Design Studio. From the main menu, choose File | New Project | Simple Project.
- The wizard walks you through setting up your project. When prompted for the location of your project files, uncheck the "use default" checkbox, and enter the path to the PCI sample solutions directory, usually located at <pentaho-pci-root>/pentaho-solutions. Name your project something you like; I named mine gretchens_solution.
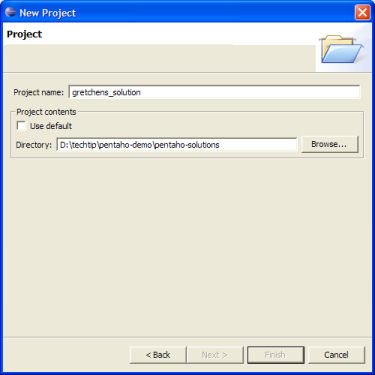
- Click the Finish button, and you are all set. You can now work on our new action sequence in the Design Studio.
Creating the Action Sequence
- Let's create a brand new container (folder) for our action sequence. In your project root (hereby referred to as <project-root>, under the samples directory, create a new folder called techtip.
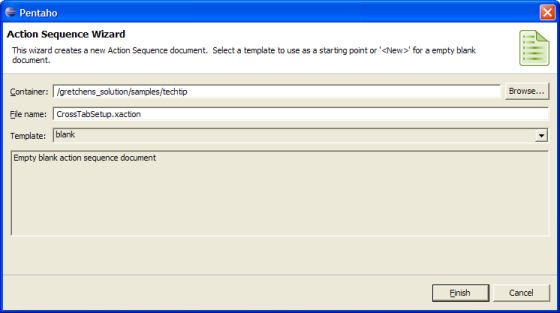
- Next, from the main menu, choose BI Platform | New Action Sequence... You will get a dialog prompt. Enter the following information into the dialog (replacing <your_project> with the name of your project, of course!):
- Container: /<your_project>/samples/techtip
- Filename: CrossTabSetup.xaction
- template: blank
- You should now see an empty shell action sequence. The next "best practice" for writing action sequences that I want to address is abstracting strings from your .xaction file. You want to separate your strings from the .xaction file into a .properties file, so that your solution can be easily translated into other languages. The .properties files is the way Java accommodates these translations. So, here's what you should do - enter the following values into the form:
- name: %title
- description: %description
- help: %help
- logging level: TRACE
- author: put your name here
Where you have the "%blah", these are place holders that get filled in from the .properties files at runtime. So our next move is to create the .properties file for this action sequence, and match the real values we want for these fields with their placeholder name.
- In the <project_root>/samples/techtip directory, create a file named CrossTabSetup.properties file. Note that if you deviated from the action sequence filename specified above, you should use that deviated name here as well - the action sequence filename and properties file name must match!
- Enter the following text in the CrossTabSetup.properties file, then save the file:
title=Dynamic Cross tab Tutorial
description=Dynamic cross tab report using sub-actions, templates, and defining the report-name
help=sub-action,template,report naming and more
That's the minimum necessary to get our action sequence established. Our next steps are to define the process for this action sequence.
Defining the Process
The process we want to define in the action sequence is :
- Create a query that will select all unique job titles from the database.
- Create a user prompt so the user can select which job titles they would like to report on, which measures they would like to see (Actual or Budget) and how they would like their report output format (RTF, web page, Excel, XML or PDF).
- From the user's selections, create the query that will result in our cross tab data for our cross tab report.
And here are the steps to do it in the Design Studio:
- Switch from the General tab to the Define Process tab in Design Studio. These tabs are at the bottom of the form/editor view.
- We are going to take advantage of the action sequence's ability to use input parameters as variables, so we build a bit of re-use into our action sequence (as you'll see later on in the process). Here are the inputs to create, and what they are used for:
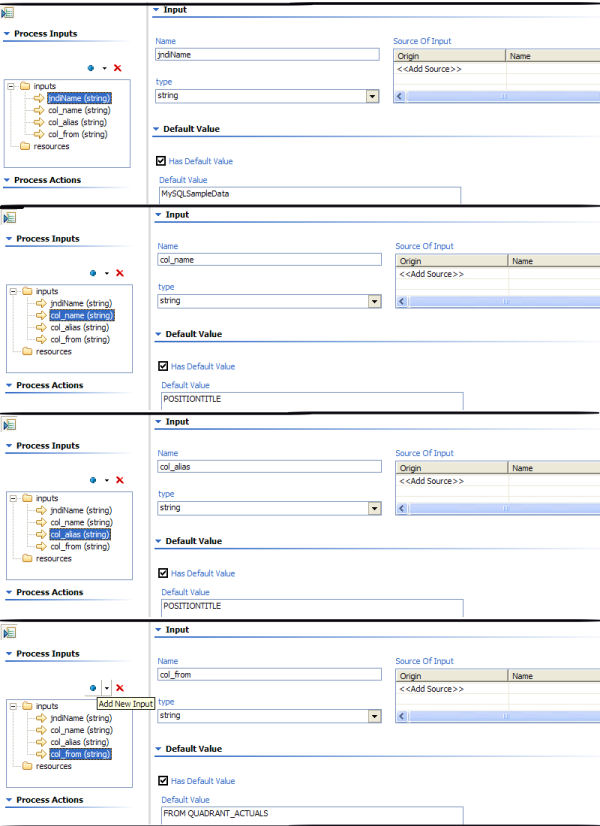
- jndiName - The first input we are going to define is going to hold our JNDI name string. By defining the JNDI name string in an input, we can use it multiple times throughout the action sequence and sub-action sequences, but only have to change it in one spot - in the default value of the input. You should set the Default Value of the jndiName input to be MySQLSampleData, which is the name we designated for our JNDI connection earlier when we defined it to JBoss.
- col_name - The col_name input is going to hold the name (as a string) of the database field where our job titles are coming from. That name is POSITIONTITLE. Set the Default Value of col_name to POSITIONTITLE .
- col_alias - The col_alias input will hold the name (as a string) of the database field where nice display names for our job titles would come from. Unfortunately the sample data doesn't have that data. It is still worth demonstrating this trick, so we will set the Default Value to POSITIONTITLE, so the regular names are picked up, but in the real world, you would hopefully have a field in your database where nice descriptions of each of your job titles existed.
- col_from - Our last input for this action is col_from, and this is the FROM portion of the query string we are going to build. Set the Default Value for col_from to FROM QUADRANT_ACTUALS.
- Now that we have our inputs, we need to create the query for retrieving the unique position titles from the database. In the Process box on the left, right-click, select Query | SQL Query.
- Set the description for the action to "Select data (positiontitles) for cross tab columns".
- Under Database Connection, select the JNDI radio button, and for the value, drop down the list and select the <jndiName> input.
- In the Query section, enter the query string
Here you can see how we are using our defined inputs to build the query. We will use these same inputs in our cross tab query, and therefore are re-using the inputs and only have to change the values in one place, should we need to modify the action sequence in the future (think maintenance!!).
select distinct {col_name} as name, {col_alias} as alias {col_from}; - set the ResultSet Name to "XTabCol_RS". Save your action sequence.
At this point we have only accomplished the first step of our process, but we will want to test it before we move forward, to be sure we have everything set up properly to this point.
- Expand the action in the Process box by clicking the plus symbol. You should see the XTabCol_RS resultset as an output from the action. Drag XTabCol_RS from the Process box into the Outputs box just below it to designate that resultset as the output of the action sequence. Save the action sequence.
- Make sure that your PCI server is up and running.
- Switch from the Define Process tab to the Test tab in Design Studio .These tabs are at the bottom of the form/editor view.
- At the top of the Test screen, you should see the URL to your PCI server. If you are not sure whether that is the correct URL, click the Test Server button. If you then see the PCI home page, then the server URL is correct.
- Click the Generate URL button. This should generate the URL needed for testing your action sequence.
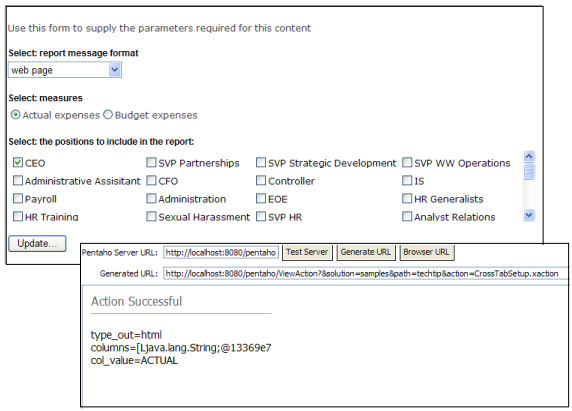
- Last, click the run button at the end of the URL location text box. If all is good, you should see results similar to the following:
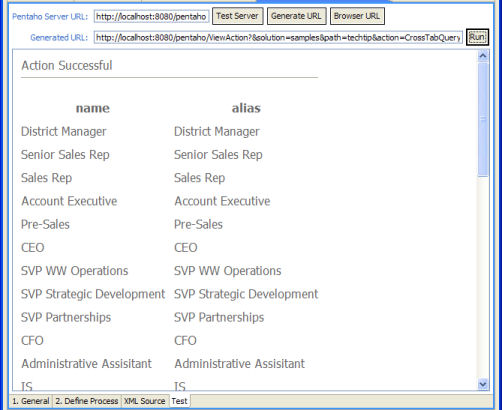
The rows of data you see here will serve as the columns in our cross tab Our next step is to create a Secured Filter Component action, which will build the user prompt page, prompting the user for the report output format, the measures they would like to use in the report and the column selections for the report. The Secured Filter Component is always the component you want to use to prompt a user for input. The name is a bit mysterious, named appropriately actually, because the component does prevent you from accessing data outside of the filters chosen by the user, but not the most intuitive, we admit.
- First thing, we need to define some more inputs. When you want to prompt a user for information, you generally need to define two inputs: one input to hold the list of selections (if there is one) you want to offer the user, and one to hold the user's choice after being prompted. Our first prompt will be for the report output format. We will need one resultset input, named type_outRS, to hold the output format values and their nice display names for our prompt page. The second input for this prompt is a string input, named type_out, to hold the user's selection. Reference the screenshots below for these inputs' details:

- Now, in the Process box, right click and select Secure Filter.
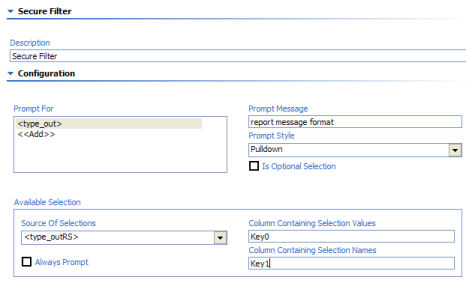
- In the Prompt For box, select the type_out input. Once selected, you see you have the option of entering a prompt message, and the type of control you would like to use.
- Enter "report output format" as the message and change the control to "pulldown". This enables another set of options, asking you how you would like to populate the pulldown.
- Select the type_outRS input for the Source of Selections. In the Column Containing Values, enter Key0. In the Column Containing Names, enter Key1. If your not sure where these came from, go back and look at the column headers of the data in your type_outRS.
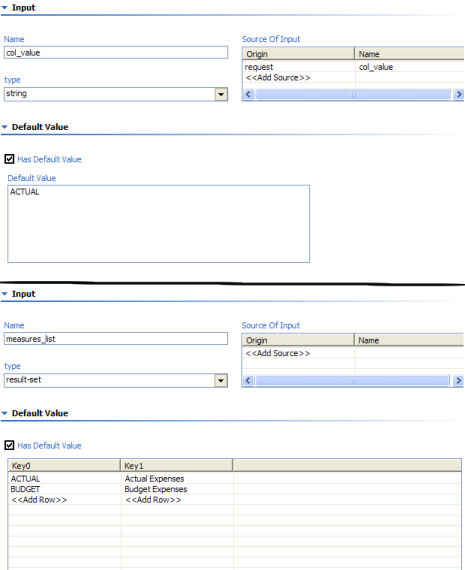
- Our next set of inputs will allow us to prompt for the report measures. We will need a string input named col_value that will hold the measure selected by the user. This value will be used in our cross tab query as the name of the database field where our measures data will come from. It should default to ACTUAL. Then we need a resultset input named measures_list that will hold the list of measures available (actual or budget). Reference the screenshots below for these inputs' details:
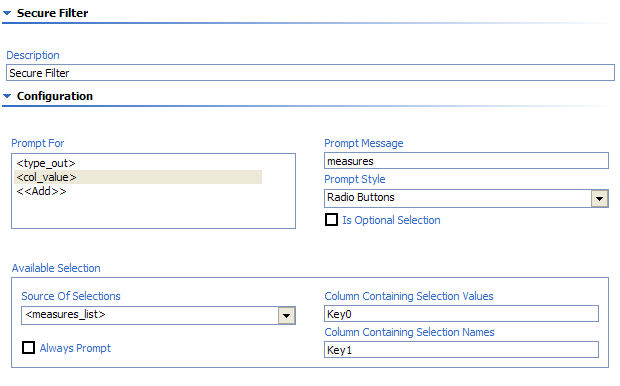
- In the Prompt For box, under type_out, add col_value.
- Enter "measure" as the message and change the control to "Radio Buttons ".
- Select the measures_list input for the Source of Selections. In the Column Containing Values, enter Key0. In the Column Containing Names, enter Key1. If your not sure where these came from, go back and look at the column headers of the data in your measures_list.
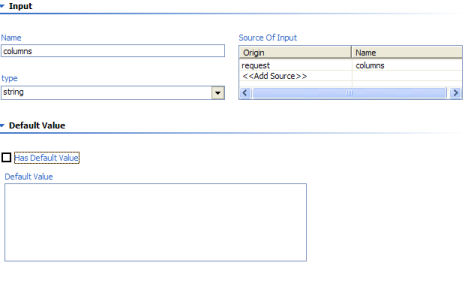
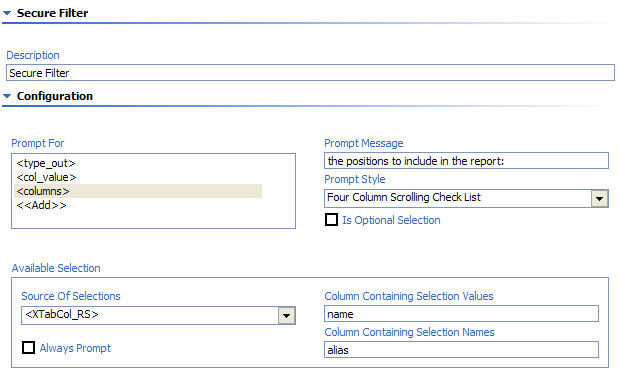
- And our last prompt will be for the job title selections to include as columns in our report. We only need to create one string input for this prompt, since we have a resultset (XTabCol_RS) from the previous action that we can use to populate the list of selections. Create an input named columns, as shown below:
- In the Prompt For box, under col_value, add columns.
- Enter "the positions to include in the report:" as the message and change the control to "Four Column Scrolling Check List ".
- Select the XTabCol_RS input for the Source of Selections. In the Column Containing Values, enter name. In the Column Containing Names, enter alias. If your not sure where these came from, refer back to the query that we used to get this data; we selected col_name as name and col_alias as alias. This allowed us to reference the columns in this step.
Now that we have our prompts defined, this looks like another good spot to stop and test what we have.
- Remove the XTabCol_RS input from the Outputs box on the left. You should be able to right-click and choose delete.
- Go back to the columns input, and add CEO as the default value. This is a minor nuance, but an exception is thrown if these inputs don't have default values at this point.
- Add the col_value, columns and type_out inputs to the Outputs box, by dragging them from the Inputs box.
- Follow the same process described above to test our solution to this point. If all is well, you should get your prompt page, then see the values that you selected printed to the screen, similar to the output below. It's not pretty, but it does validate that we can get through this much of the action sequence without problems.
So, now we are at the last step in generating our cross tab query - actually taking the values that the user selected in the Secure Filter step, and using them to aggregate the chosen measure up to each chosen job title, by region. We are going to demonstrate using sub-action sequences and calling them using the Call External Action, or Subcomponent component, since we could reuse the query we are about to build with different inputs, different database fields used as the columnar values, etc.
The steps to complete this action sequence are :
- Use a Javascript rule, and inputs from our parent action sequence to build a SQL statement that will aggregate our measures as we want and build our cross tab dataset.
- Execute the previous query and return a resultset we can eventually pass to a Pentaho report.
And here's how we do it in the Design Studio:
- In our CrossTabSetup action sequence, we need to add two more string inputs, to use as variables in generating our new query.
- Create a string input named row_name, with a Default Value of "REGION".
- Create a string input named row_from, with a Default Value of "FROM QUADRANT_ACTUALS GROUP BY REGION ". Save the action sequence.
- Create a new action sequence using the Action Sequence Wizard (main menu | BI Platform | Create Action Sequence), placing it in the same container as our first action sequence, and naming it CrossTabQuery.xaction.
- Fill in the General information using the %variable placeholders as we did for the first action sequence.
- Create a CrossTabQuery.properties file and fill in the content with the values below:
title=Cross tab Query Generation
description=This will generate a cross tab query for SQL that can be used as a subComponent or Standalone to create your query for you.
help=This action sequence requires 6 inputs: jndiName, col_name, col_value, columns, row_name and row_from. - Switch to the Define Process tab.
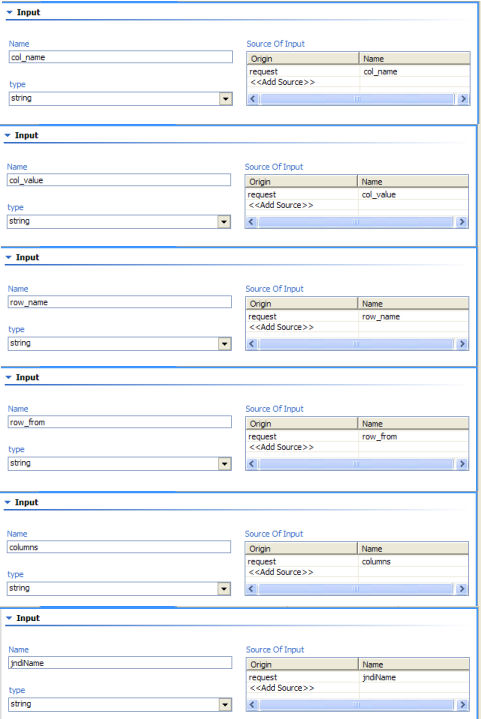
- Create the following string inputs, with no default values. These inputs will be populated from the CrossTabSetup once we hook the two action sequences together. This is made possible by specifying the source of the input as "request" with the source name that matches the input in the CrossTabSetup action sequence. This should get populated this way by default, but it doesn't hurt to double check with the screenshots below.
- col_name
- col_value
- row_from
- row_name
- columns
- jndiName
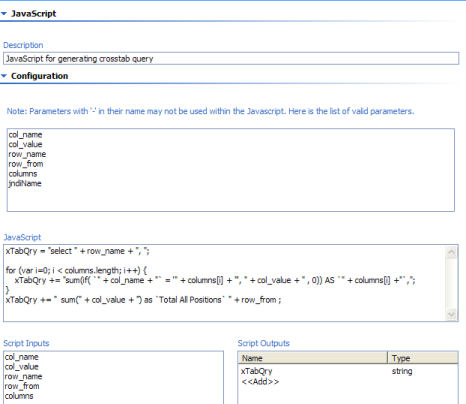
- Next, we will use a Javascript Rule component to craft our query. In the Process box, right-click and select Javascript.
- Enter "JavaScript for generating cross tab query" as the action description.
- Drag the following inputs from the Inputs box on the left to the Script Inputs box:
- col_name
- col_value
- columns
- row_from
- row_name
This makes these inputs available to our Javascript.
- Now copy and paste the following Javascript into the Javascript box:
xTabQry = "select " + row_name + ", "; for (var i=0; i < columns.length; i++) { xTabQry \+= "sum(if( `" + col_name + "` = '" + columns\[i\] + "', " + col_value + " , 0)) AS `" + columns\[i\] \+"`,"; } xTabQry \+= " sum(" + col_value + ") as `Total All Positions` " + row_from ; - In the Script Outputs box, put the xTabQry variable from your Javascript as a string output. This string will hold the entire derived query for our cross tab
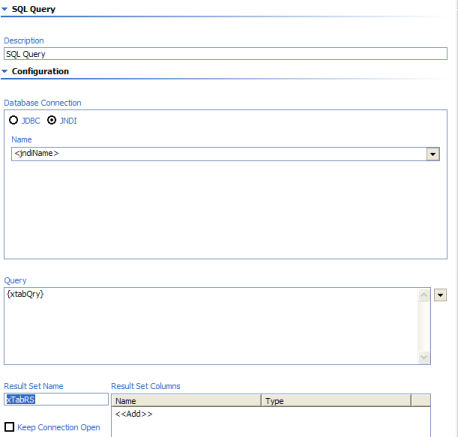
- We're in the home stretch now! Our next step is to add a SQL Query action that will execute the query we just generated. So in the Process box, right-click and add a Query | SQL Query action.
- In the Database Connection space, choose the JNDI radio button, and select <jndiName> as the JNDI name.
- In the Query box, enter {xTabQry} - the output from our previous action.
- In the Resultset Name, enter xTabRS. This is our final dataset that we will send to our report (covered in the next article; I think this one has gotten long enough!).
- Drag the output (xTabRS) from the SQL Query in the Process box to the Outputs box at the bottom of the screen. Save the action sequence.
- Our final step is to hook our CrossTabQuery action sequence into our CrossTabSetup action sequence.
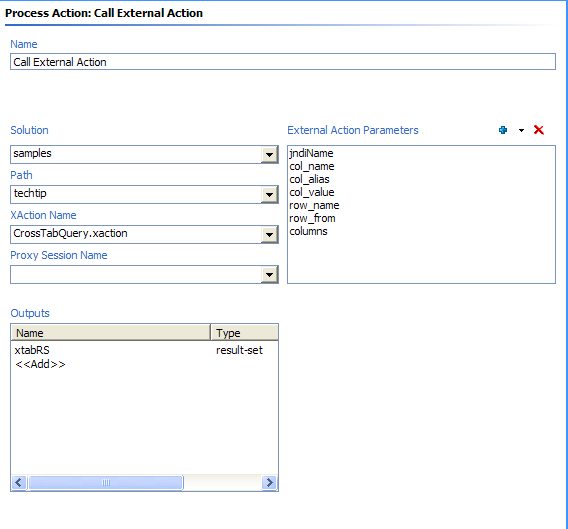
- In the CrossTabSetup action sequence, we need to add one more action in the Process Box - an External Action. Right-click in the Process box and select the Call External Action component. In the External Action form, enter the following information:
- Solution: samples
- Path: /techTip
- XAction Name: CrossTabQuery.xaction
- Now we need to tell the CrossTabSetup what the inputs and outputs of the call to the External Action is. The inputs are the bits of the query that we defined in string inputs early on. The output is the xTabRS resultset, so that we can use it as the output of the CrossTabSetup action sequence.
NOTE: There is a bug in some early RC1 builds of the Design Studio that prevent you from adding inputs and outputs to external action calls. If you see a box labeled "External Action Parameters" on the External Action form then you are NOT affected. If you do not see the box then proceed to step 22.
Right click and add: jndiName, col_name, col_alias, col_value, row_name, row_from and columns to the External Action Parameters box. These parameters will be given to CrossTabQuery.xaction as inputs. The names of the inputs must match the names selected here.
Right click and add: xtabRS under the Name column in the Outputs box and select result-set for the type. This parameter is returned from the outputs of CrossTabQuery.xaction. This name must match the name of the output and case is important.
- If you experienced the bug mentioned in step 21, you have to hand edit the XML in this step, otherwise, skip to step 23.
- Switch to the XML source tab of the CrossTabSetup action sequence.
- Search for the node <component-name>SubActionComponent</component-name>.
- Add the following XML directly under that node :
<action-inputs>
   <col_name type="string"/>
   <col_alias type="string"/>
   <col_value type="string"/>
   <row_name type="string"/>
   <row_from type="string"/>
   <columns type="string"/>
   <jndiName type="string"/>
</action-inputs>
<action-outputs>
   <xtabRS type="result-set"/>
</action-outputs>
- Switch back to the Design process tab, and you should see xTabRS as the output for the Call External Action in the Process box.
- Drag the xTabRS output from the Process box to the action sequence Outputs box. If there are any residual outputs from previous testing in the Outputs box, remove them now.
Whew!! Now, if all moons are aligned, we should be able to test our action sequence and see our cross tab data. Let's give it a try. A word of warning, don't be discouraged if you get an exception the first test run through. I had to go back and clean up a couple of typos before my action sequence took off. If you don't get any hints from the stack trace on the screen (in Design Studio or the server console), check the JBoss log files under <pentaho-pci-root>/jboss/server/logs/server.log. You can get more detailed debug information there.
Follow the same process described above to test our CrossTabSetup solution to this point. If all is well, you should get your prompt page, then see the results of our cross tab query printed to the screen.

Now, test again and select a different number of positions. You should see the number of columns in the dataset change.
You can download the solution files for this article here.
In our next tech tip article, we will continue with Nic's example and use the generated resultset from this tip and hand it to a dynamically generated report spec, to create a Pentaho report that allows a variable number of columns, dynamically generated report name, nice output names for external files and other goodies! Stay Tuned..