The IF Statement and PREPARE - Building Flexible, Secure and Scalable Solutions
October 11, 2006
Submitted by Marc Batchelor and Doug Moran, Pentaho Team Developer
This tech tip introduces a couple of key features in an action sequence that will help Pentaho platform users build more flexible, secure and scalable solutions.
The first feature we'll talk about is the {PREPARE:} option in the SQLLookupRule component. The {PREPARE:} option is a much more robust and secure replacement for using replaceable parameters in a SQL statement.
The second feature we'll cover is the IF Statement component, which allows you to conditionally execute one or more actions defined in an action sequence.
So, one final word of caution before we get started. This article requires that you retrieve the latest nightly build of both the Pentaho Design Studio and the PCI. The nightly builds can at times be problematic or just plain broken. They are built specifically to test what has been broken (or fixed) due to code added since the previous nightly build. That being said, we are in a release candidate cycle where we are very careful not to break the builds. If you are faint of heart or just commonly annoyed with temperamental software, you will be better off waiting until our RC3 release candidate is out, due sometime in the next week or so, before you try out this tech tip. If you are the adventurous sort, we encourage you to try this stuff, and are eager to get as many hands testing these new features as possible.
Prepare Versus SQL Parameter Replacement
In many cases, when creating a Pentaho solution, you will want to be able to specify parts of an SQL query dynamically. For example, our samples have many places where we use a prompt (secure filter component) to allow the user to select a Region, then use the selected region value in the where clause of a SQLLookupRule component. The SQL for that example would look something like this:
select * from quadrant_actuals where region = '{REGION_VAR}'
While this works fine on the "happy path", there are a couple of problems with this technique. The first and arguably the biggest problem is that it opens a security hole. If you do not use a secure filter component to be absolutely sure that the value for {REGION_VAR} is coming from a source that you have qualified, then your data can be compromized by a SQL injection attack. The second problem is the syntax used above favors strings, but does not account for date or numeric values.
This is where the prepare feature comes in. By using the PREPARE: prefix on your parameters, you instruct the platform to process this SQL query using a prepared statement. This is different from the original example because in the first example, the SQL string was pre-processed and handed to the SQL processor already built. Which is fine, if you have made sure to protect your parameters using a secure filter component. But sometimes that is not a viable option, as is the case where you want to report on three customers and the list of customers is over 200,000 records. In this instance, you use the PREPARE: option and your Customer parameter is protected. No rogue statements can be injected, and only where clause parameter values can be passed in to the SQL query. Here's what the prepare option looks like:
select * from quadrant_actuals where region = {PREPARE: REGION_VAR}
Note that PREPARE must be all uppercase, and there should be no spaces on either side of the colon.
This also eliminates the data type syntax issue. Notice that there are no quotes around the PREPARE parameters. Again, the platform knows to build this SQL as a prepared statement, so the parameter values are passed to the SQL processor at runtime and the data types are determined at that time. No predetermined type limitations due to syntax restrictions.
Let's build a small action sequence and watch the prepare option in action.
Resources Before You Get Started
The following software is what I used to build out this article. I highly recommend you set up these pieces in your environment before you get started. While it may seem like a bit of work, each project has a very simple install and setup.
- Pentaho Design Studio (PDS), the latest nightly build. As of today, that would be 1.2.0.275 RC3.
- Pentaho Pre-configured Installation (PCI) running locally, and the hypersonic database running locally with the SampleData database, the latest nightly build. As of today, that would be 1.2.0.456 RC3.
Visit http://community.pentaho.orgfor instructions on how to get the specific (or the latest) nightly builds of any of the Pentaho projects.
You can also download the solution to this article to follow along if you like, although the article will step through creating each of these files.
Let's get started!
Step-By-Step
As I mentioned in the "Resources.." section, it's important at this point that you have the PCI, and the Pentaho Design Studio installed and ready to run somewhere on your computer. If you have any questions on how to set these things up, they all have installation and user guides located at http://www.pentaho.org/download/latest.html. From here forward I will assume you have the necessary tools for the exercise.
Creating the Sample Solutions Project in Design Studio
The first thing we need to do is set up the Design Studio so that we can work and debug directly from the sample solutions that come with the PCI. (If you want to use your own solution directories, that's fine too, just modify the following steps to accommodate your structure).
- Open the Pentaho Design Studio. From the main menu, choose File | New Project | Simple Project.
- The wizard walks you through setting up your project. When prompted for the location of your project files, uncheck the "use default" checkbox, and enter the path to the PCI sample solutions directory, usually located at/pentaho-solutions. Name your project something you like; I named mine gretchens_solution.
- Click the Finish button, and you are all set. You can now work on our new action sequence in the Design Studio.
Creating the Action Sequence
- Let's create a brand new container (folder) for our action sequence. In your project root (hereby referred to as, under the samples directory, create a new folder called techtip.
- Next, from the main menu, choose BI Platform | New Action Sequence... You will get a dialog prompt. Enter the following information into the dialog (replacing with the name of your project, of course!):
- Container: //samples/techtip
- Filename: prepare_techtip.xaction
- template: blank
- You should now see an empty shell action sequence. On the General tab, fill in some of the basic information for the action sequence. I set the following values:
- Title: "PREPARE and the IF Statement"
- Description: "Demonstrates use of the PREPARE option in the SQLLookupRule and the IF Statement"
Defining the Process
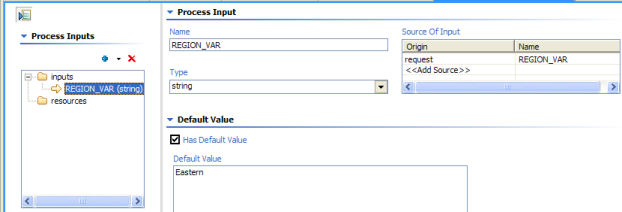
- In the Process Inputs section, define a string input named REGION_VAR, and set the default string value to 'Eastern'.
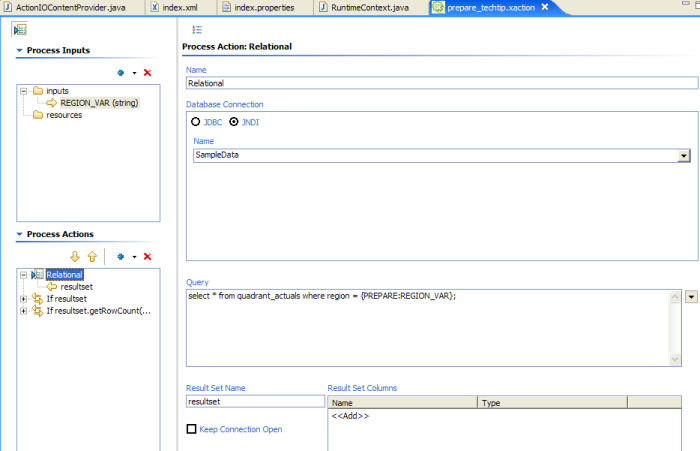
- In the Process Action section, add a SQLLookupRule, by clicking the plus sign, and choosing Get Data From => Relational.
- Select the Relational component you just created. You should see the Component panel on the right hand side where you can set the values for the component.
- For the Database Connection, choose JNDI, and enter the string SampleData.
- For the Query, enter the following string:
#And finally, for the Result Set Name, change the value to resultset.
select * from quadrant_actuals where region = {PREPARE:REGION_VAR}
- In the Process Outputs section, drag the resultset output from the Relational component to the Outputs section.
That's all there is to it, not very different from the queries you have been using all along, but alot more secure, and flexible! Let's test what we have so far:
- Make sure that your PCI server is up and running.
- Switch from the Define Process tab to the Test tab in Design Studio .These tabs are at the bottom of the form/editor view.
- At the top of the Test screen, you should see the URL to your PCI server. If you are not sure whether that is the correct URL, click the Test Server button. If you # then see the PCI home page, then the server URL is correct.
- Click the Generate URL button. This should generate the URL needed for testing your action sequence.
- Last, click the run button at the end of the URL location text box. If all is good, you should see results similar to the following:
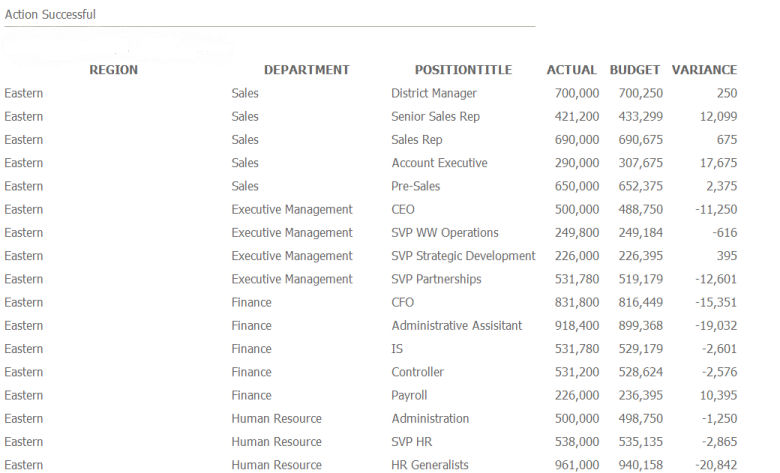
You see that the output is pretty much what was expected. The power behind the PREPARE is knowing that the parameters you have defined are safe, and that it's simple to use the same syntax for a number or a date/time field in the database.
The IF Statement
I wanted to take this opportunity to demonstrate another very powerful feature, the IF statement. The IF statement is an intuitive conditional component. When the condition you specify evaluates to true, any actions associated with the IF statement are executed. The powerful part is in the evaluation of the conditional statement. A condition evaluates to true under the following circumstances:
- the condition evaluates to a boolean true
- the condition evaluates to a string with the value 'true" or "yes", case-insensitive
- the condition evaluates to an integer greater than zero
- the condition is a resultset that has at least one row in it
Let's try it out in our action sequence.
- In the Process Action section, add an If Statement component by clicking the plus sign and choosing If Statement.
- Select the If Statement component you just created. You should see the Component panel on the right hand side where you can set the values for the component.
- Set the condition to resultset.
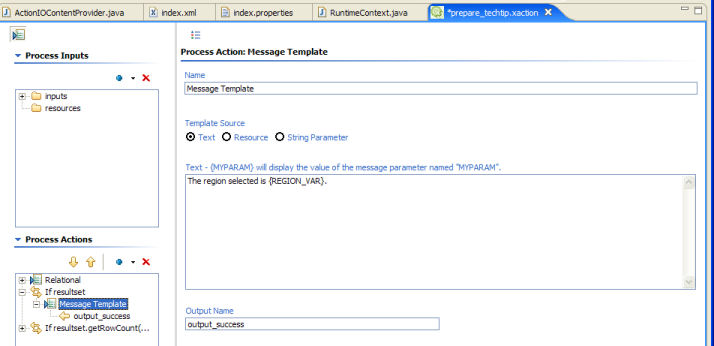
- Add a MessageTemplate component, as a child of the If statement.
- The template source should be text. Add the following message in the text box:
The region selected is {REGION_VAR}.
- In the Output Name, enter output_success.
- Drag the output_success output to the Process Outputs section.
- Save and test your action sequence. You should see a screen similar to the following:
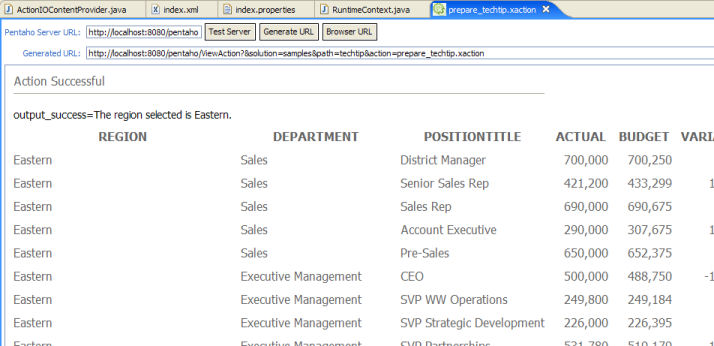
What we have coded here is "If the resultset has data, display the message "The selected region is Eastern"" . It is simply a matter of adding another If Statement component to display a different message if the resultset is empty. I encourage you the reader to extend the solution to display "The region {REGION_VAR} is invalid" if the resultset is empty. I will give you a hint - while much of our syntax is Java or JavaScript based in nature, the (!resultset) syntax will not work for this task. You must evaluate the resultset row count in order to get the right conditional, which looks like
(resultset.getRowCount() == 0).
That's it for today, you can download the solution files for this article here.