Dynamically Generating SQL... And More
June 8, 2006
Submitted by Marc Batchelor, Pentaho Team Developer
Quick Background
Sometimes, it isn't possible to be able to pre-define your query as a resource or an input to report. Sometimes, it becomes necessary to generate your query (whether it's SQL, MDX, or whatever) using a programming language (such as javascript). Examples of this requirement may involve:
- Based on user inputs, a query may require a join to one or more tables
- If there are several optional inputs that effect the way the query is constructed.
What This Tech Tip Demonstrates
This tech tip goes beyond simply demonstrating building a dynamic SQL query in a javascript rule. Here are the highlights:
- Dynamic SQL generation
- Iterating over a result-set in a javascript rule to get the column title based on user input
- Defining a message-field for the column name in a report
- Defining a message-field for the selected region in a report.
Sample Use Case
Instead of just coding up a sample, I wanted to make sure I had a reasonable use case for the technical tip. The use case was:
- Gather user input.
- Based on the users' input, run a query that either returns information on departments, or information on position titles.
- Do this using only one report specification and one action sequence.
Setup and Requirements
Before beginning this tech tip, please make sure you have downloaded and installed the following:
- Report Design Wizard (RDW) version 1.1.6 or later.
- Pentaho Design Studio (PDS) version 1.1.6 or later.
- Pentaho Pre-configured Installation (PCI) running locally, and the hypersonic database running locally with the SampleData database, version 1.1.6 or later.
Query Analysis
This action sequence will compose the following queries:
If the user selects the department report, the query will look like this:
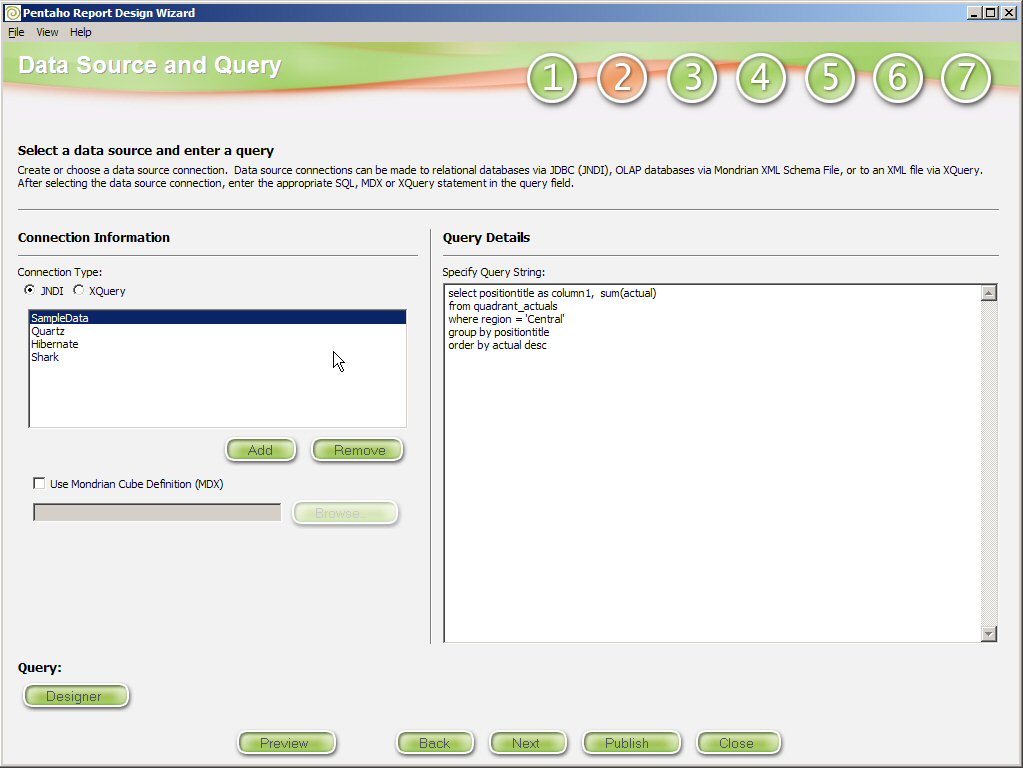
select department as column1, sum(actual) from quadrant_actuals where region = '{region}' group by department order by actual desc
If the user selects the position report, the query will look like this:
select positiontitle as column1, sum(actual) from quadrant_actuals where region = '{region}' group by positiontitle order by actual desc
Note that in both cases, the first column is selected and renamed as column1. This is an important thing to note because when the report is built using the Report Design Wizard, column1 will be the column that's used for getting at the data.
Building the Report Using the Report Design Wizard
For the purposes of laying out a quick report, it doesn't matter which query we choose - the result will be the same. The following screenshots walk you through the steps and options to choose in the Report Design Wizard.
Run the Report Design Wizard ( execute the reportwizard.bat|.sh file). (If you are not familiar with the Report Design Wizard, review the Report Design Wizard User's Guide before going forward.)
Important Note
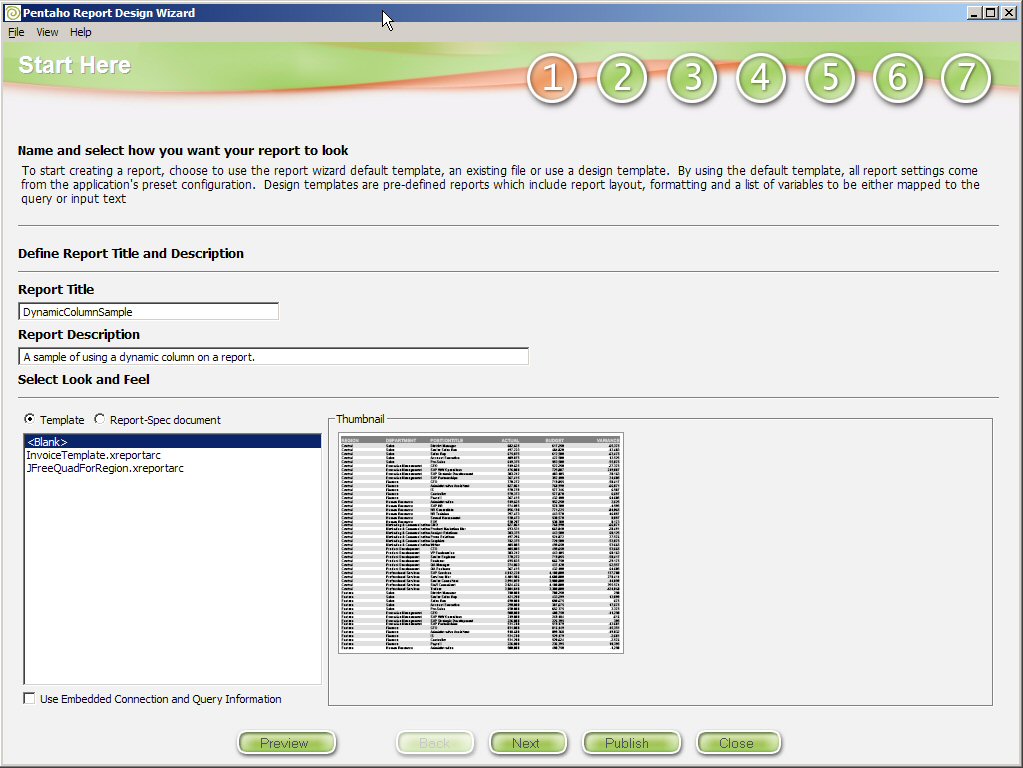
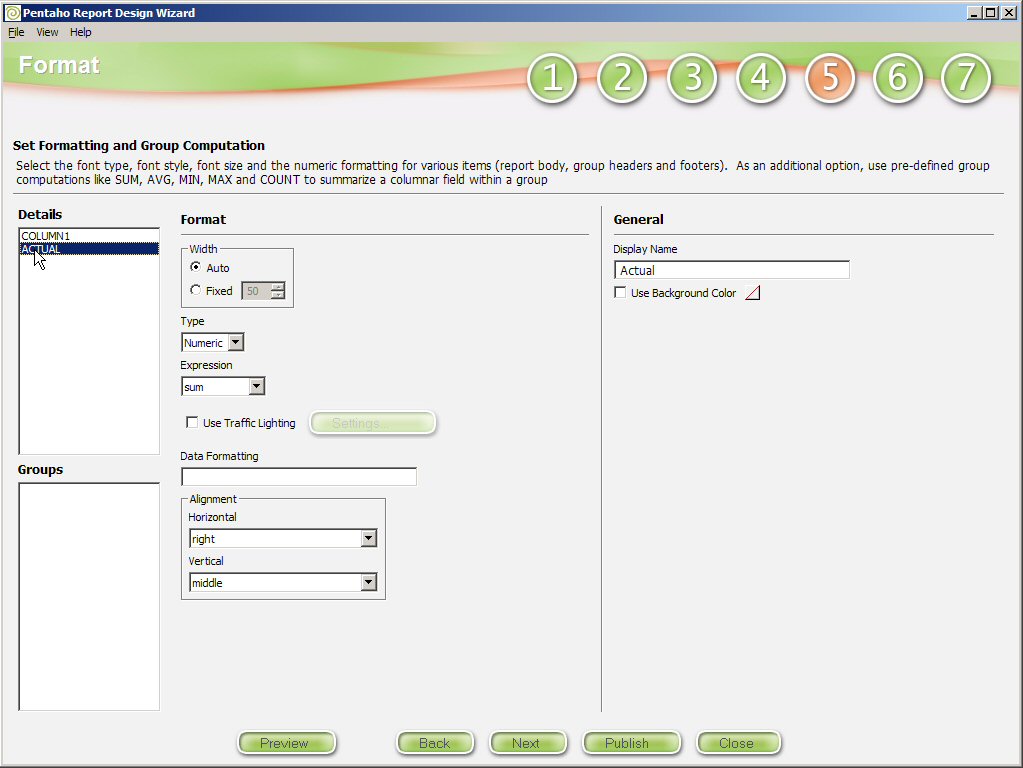
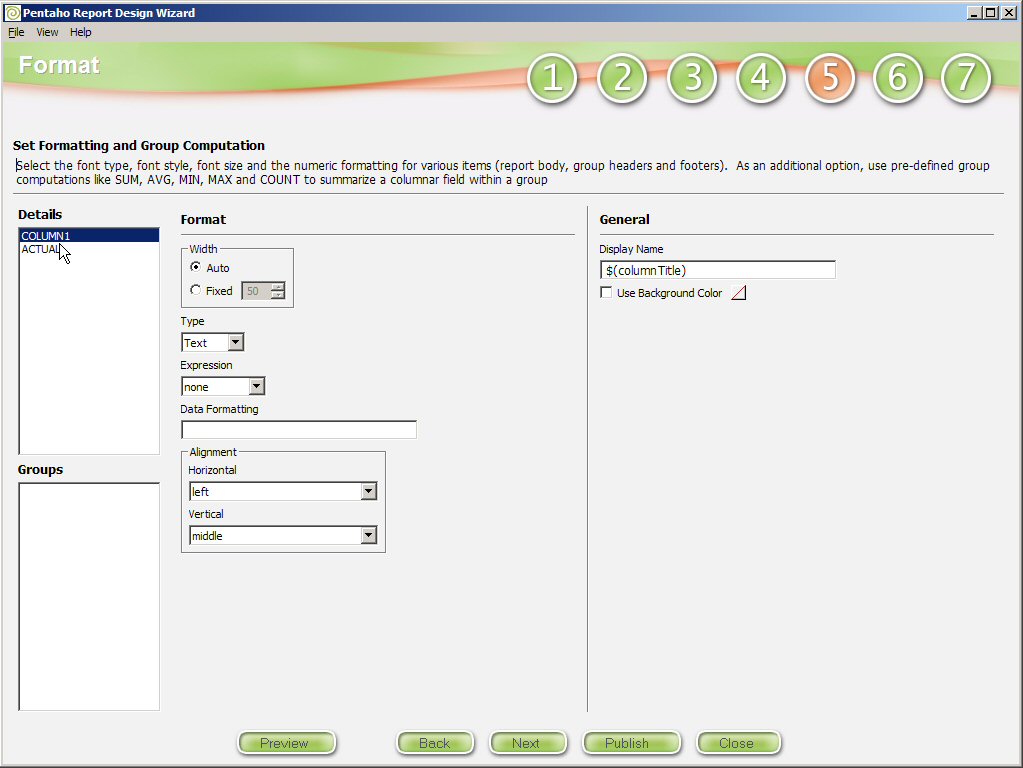
In Step 5, "Describing Column1", you'll note that the display name was set to $(columnTitle). In Step 5, "Describing Actual", you'll see the display name is set to Actual. This is the only change we will make to this report definition.
Otherwise, the report defaults were used to generate this simple report.
STEP 1: Report Title and Description
STEP 2: Select a Datasource and Query
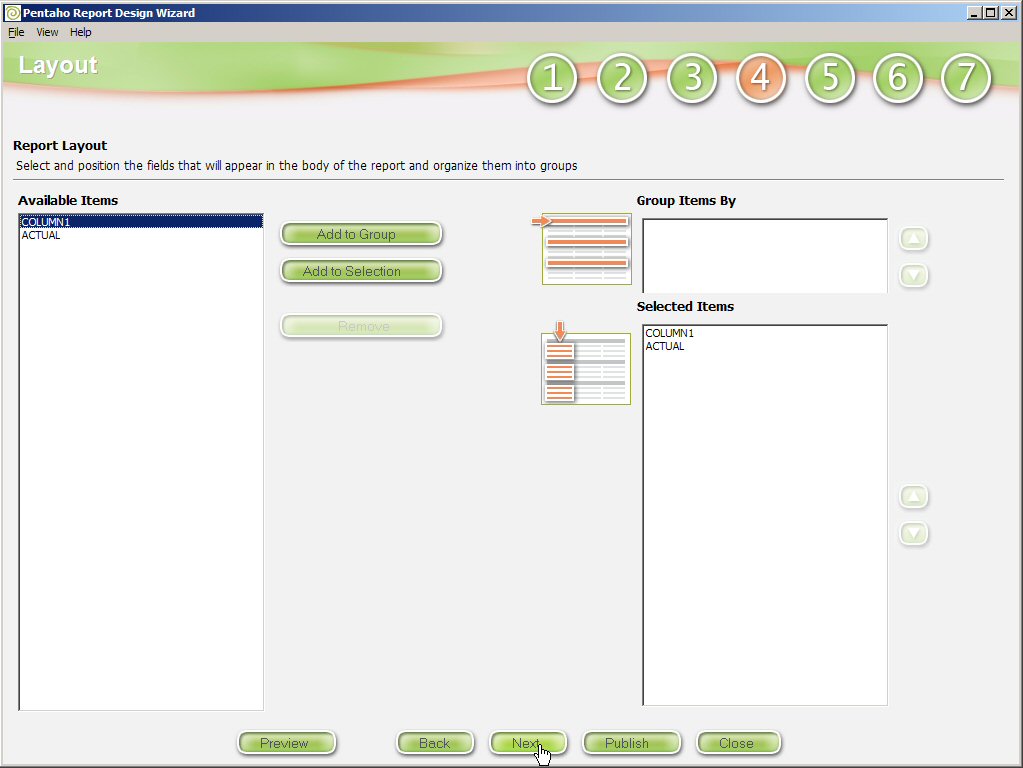
STEP 4: Report Layout
STEP 5: Describing Actual
STEP 5: Describing Column1
STEP 6: Page Setup
STEP 7: Advanced Options
Modifying the report XML
To modify the report to be able to handle the incoming region (for the title) and the substitution of the incoming column title, you could use the Report Designer (not the Report Design Wizard, but our new offering), or you can simply directly modify the report XML document. I'm choosing the latter because the changes are small for this example.
This AraxisMerge image shows the before (on the left) and the after (on the right). The overview of the changes are as follows:
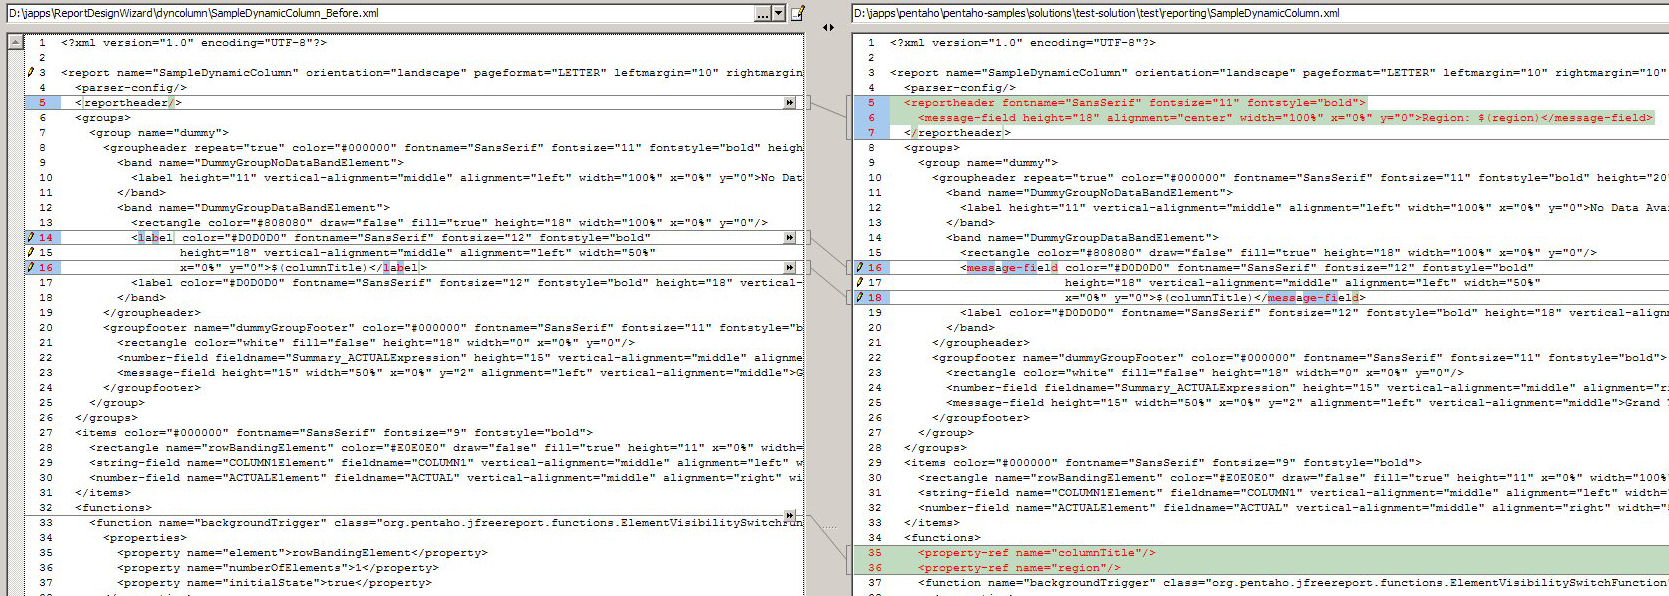
- Add a report header that displays the region;
- Change the field type for the column header from label to message-field;
- And create property references for the incoming parameters.
Adding the Report Header
To add the report header, either type, or paste in the following XML fragment over the existing <reportheader/> line in the XML document:
<reportheader fontname="SansSerif" fontsize="11" fontstyle="bold">
<message-field height="18" alignment="center" width="100%" x="0%" y="0">Region: $(region)</message-field>
</reportheader>
Changing the Field Type
Why would we want to change the field type? Well, in JFreeReport, a label is simple text. A message-field will do evaluation on the parameters. For this example, we want to evaluate the value of the column header parameter, and display that value. The new field looks like this:
<message-field color="#D0D0D0" fontname="SansSerif" fontsize="12" fontstyle="bold" height="18" vertical-alignment="middle" alignment="left" width="50%" x="0%" y="0">$(columnTitle)</message-field>
Adding the Property References
Before JFreeReport can use the incoming parameters, they must have a property-ref entry in the <functions> section.
<property-ref name="columnTitle"/>
<property-ref name="region"/>
Publish the Report to the Pentaho Pre-configured Installation
That's it. Now, we want to publish our report to the local Pre-configured Installation, with a starter action sequence.
- From the File menu, select Publish | To Location....
- You will be prompted with a file system navigation dialog. Navigate to the <Pre-configured Installation root>/pentaho-solutions/samples/reporting directory.
- Select OK, and the report definition along with a starter action sequence file will be generated in that directory.
Finishing the Action Sequence Using the Pentaho Design Studio
The action sequence that is generated from the Report Design Wizard only sets up the step to run the report we just created. We need to add a few steps to the action sequence to achieve our goal:
- We need to add a SecureFilterParameter component, which provides the ability to prompt the user for the dynamic values in our report (which region, which column we would like in the query (department or position), and report output format (pdf, xls, or html)).
- We need to add a Javascript rule that will accept the query column parameter and the region parameter from the SecureFilterParameter component, and builld them into our report query.
- We need to add a Javascript rule that will use the query resultset to find the title to use on the dynamic column in our report, Position Title or Department.
- Finally, we need to stitch up the report component to use our newly defined parameters and dynamic query.
We'll use the Pentaho Design Studio to fill out our action sequence. If you are not familiar with the Pentaho Design Studio or action sequences, take time now to review the Pentaho Design Studio User's Guide and Creating Pentaho Solutions Guide. Both can be found on our downloads site.
- Start the Pentaho Design Studio.
- The easiest way to work on your new action sequence is to have the pentaho-solutions directory (under the Pre-configured Installation root) set up as a Simple Eclipse Project. From the File menu, choose New... | Project.
- In the dialog, choose the Simple option in the list, then Project. Click the Next button.
- Name your project TechTipSolution, uncheck the "use Default" option, and Browse to the <Pre-configured Installation>/pentaho-solutions directory on your local machine. Click the Next button.
- Click Finish. You should have a new Eclipse project named TechTipSolution in your Navigator view.
- Navigate to <Pre-configured Installation root>/pentaho-solutions/samples/reporting directory, and open the .xaction file with the name of your report prefixed. In our example, the file name is DynamicColumnSample.xaction, since DynamicColumnSample is what we named our report in the Report Design Wizard.
Now, we can get to work finishing our action sequence.
General Action Sequence Information
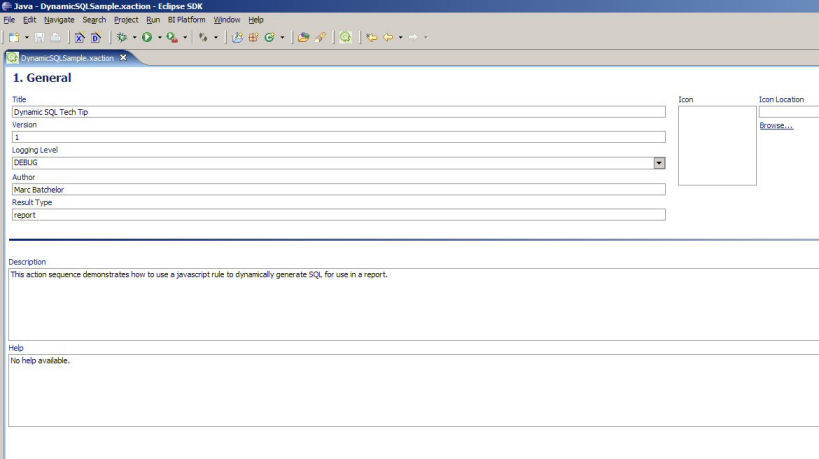
- The first screen displayed is the General information about your action sequence. The fields are pretty self explanatory, fill in this information for your action sequence.
Define Inputs
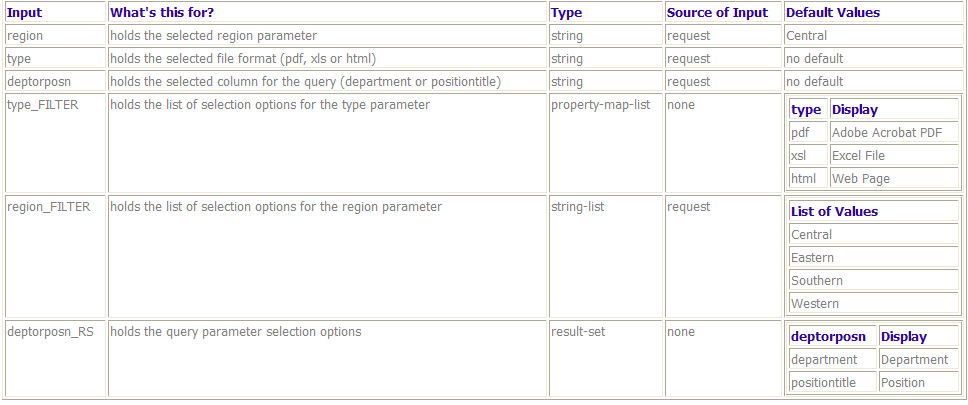
- For each parameter, we need an input to hold the list of possible values as well as an input to hold the selected value. Define the following inputs for your action sequence:
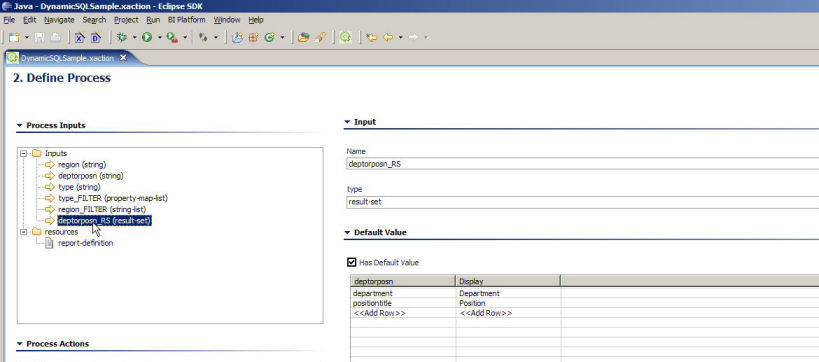
Define Processes
Our next step is to define the actions, or processes, in the action sequence that we outlined above.
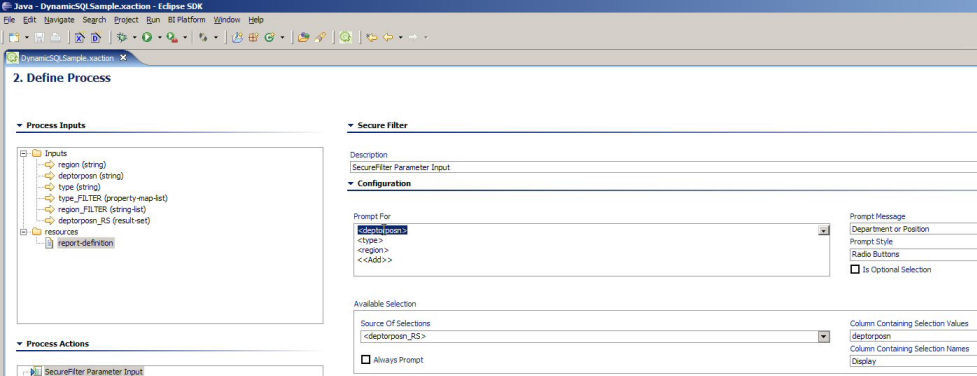
- The first action we will define uses the SecureFilterComponent to describe the parameters that we want to prompt a user of our action sequence to fill in.
- Right-click on the Process Actions box on the left hand side of the pane and select Add | Secure Filter.
- Drag FROM the Process Inputs box to the Prompt For box on the right the inputs region, type and deptorposn.
- Click on the region Input in the Prompt For box. Type in "Region:" for the Prompt Message, Select "Pulldown" as the Prompt Style and select <region_Filter> as the Source of Selections. Leave the Column Containing... fields blank, they are not needed for this input.
- Click on the type Input in the Prompt For box. Type in "Report Format:" for the Prompt Message, Select "Pulldown" as the Prompt Style and select <type_FILTER> as the Source of Selections. Column Containing Selection Values should be "type", Column Containiing Selection Names should be "Display". You should have defined the names of these columns when you set up the Inputs, refer back to the type_FILTER input of you don't make this connection, its an important one!
- Click on the deptorposn Input in the Prompt For box. Type in "Department or Position :" for the Prompt Message, Select "Radio Buttons" as the Prompt Style and select <deptorposn_RS> as the Source of Selections. Column Containing Selection Values should be "deptorposn", Column Containiing Selection Names should be "Display". You should have defined the names of these columns when you set up the Inputs, refer back to the deptorposn_RS input of you don't make this connection, its an important one!
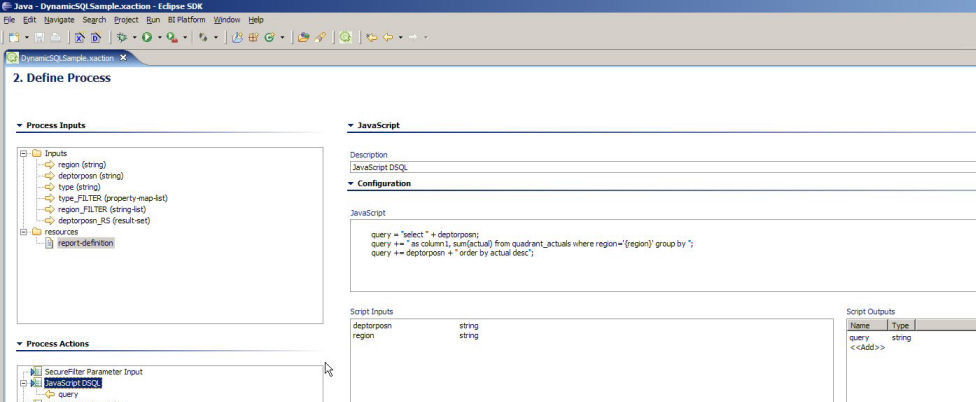
- Next we will define the Javascript rule for our query. Right-click on the Process Actions box on the left hand side of the pane and select Add | Javascript.
- In the Javascript box, enter the following Javascript:
query = "select " + deptorposn; query += " as column1, sum(actual) from quadrant_actuals where region='{region}' group by "; query += deptorposn + " order by actual desc"; - Drag FROM the Process Inputs box to the Script Inputs box on the right the inputs region and deptorposn.
- In the Script Outputs box, enter an output named "query" with a type of "string ".
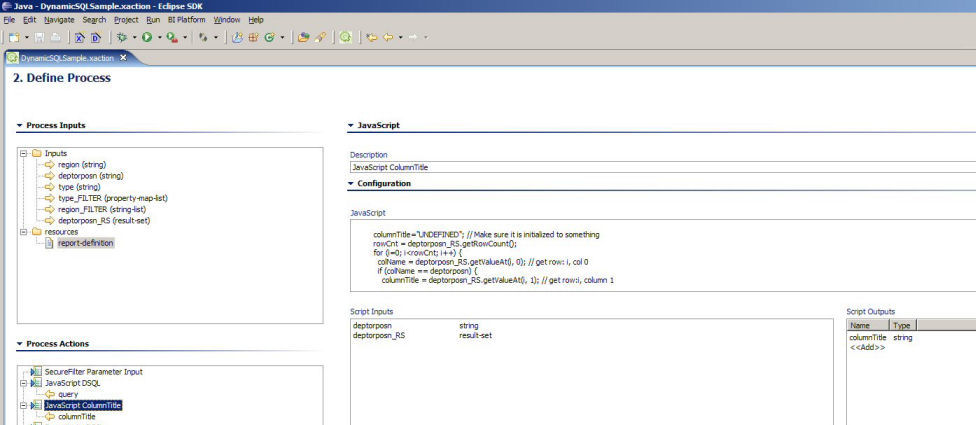
- The last new action we need to define is the Javascript rule for looking up the name of the dynamic column. Right-click on the Process Actions box on the left hand side of the pane and select Add | Javascript.
- In the Javascript box, enter the following Javascript:
columnTitle="UNDEFINED"; // Make sure it is initialized to something rowCnt = deptorposn_RS.getRowCount(); for (i=0; i < rowCnt; i++) { colName = deptorposn_RS.getValueAt(i, 0); // get row: i, col 0 if (colName == deptorposn) { columnTitle = deptorposn_RS.getValueAt(i, 1); // get row:i, column 1 break; } } - Drag FROM the Process Inputs box to the Script Inputs box on the right the inputs region deptorposn_RS, and deptorposn.
- In the Script Outputs box, enter an output named "columnTitle" with a type of "string ".
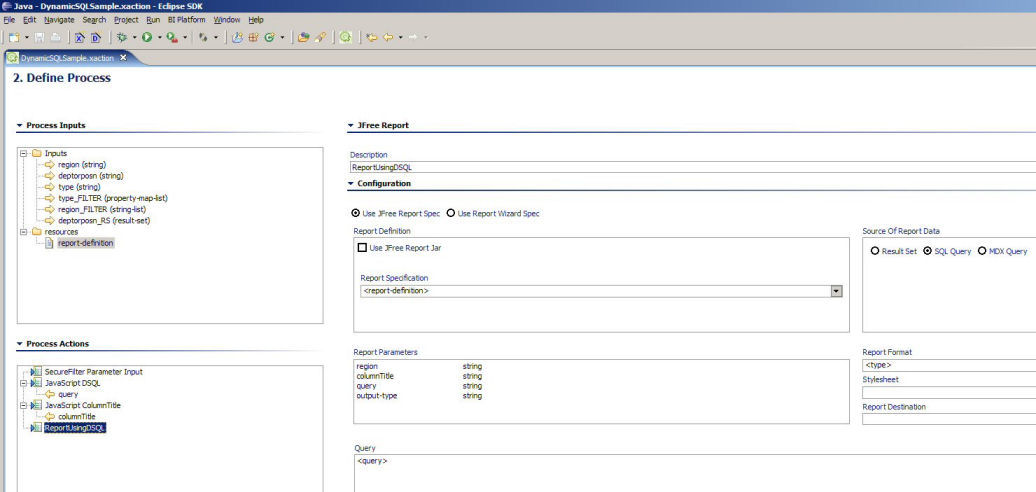
- And finally, a little twddling of our report action definition, as we will be ready to test our solution. Click on the report action in the Process Actions box.
- Drag FROM the Process Inputs box to the Report Parameters box on the right the inputs region and type.
- Drag FROM the Process Actions box (under the query Javascript action) to the Report Parameters box on the right the output query.
- Drag FROM the Process Actions box (under the column title Javascript action) to the Report Parameters box on the right the output columnTitle.
- Make sure that <type> is selected in the Report Format pulldown.
- In the Query box on the right, delete the query and replace it with <query> .
Testing the Action Sequence
You have the ability to test the action sequence directly from the Pentaho Design Studio.
- First, make sure your Pre-configured Installation is up and running. If you don't know how to get it started, or are unsure as to whether it's already running, see the Pentaho Getting Started Guide for how to successfully start the server.
- Next make sure that the solution folders you are using with the Pre-configured Installation contains your new solution.
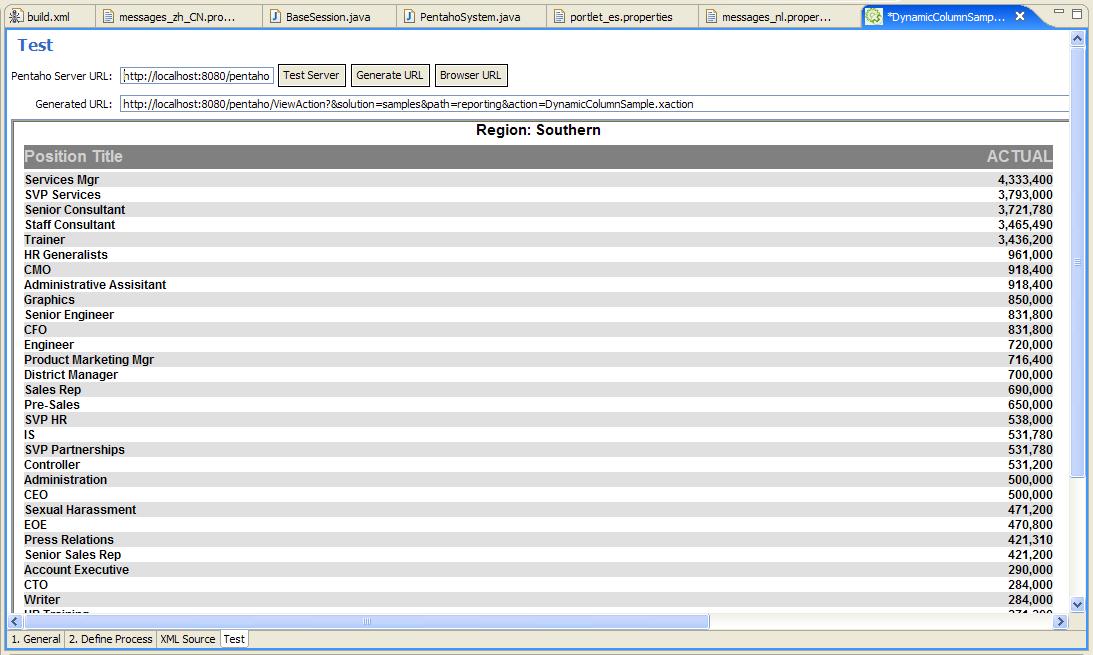
- Switch to the Test tab of the Action Sequence Editor. Verify that the "Server URL" at the top of the page is indeed the URL to your Pre-configured Installation by clicking the "Test Server" button. You will see see the home page of the Pre-configured Installation if all is operating properly.
- You should see the URL for the action sequence we want to test in the textbox labeled "Generated URL". Just after that text box is a "Run" button.
- Click the "Run" button to test your action sequence. You should see the prompt page asking for the report parameters. Select values for each parameter, and click Submit to view your report.
Should you encounter any problems or if you just want to peruse the solution, you can find the all of the files for this exercise here.