Localizing a Pentaho Report
July 13, 2006
Submitted by Mike D'Amour, Pentaho Team Developer
With our next GA release coming up, I thought it would be good to get some internationalization expertise into the hands of the community.
For all of you interested in localizing the Pentaho Open BI Suite, you should read the Pentaho Internationalization Guide, which is a detailed how-to on translating the platform from the our demo. This guide is also a great place to start if you are a beginner at translating Java applications. This article assumes some familiarity with resource bundles and Java internationalization.
The content we are discussing here is specific to Pentaho Reports, previously JFreeReport. I will walk you through the process of creating a simple report with the Report Design Wizard, publishing that report to the Pentaho demo, then localizing the report to German. When I say "localize the report", I mean I will demonstrate localizing the display labels in the report.
I will forewarn you that this task is an exercise in manually editing the Pentaho Reports XML file. But with attention to detail and a little care, this should not be a difficult exercise!
Resources Before You Get Started
Before you dive in, be sure you have the following resources.
- Pentaho Pre-configured Installation, RC1, version 1.2 or later
- Pentaho Quick Start Guide, RC1, version 1.2 or later
- Pentaho Report Design Wizard, RC1, version 1.2 or later
- Pentaho Report Design Wizard User's Guide, RC1, version 1.2 or later
Step By Step
If you are not familiar yet with our demo, or the Report Design Wizard, then you will want to review the guides listed above before trying to follow along with this technical article.
First up, let's create a simple Pentaho Report from the PCI demo's sample data, so we have a report to work with.
Create the Pentaho Report
- Unzip the PCI demo to a working locaton on your computer.
- Start the PCI demo by executing the start-pentaho.bat|.sh file in the root directory of the demo. If you have any trouble with this, such as conflicting ports or JBoss conflicts, see the Quick Start Guide to help you through. This step will also startup the sample HSQLDB database, which contains the data that we will be using in this article.
- Unzip the Report Design Wizard to a working location on your computer.
- Start the Report Design Wizard by executing the reportwizard.bat|.sh file in the root directory of the Design Wizard install.
- Wizard Step 1: Name your report, give it a description and choose the <BLANK> template as your starting point.
- Wizard Step 2: Using a JNDI connection to the SampleData database, enter the following query into the Query Details box:
SELECT * FROM QUADRANT_ACTUALS ORDER BY REGION
- Choose Preview. You should see a report that looks similar to the image displayed here.
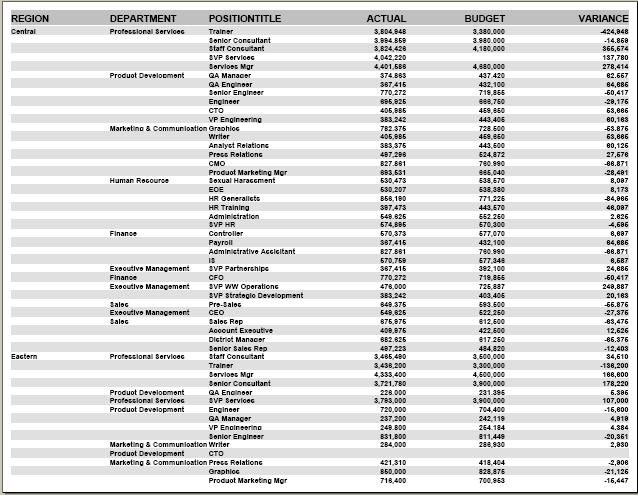
That is all we are going to do with this report in the Wizard. Since we want to demonstrate localization, we do not need to tweak the report features.
Publish the Report to the PCI Demo Server
We want to publish this report to the PCI demo server, so we can test our localization once we have created it.
- From the File... menu in the Report Design Wizard, Select Publish, then To Server... You should see a "Publish Report to Server" dialog.
- Name your report. I named mine Localized_Report.
- The default Publish Location should be "/samples/reporting". Leave the default value for Publish Location.
- Change the Default Report Type to html, just to speed things up a bit.
- Under JBoss Deployment Settings, uncheck "Create JBoss Datasource", since we are using the sample data that already has a JBoss datasource defined.
- If you installed the PCI on your local machine, with no changes to the port, then the default "Web Publish URL" should be fine. If you installed the demo remotely or had to change the port, make the necessary changes to the Web Publish URL now.
- Make sure that your PCI demo is up and running! The server needs to be running to complete the publish!
- Select OK when you are done.
Congratulations, your report is now published to the PCI demo server. Let's go check it out.
Viewing the Published Report
- Navigate to the URL of your PCI demo. The URL of a locally installed demo with no port or name changes is http://localhost:8080/pentaho. If this is not the URL of your demo or you are having problems, refer to the Quick Start Guide.
- To view our new report, navigate to the Reporting Samples page, and scroll down until you find the hyperlink with the name of your report.
- Click that link, and the report we saw in the Preview step above should be displayed.
Localizing the Report
Finally, the good part! I want to localize my report to German. The general steps to localizing the report are
- Change any labels in the report XML definition to resource-labels.
- Add the necessary string resources to the properties file (also known as a resource bundle).
- Create our German resource bundle from the English one.
It's OK if those steps don't make alot of sense right now; that will improve as we walk through the example.
When we "published" our report to the server, a number of files were created. If you followed the steps above, you should be able to find these files under <pentaho-demo-root>/pentaho-solutions/samples/reporting. The files are:
- localized_report.xml - this is the report definition in XML format
- localized_report.properties - this is the default resource bundle for the report
- localized_report.xaction - this is the action sequence for the report, that tells the server how to run the report.
The first file we care about is the localized_report.xml. We need to change some of the XML so that the report engine knows what strings to look for in our resource bundle instead of directly in the report. We do this by finding any label elements in the XML and changing them to resource-label elements. This changes how the report engine interprets the text in the label (now resource-label) nodes. It now reads that text to be a key in a resource bundle. The report engine will use that key to find the REAL value to use in the report. Let's change one label, and you can see localization in action:
- Open the localized_report.xml file in your favorite text editor.
- Search for the word label. The first one you find should look like this:
<label color="#000000" fontname="SansSerif" fontsize="12" fontstyle="bold" height="18" vertical-alignment="middle" alignment="left" width="16%" x="0%" y="0">REGION</label>
- Change the label element to resource-label, and add the attribute resource-base="". The line should now look like:
<{color:#ff0000}resource-label resource-base="" ...{color} width="16%" x="0%" y="0">REGION</{color:#ff0000}resource-label{color}> - Note that the resource-base attribute will allow you to specify a resource bundle in a different location, but for our purposes, the resource bundle is in the same directory, so specifying it with an empty string is sufficent.
- ALSO NOTE that if you are using Pentaho Reports (the JFreeReport library) standalone OUTSIDE of the Pentaho platform, the resource-base CANNOT be an empty string. A small misalignment in the code that is logged to be fixed.
- Save, but do not close, the localized_report.xml.
Next we need to add REGION to our resource bundle, and give it the display value that we want displayed by default. Let's say oh, "Company Regions" will be the display text we want as default.
- Open the localized_report.properties file.
- Add the following line in the file:
REGION=Company Regions
- Save, but do not close, the file.
Now let's look at what we've accomplished so far.
- Make sure that your PCI demo server is running.
- In your favorite browser, navigate to the PCI demo home page - usually this is http://localhost:8080/pentaho.
- Under the Refresh options, choose the Solution Repository, and click OK to confirm you want to refresh it. This step is how we tell the platform to pick up changes to the solution files.
- Navigate to Reporting Samples, and find your new report.
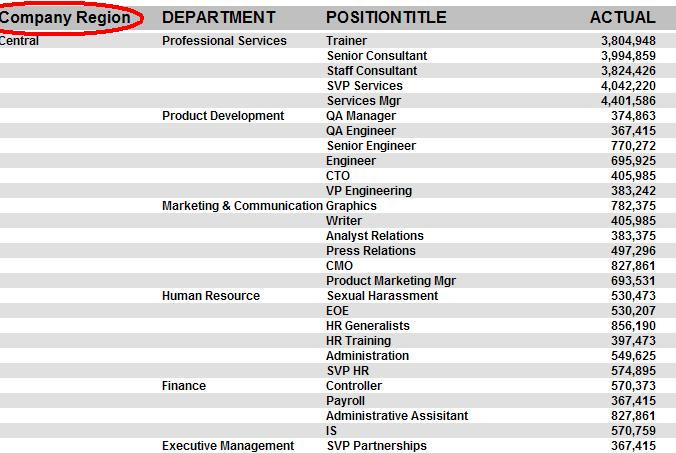
- Click on the link to your new report, and notice that the column label that used to be REGION is now Company Region. The label for that column was read from your resource bundle as a result of our changes. If you only see a dash
 where you should see Company Regions, then go back and check your xml for typos, and make sure that the name REGION you used for the key in your .properties file EXACTLY matches the text in your new resource-label node.
Hopefully, by now, you get the jist of how this works. The final step in localizing the report to German is to create the German resource bundle.
- Save the file localized_report.properties as localized_report_de.properties.
- Open the localized_report_de.properties in your favorite text editor.
- Change the text "Company Region" to "Firma-Region", the German translation (I think - that's what the online translator told me anyway

- Save, but do not close, the localized_report_de.properties file.
- Follow the steps above to refresh the solution repository.
- Change your browser settings to use German as the default language. In Internet Explorer, the option is under Tools|Internet Options|Languages. In Mozilla FireFox, the option is under Tools|Options...|Advanced|Edit Languages.
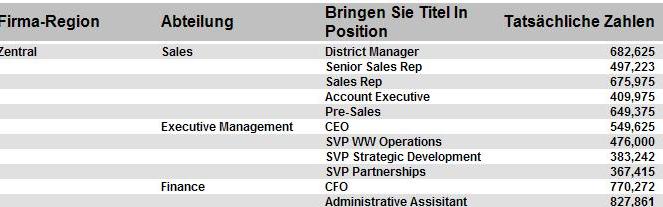
- Navigate to your report, and click the link to launch it. You should now see the German text.
That's all there is to it! I had you leave your files open, so that you can go back and change the rest of the labels to resource-labels, and move the resources to the English and German resource bundles, to complete the exercise. When completed, your report should resemble the following screenshot:
In case you run into any problems, I have included the solution files for this exercise here.