How to Configure Kettle's Spoon for a Pentaho Solution
May 25, 2006
Submitted by James Dixon, Pentaho Chief Geek
This technical tip shows how to configure Kettle so that input files such as XML, CSV and Excel files can be loaded from a Pentaho solution folder.
This is useful for defining transformations that accept one or more input files that will be executed on a server without having to replicate the exact directory structure of the server in order to test your transformations.
We will load a simple XML file that has CD collection data in it, then use an action sequence to display the data in a browser. Not entirely real world complex, but it takes you through the steps so you can use your real data later on.
Resources Before You Get Started
As always, you will want to gather the necessary resources before you start the hands on part of this article. This article's tip will NOT work with PCI (the Pentaho demo) versions PRIOR to release milestone 1.1.6.
- Pentaho Pre-Configured Install, version 1.1.6 build 279 or later
- Pentaho Getting Started Guide, version 1.1.6 build 279 or later
- Kettle, version 2.2.2 or later
- Our sample XML file, the CD collection (cdcollection.xml) - you can download that file here. Use your browser's right-click | Save As... option to right-click on the link and save the this file to your hard drive in a spot you will remember.
In order to keep this tip short and to the point, I'll assume you have a working knowledge of Kettle. It is an intuitive application to use, so if you are not familiar with it, you can get up to speed rather quickly.
We need to accomplish a few different tasks to complete this exercise. First, we must configure Kettle's Spoon, and build our transformation that loads our external file. Then we need to build the action sequence that will execute the transformation. Last, we should test our solution to be sure it's all working as we expect it.
Step-By-Step: How to Build Your Transformation
Edit Spoon's Configuration
- If you haven't yet installed Kettle, do so now. You can find very simple installation instructions here.
- You should have the Pentaho sample solution available on your computer. The sample solution comes bundled in the Pentaho Pre-Configured Install (herein referred to as PCI). If you haven't yet, unzip the PCI to a location on your computer that you will remember. You can use the Getting Started Guide if you need help getting the PCI up and running.
- WINDOWS USERS:
- BEFORE you run any of Kettle applications, open the Spoon.bat file (located in the root of the Kettle install) with your favorite text editor.
- Find the line that reads:
set OPT=-Xmx256m -cp %CLASSPATH% -Djava.library.path=libswt\win32\ -DKETTLE_REPOSITORY="%KETTLE_REPOSITORY%" -DKETTLE_USER="%KETTLE_USER%" -DKETTLE_PASSWORD="%KETTLE_PASSWORD%" - ADD to that line: -Dpentaho.solutionpath= [path to the root of your solution]
- The solution path will be the path to the pentaho-solutions directory in your PCI. For example, if your PCI is installed to d:\pentaho-demo, then your solution path is d:\pentaho-demo\pentaho-solutions\.
- Make sure that your solution path ends with a "\"!
- UNIX and OS X USERS:
- BEFORE you run any of Kettle applications, open the Spoon.sh file (located in the root of the Kettle install) with your favorite text editor.
- Find the line that reads:
OPT="-Xmx256m -cp $CLASSPATH -Djava.library.path=$LIBPATH" - ADD to that line: -Dpentaho.solutionpath= [path to the root of your solution]
- The solution path will be the path to the pentaho-solutions directory in your PCI. For example, if your PCI is installed to /usr/joe/pentaho-demo, then your solution path is /usr/joe/pentaho-demo/pentaho-solutions/.
- Make sure that your solution path ends with a "/"!
- Save and close the configuration file that you just edited.
Create Your Transformation
- Copy the cdcollection.xml file to the following directory under your PCI's solution folders: <pentaho-demo>/pentaho-solutions/samples/etl/cdcollection.xml.
- Launch Kettle's Spoon application using the spoon.bat (Windows users) or the spoon.sh (*nix users) file in the root of the Kettle installation.
- In the tree on the left pane, locate the XML Input step under Base step types | Input. Drag an XML Input step from the tree in the left pane to the right working pane.
- Double-click on the XML Input step in the right working pane to bring up the XML Input step properties dialog.
- Click the Browse button to locate the cdcollection.xml file in the Pentaho solution folders. Once you have selected the file, you will see the path to it in the File textbox.
- Next, we want to substitute the path to the root of the solutions folders with the environment variable pentaho.solutionpath, so when we move this solution to another server (likely in a real world scenario), the path to the data file remains relative to the solution and won't need to be changed. To do this, click on the Variable button. From the popup list, select pentaho.solutionpath. Notice that %%pentaho.solutionpath%% (${pentaho.solutionpath} in *nix) has been prepended to the path to the xml file.
- Now change the path to the xml file so that the %%pentaho.solutionpath%% replaces the root portion of the path to the solution files, and change all backslashes to forward slashes. In our example, the new path would look like this:
%%pentaho.solutionpath%%samples/etl/cdcollection.xml
- We change the slashes because it is safest to use '/' as the file path separator as this text is used by Spoon and the Pentaho server and it will work equally well on Windows and Linux and OS X, whereas '\' will only work on Windows.
- Click the Add button to add the path to your xml file to the Selected Files list.

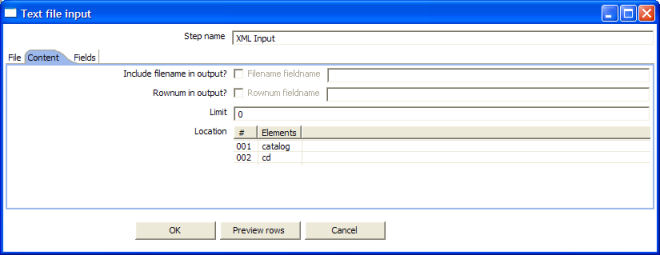
- Switch to the Content tab. Here we want to specify the location of the node in the xml file that represents the repeating data that will become rows of data in our resultset. In the cdcollection.xml file the cd node under the catalog node is the location that represents our repeating data. In the Location list, add the catalog element first, then add the cd element second.
- Switch to the Fields tab. Click the Get Fields button. If all has gone well, you should see the Field list populated with 4 fields - Title1, Artist1, Price1 and Category1.
- Click the Preview Rows button. Your transformation is working successfully if you get a popup dialog filled with the CD collection data. If you don't, go back and carefully verify each step again.
- Click OK to close the properties dialog.
- Finally, we want to export your new transformation to your Pentaho solutions folders. From the File menu, choose the Export to XML option, and save your transformation as cdcollection_transform.xml in the <pentaho-demo>/pentaho-solutions/samples/etl directory.
Step-By-Step: How to Build Your Solution
- To finish this thing up, we will reuse the sample etl action sequence that comes with the PCI.
- Make a copy of the SampleTransformation.xaction file and name that copy xml_input.xaction. You can find the SampleTransformation.xaction file in <pentaho-demo>/pentaho-solutions/sampes/etl directory.
- Make a copy of the SampleTransformation.properties file and name that copy xml_input.properties. You can find the SampleTransformation.properties file in <pentaho-demo>/pentaho-solutions/sampes/etl directory.
- Open the xml_input.properties file in your favorite text editor.
- At the top of the file, change the value of the <name> node to be xml_input.xaction. It should look like this:
<name>xml_input.xaction</name>
- Under the resources/transformation-file/solution-file nodes, change the value of the location node to cdcollection_transform.xml. It should look like this:
<location>cdcollection_transform.xml</location>
- Under the component-definition node, change the value of the importstep node to "XML Input", without the quotes. This is the name of the step we created in our transformation. If you changed the step name in the transformation, then also change it here. It should look similar to this:
<importstep>XML Input</importstep>
- Save and close the xml_input.xaction file.
- Open the xml_input.properties file in your favorite text editor.
- Change the value of the title property to "2. XML Input Example", without the quotes.
- Change the value of the description property to "How to configure Kettle so that input files such as XML, CSV and Excel files can be loaded from a Pentaho solution folder.", without the quotes.
- Save and close the xml_input.properties file.
Step-By-Step: How to Test Your Solution
Follow the steps given to test out your new solution in the server.
- First, make sure your PCI is up and running. If you don't know how to get it started, or are unsure as to whether it's already running, see the Pentaho Getting Started Guide for how to successfully start the server.
- Next make sure that the solution folders you are using in the PCI contains your xml_input.xaction!!
- Navigate through the sample pages to the ETL samples. From the Samples home page, go to "A Collection of Samples and Examples" | "Extraction, Transformation and Loading with Kettle".
- You should see the link to your new action sequence, labeled "XML Input Example". If you don't, try refreshing your solution repository by navigating to Content and Settings, and clicking the Publish link for the Solution Repository.
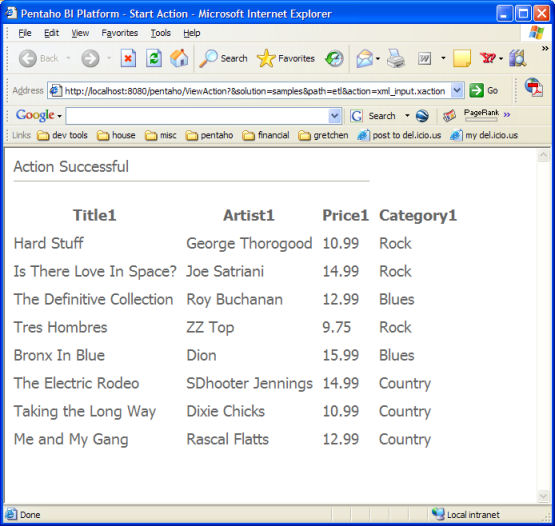
- Click the "XML Input Example" link. You should see your CD collection data in a new browser window.
Our example deployment of this solution is just one way you could deploy it. You can execute this action sequence in this PCI or any other Pentaho server using the web service, Java API or user interface. The Pentaho server automatically sets the 'pentaho.solutionpath', so no configuration is necessary on the server.
Please feel free to comment on this article.
best regards,
Gretchen