Extracting Data from Hive to Load an RDBMS in MapR
How to use a PDI transformation to extract data from Hive and load it into a RDBMS table. The new RDBMS table will contain the count of page views by IP address and month.
Note
For brevity's sake, this transformation will only contain two steps: Table Input and a Table Output. In practice, the full expressiveness of the PDI transformation semantic is available. Further, PDI supports bulk loading many RDBMS and that would be a viable, and common, alternative to using a Table Output approach.
Prerequisites
In order follow along with this how-to guide you will need the following:
- MapR
- Pentaho Data Integration
- Hive
Sample Files
The source data for this guide will reside in a Hive table called weblogs. If you have previously completed the "Loading Data into Hive" guide, then you can skip to "Create a Database Connection to Hive". You do not have to load the following sample data.
The sample data file needed for the "Create a Hive Table" instructions is:
File Name |
Content |
Tab-delimited, parsed weblog data |
NOTE: If you have previously completed the "Using Pentaho MapReduce to Parse Weblog Data" guide, then the necessary files will already be in the proper location.
This file should be placed in the /weblogs/parse directory of the CLDB using the following commands.
hadoop fs -mkdir /weblogs
hadoop fs -mkdir /weblogs/parse
hadoop fs -put weblogs_parse.txt /weblogs/parse/part-00000
Step-By-Step Instructions
Setup
Start MapR if it is not already running.
Start Hive Server if it is not already running.
Create a Hive Table
NOTE: This task may be skipped if you have completed the "Loading Data into Hive" guide.
- Open the Hive Shell: Open the Hive shell so you can manually create a Hive table by entering 'hive' at the command line.
- Create the Table in Hive: You need a hive table to load the data to, so enter the following in the hive shell.
create table weblogs ( client_ip string, full_request_date string, day string, month string, month_num int, year string, hour string, minute string, second string, timezone string, http_verb string, uri string, http_status_code string, bytes_returned string, referrer string, user_agent string) row format delimited fields terminated by '\t'; - Close the Hive Shell: You are done with the Hive Shell for now, so close it by entering 'quit;' in the Hive Shell.
- Load the Table: Load the Hive table by running the following commands:
hadoop fs -put part-00000.txt /user/hive/warehouse/weblogs/
Create a Database Connection to Hive
If you already have a shared Hive Database Connection defined within PDI then this task may be skipped.
- Start PDI on your desktop. Once it is running choose 'File' -> 'New' -> 'Job' from the menu system or click on the 'New file' icon on the toolbar and choose the 'Job' option.
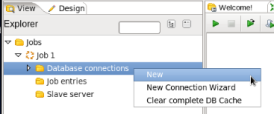
- Create a New Connection: In the View Palette right click on 'Database connections' and select 'New'.
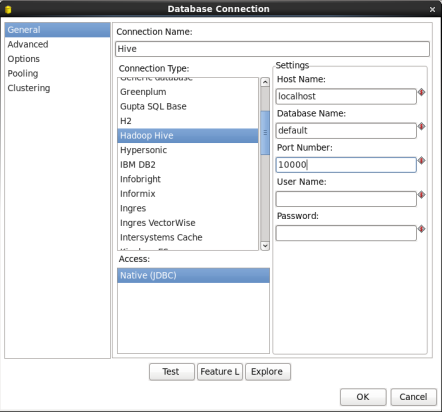
- Configure the Connection: In the Database Connections window enter the following:
- Connection Name: Enter 'Hive'
- Connection Type: Select 'Hadoop Hive'
- Host Name and Port Number: Your connection information. For local single node clusters use 'localhost' and port '10000'.
- Database Name: Enter 'Default'
When you are done your window should look like:
Click 'Test' to test the connection.
If the test is successful click 'OK' to close the Database Connection window.
- Share the Hive Database Connection: You will want to use your Hive database connection in future transformations, so share the connection by expanding 'Database Connections' in the View Palette, right clicking on 'Hive', and selecting 'Share'.
Sharing the connection will prevent you from having to recreate the connection every time you want to access the Hive database in a transformation.
Create a RDBMS Connection
In this task you will create a connection to a RDBMS that you will use throughout this guide. This task uses a MySQL connection, but you may use any database you wish that has a JDBC driver.
- Start PDI on your desktop. Once it is running choose 'File' -> 'New' -> 'Transformation' from the menu system or click on the 'New file' icon on the toolbar and choose the 'Transformation' option.
- Create a Database Connection: You need to create a database connection to your RDBMS, so right click on the 'Database connections' in the View palette and select New. If you already have a database connection for your RDBMS database you may skip this step.
The Database Connection window will appear. Enter the following information:- Connection Name: Enter 'RDBMS'
- Connection Type: Select 'MySQL'
- Host Name and Port Number: Your connection information for the MySQL Server. For a local MySQL database Host Name is 'localhost' and Port Number is '3306'.
- Database Name: Enter your database name. For a local MySQL database use 'test'. If you have not already created a database named 'test' on MySQL, please do so now.
- User Name and Password: Your database username and password.
When you are done your window should look like:

Notice that there are lots of connection types that you could have used.
Click 'Test' to verify your connection is working properly. If the test fails verify your RDBMS server is running and you have entered the correct connection information.

Click 'OK' to close the Database Connection window.
- Share the RDBMS Connection: You will want to use your RDBMS connection in future transformations, so share the connection by expanding 'Database Connections' in the View Palette, right clicking on 'RDBMS', and selecting 'Share'.
Sharing the connection will prevent you from having to recreate the connection every time you want to access the RDBMS in a transformation.
Create a Transformation to Extract Data from Hive
In this task you will create a transformation to extract data from Hive and load into a RDBMS table.
Speed Tip
You can download the Kettle Transformation hive_to_rdbms.ktr already completed
- Start PDI on your desktop. Once it is running choose 'File' -> 'New' -> 'Transformation' from the menu system or click on the 'New file' icon on the toolbar and choose the 'Transformation' option.
- Add a Table Input Step: You are going to extract data from Hive using HiveQL, so expand the 'Input' section of the Design palette and drag a 'Table Input' node onto the transformation canvas. Your transformation should look like:

- Edit the Table Input Step: Double-click on the 'Table Input' node to edit its properties. Enter this information:
- Connection: Select 'Hive'
- SQL: Enter the following
select client_ip, year, month, month_num, count(*) as pageviews
from weblogs
group by client_ip, year, month, month_num
When you are done your 'Map/Reduce Input' window should look like this:

Click 'OK' to close the window.
- Add a Table Output Step: You are going to write the data to a database, so expand the 'Output' section of the Design palette and drag a 'Table Output' node onto the transformation canvas. Your transformation should look like:

Notice that there are lots of other output formats you can use such as Text file, XML, and Microsoft Excel.
- Connect the Input and Output steps: Hover the mouse over the 'Table Input' node and a tooltip will appear.
 Click on the output connector (the green arrow pointing to the right) and drag a connector arrow to the 'Table Output' node. Your canvas should look like this:

- Edit the Table Output Step: Double-click on the 'Table Output' node to edit its properties. Do the following:
- Connection: Select 'RDBMS'
- Target Table: Enter 'aggregate_hive'
- Check 'Truncate table' so you can re-run this transformation.
- Click the 'SQL' button to create the table in your target database.

- Click the 'Execute' button to run the SQL.

The 'Results of the SQL statements' window will appear telling you if the SQL was succesffully executed or give you troubleshooting information if the SQL failed. - Click 'OK' to close the window.
- Click 'Close' to close the 'Simple SQL editor' window.
When you are done your window should look like:

Click 'OK' to close the window.
- Save the Transformation: Choose 'File' -> 'Save as...' from the menu system. Save the transformation as 'hive_to_rdbms.ktr' into a folder of your choice.
- Run the Transformation: Choose 'Action' -> 'Run' from the menu system or click on the green run button on the transformation toolbar. A 'Execute a transformation' window will open. Click on the 'Launch' button. An 'Execution Results' panel will open at the bottom of the PDI window and it will show you the progress of the transformation as it runs. After several seconds the transformation should finish successfully:

If any errors occurred the job step that failed will be highlighted in red and you can use the 'Logging' tab to view error messages.
Check RDBMS for Hive Aggregated Table
- Explore the Database: Choose 'Tools' -> 'Database' -> 'Explore' from the menu system.
- Select the Connection: In the 'Make your selection' window select 'RDBMS' and click 'OK'.

- Preview the Table: Expand RDBMS -> Tables. Right click on 'aggregate_hive' and select 'Preview first 100'

Summary
During this guide you learned how to create a PDI transformation that sources data from Hive and loads into an RDBMS table.