Graphical View
The Graphical View tab contains the canvas on which transformations and jobs are drawn. There will be a separate tab for each job and/or transformation you currently have open with an icon indicating the file type. The Graphical View tab(s) provide an easy to understand representation of the work that needs to be done and the flow of the data.
The following topics are covered in this section:
- #Adding Steps or Job Entries
- #Hiding a Step
- #Transformation Step Options
- #Job Entry Options
- #Adding Hops
- #Keyboard Shortcuts
Adding Steps or Job Entries
Adding steps to a transformation (or a job entry to a job) on the canvas is easy: simply select a step type from the tree on the left and drag in onto the canvas:
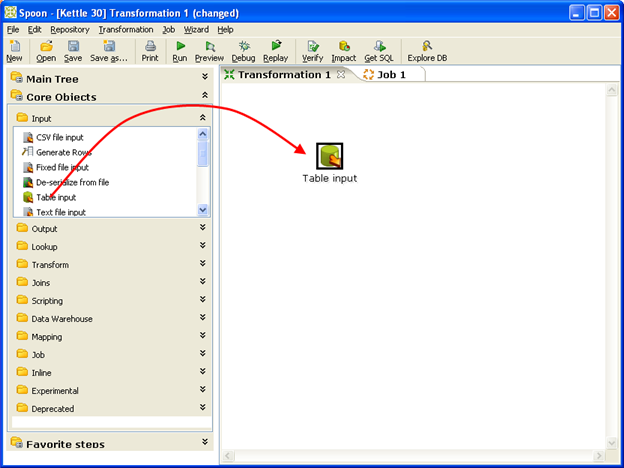
At the location of the mouse you will see a square that represents the location of the steps when you let go of the button. When you let go of the mouse button the selected step (Text file input) will become part of the transformation.
You can also add a transformation step by right-clicking on the workspace and selecting New Step, then Step type.
Hiding a Step
If you right click on a step or job entry that is drawn on the graphical view, you will get a popup-menu that allows you to select the option: "Hide step". This will remove the step from the graphical view, but not delete it.
Transformation Step Options
This section describes the right-click menu options when you right-click on a transformation step in the Graphical View.
Edit step
This opens the step dialog so that you can change its settings.
Edit step description
This opens a dialog that allows you to enter a textual description of the step.
Data movement
See Distribute or copy for a complete description of the available data movement options.
Change number of copies to start...
See Launching several copies of a step.
Copy to clipboard
This option allows you to copy the XML defining the step to the clipboard. You can then paste this step into another transformation.
Duplicate Step
This option will create a copy, positioned a bit lower to the right of the original step.
Delete step
This will permanently remove the step from the transformation.
Hide Step
This will hide the step in the Graphical View, but not remove it from the transformation.
Show input fields
This option tries to determine all the fields and their origin by tracing the input-streams back to their source.
Show output fields
This option adds the fields of the current step to the ones of the input fields and shows the result.
Job Entry Options
Open Transformation/Job
This opens a new tab displaying the selected transformation or job.
Edit job entry
This opens the dialog for the job entry allow you to change the settings.
Edit job entry description
This opens a dialog that allows you to enter a textual description of the job entry.
Create shadow copy of job entry
This option will create a copy, positioned a bit lower to the right of the original job entry.
Copy selected entries to clipboard (CTRL-C)
Copies the XML describing the selected job entries to the clipboard.
Align / distribute
This option allows you to keep the graph clean by aligning job entries with each other.
Detach entry
Unlinks this job entry from the hops that connect it to other steps.
Delete all copies of this entry.
Delete all copies of this job entry, not just this one.
Adding Hops
On the graphical view the quickest way to create a new hop is by dragging with the mouse from one step to another using the middle button. You can also drag the left button and press the SHIFT key at the same time. For a more complete explanation regarding hops, please refer to .06 Hops.
Keyboard Shortcuts
The following keyboard shortcuts work within the graphical transformation editor in Spoon.
Shortcut |
Action |
|---|---|
Ctrl-Up |
Align selected steps to top of selection |
Ctrl-Down |
Align selected steps to bottom of selection |
Ctrl-Left |
Align selected steps to left of selection |
Ctrl-Right |
Align selected steps to right of selection |
Alt-Right |
Distribute selected steps horizontally |
Alt-Up |
Distribute selected steps vertically |
Space |
Show output steps (whilst mouse cursor is over a step) |