Introduction
In this tutorial I outline how I went out adding a new look and feel to my dashboard solution.
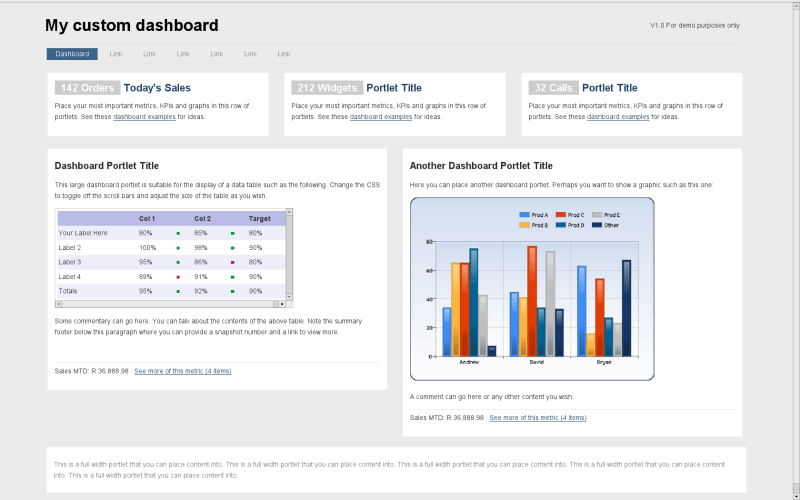
The CE Server Edition version 3.0 comes complete with a few dashboard examples. I wanted to create my own custom dashboard, but with an entirely different look and feel.
The steps outlined here might not necessarily be the best approach to achieving this. YMMV.
Steps Required
In order to replace the CE demo look and feel with my own, I needed to make changes to the template-dashboard.html file. The file can be found at the following location:
| Panel |
|---|
biserver-ce/pentaho-solutions/system/pentaho-cdf/template-dashboard.html |
Not wanting to lose the file, I made a copy of the template-dashboard.html to template-dashboard-orig.html and replaced the file with a copy of my own file.
I changed my own copy of the template-dashboard.html file and added the following line in the file where the dashboard content will go.
| Code Block |
|---|
{content}
|
My template-dashboard.html file now looked like this.
| Code Block |
|---|
<!DOCTYPE html PUBLIC "-//W3C//DTD XHTML 1.0 Strict//EN" "http://www.w3.org/TR/xhtml1/DTD/xhtml1-strict.dtd">
<html xmlns="http://www.w3.org/1999/xhtml">
<head>
   <title>My custom dashboard</title>
   <meta http-equiv="Content-Type" content="text/html; charset=UTF-8" />
   <meta name="description" content="My Site" />
   <meta name="keywords" content="key, words" />
   <meta name="Distribution" content="Global" />
   <meta name="Robots" content="index,follow" />
   <link rel="stylesheet" type="text/css" href="dashboard-custom/style/stylesheet.css" media="screen" />
</head>
<body>
   <div id="wrapper">
      <div id="logo"><img src="dashboard-custom/image/companylogo.png" />

         <h1>My custom dashboard</h1>
      </div>
      <p id="top">V1.0 For demo purposes only </p>

      <ul id="menu">
         <li><a class="current" href="http://wiki.pentaho.com/pages/createpage.action#" title="Home">Dashboard</a></li>
         <li><a href="Reports">Reports</a></li>
         <li><a href="Link">Link</a></li>
         <li><a href="Link">Link</a></li>
         <li><a href="Link">Link</a></li>
         <li><a href="Link">Link</a></li>
         <li><a href="Logout">Logout</a></li>
      </ul>

      <!-- START OF DASHBOARD CONTENTS -->
         {content}
      <!-- END OF DASHBOARD CONTENTS -->

      <div id="footer">
         <p><img href="dashboard-custom/images/copyright.png"></p>
      </div>
   </div>
</body>
</html>
|
I then created the following directories structure in the system/pentaho-cdf directory.
| Panel |
|---|
biserver-ce/pentaho-solutions/system/pentaho-cdf/dashboard-custom/ |
and placed the images, style and javascript files into that directory. (This directory will be regarded as the 'root directory for your web page)
The next step was to create the dashboard file itself.
I created the following directory from within the Pentaho Console (otherwise the index.xml isn't created).
| Panel |
|---|
biserver-ce/pentaho-solutions/bi-developers/dashboard-custom |
and created the following files:
dashboard-custom.xcdf
| Code Block |
|---|
<?xml version="1.0" encoding="UTF-8"?> <cdf> <title>Custom Dashboard</title> <author>DataCraft Software</author> <description>First Test</description> <icon></icon> <template>template.html</template> </cdf> |
template.html
| Code Block |
|---|
<div class="column"> <h1><span class="number">142 Orders</span> Today's Sales</h1> <p>Place your most important metrics, KPIs and graphs in this row of portlets. </p> </div> : : <div class="clear"></div> <div class="news"> <p>This is a full width portlet that you can place content into. This is a full width portlet that you can place content into. This is a full width portlet that you can place content into. This is a full width portlet that you can place content into. This is a full width portlet that you can place content into. </p> </div> |
I then navigated to the dashboard
| Code Block |
|---|
http://localhost:8080/pentaho/content/pentaho-cdf/RenderXCDF?solution=bi-developers&path=/dashboard-custom&action=custom.xcdf |